6operación – Kidco G2301 User Manual
Page 5
U S E R G U I D E
5
4
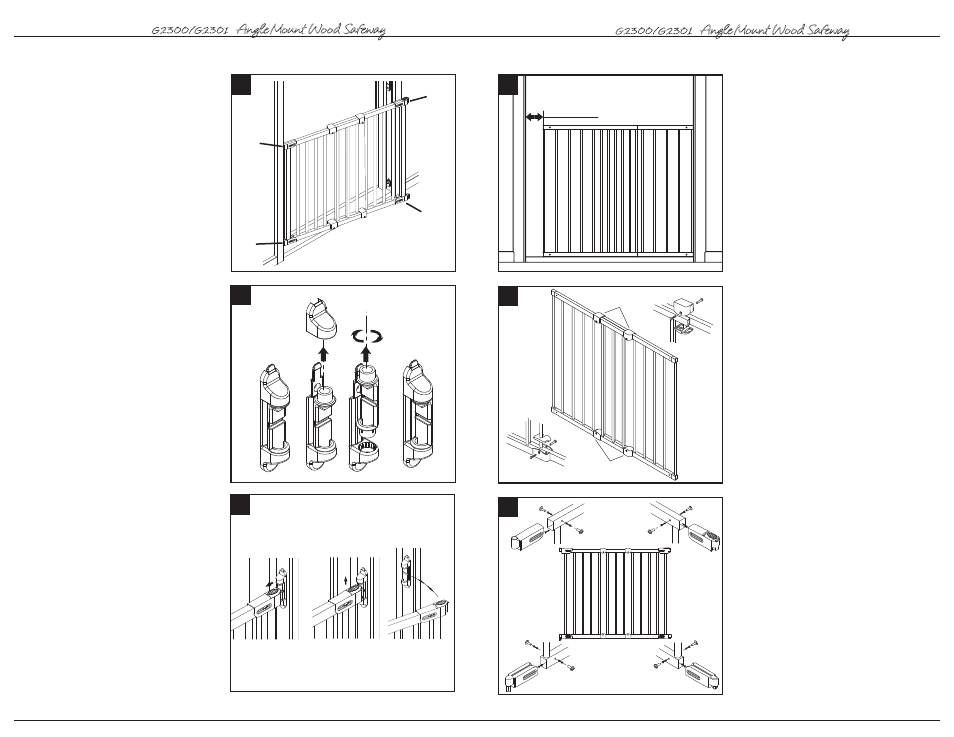
Finding appropriate width of gate
With the two sections aligned against each
other, place gate against one side of
opening where it is to be installed. The
distance between the opposite side of gate
and wall/doorframe must be between
2” – 4 ¾”.
5
Once proper width is achieved, it is
ready to assemble. Place parts (D1) and
(E1) on top gate rail with (E1) fitting under
the top rail around the end vertical bar of
one gate panel and (D1) locking around
(E1) above top rail. Line up screw holes
and insert one set of screws (F and M),
loosely securing. Repeat for second side of
top assembly. Next, place parts (D2)
locking around (E2) below bottom rail. Line
up screw holes and insert screws (F and M)
loosely securing. Repeat for second side of
bottom assembly. Once all four assemblies
are attached, tighten screws.
6
Place handle and hinge parts (H), (I),
(J) and (K) onto the gate. Insert the screws
(L) and the screw sockets (G) into all four
parts according to picture. Do not fully
tighten yet.
2”-4
3
/
4
”
4
G2300/G2301
Angle Mount Wood Safeway
®
K
L
G
J
L
G
G
L
I
L
G
H
6
Operación
24
13
Centre la reja en la abertura. Afloje los
tornillos de las piezas (H), (I), (J) y (K) y
ajústelos de manera que descansen
firmemente en la bisagra y en los soportes
del lado del mecanismo de cierre. La
distancia entre la reja y la pared o el
bastidor de la puerta debe ser
de 1” - 3”.
14
Si la reja se instala en ángulo,
necesitará girar la pieza (R) para que el asa
de la reja descanse de manera segura
dentro del soporte superior del mecanismo
de cierre. Una vez que el asa de la reja
descanse seguramente en el interior del
soporte del mecanismo de cierre, deslice la
tapa de cierre (Q) en el soporte superior del
mecanismo de cierre (W).
IMPORTANTE: ASEGÚRESE DE QUE
LA TAPA DE CIERRE NO SE PUEDA
EMPUJAR HACIA ARRIBA Y QUE
ESTÉ FIJA EN SU LUGAR.
Asegúrese de apretar todos los tornillos
de la reja.
15
Para abrir la reja, con su pulgar hale
hacia atrás el mecanismo de cierre y
levante la reja hacia arriba y hacia afuera
del soporte.
Al cerrar la reja, asegúrese de que tanto la
parte superior como la inferior del lado del
cierre estén descansando de manera
segura en los soportes, y que el cierre
superior esté cerrado.
15
14
Q
R
W
J
I
H
K
13
5
D2
+
E2
D2
E2
D1
+
E1
D1
E1
F
F
M
M
G U Í A D E L U S U A R I O
G2300/G2301
Angle Mount Wood Safeway
®
No part of the gate requires lubrication. Clean using warm, soapy water or a damp cloth. Do not use abrasive
cleaners or bleach. Once installed the gate should be checked periodically to ensure a safe and secure fit
and to maintain proper working order.