Attach downrods, Install ceiling angles on 48" side – Hyloft 48 x 96 Super Pro Ceiling Storage Unit 00164 and 00199 User Manual
Page 4
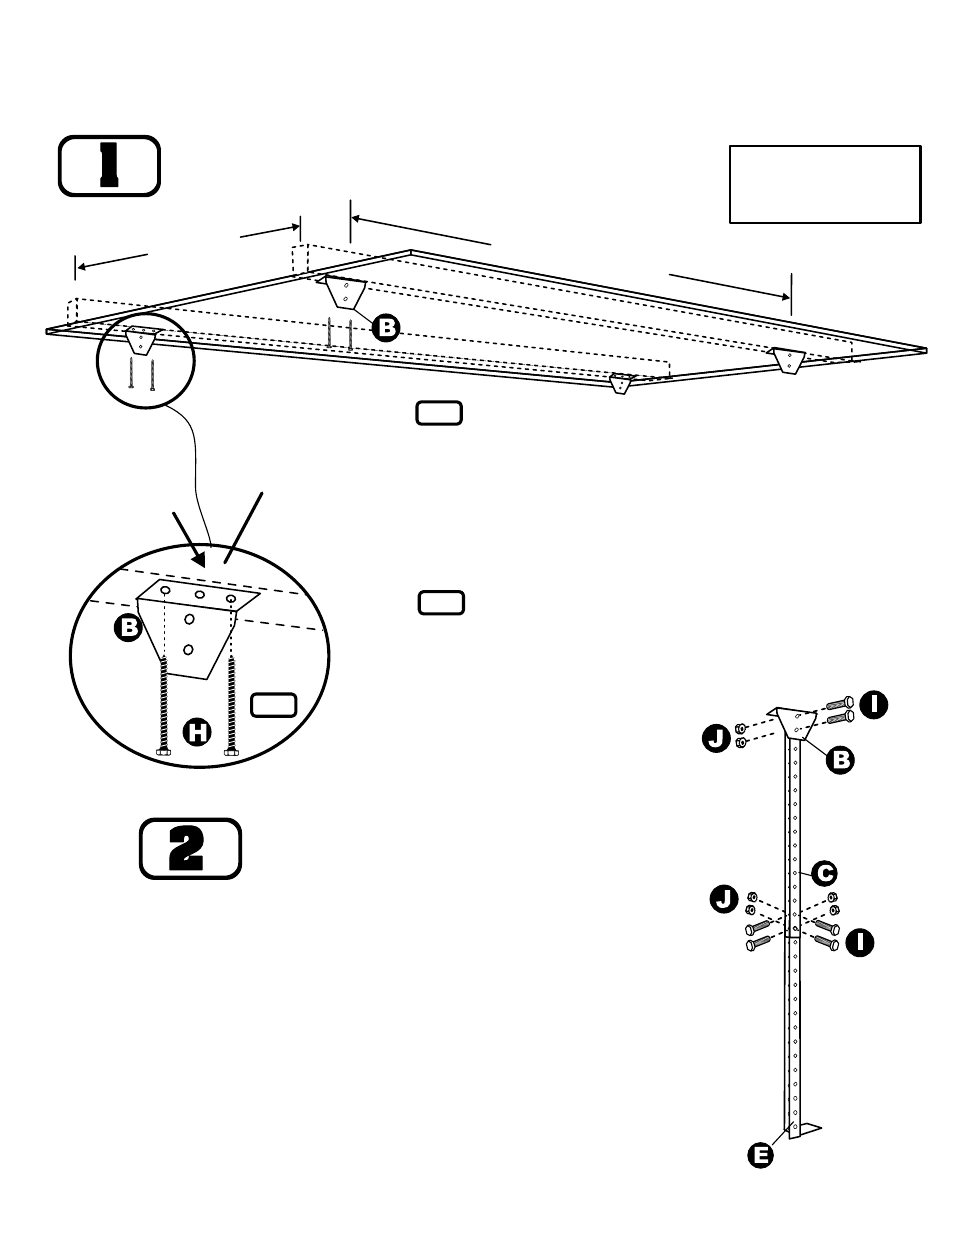
Locate the ceiling joists in the area of desired installation and determine the direction in which they are
running. The ceiling Angle Brackets(B) are installed parallel to the ceiling joists. Refer to the diagram
below for additional installation clarification.
INSTALL CEILING ANGLES ON 48" SIDE
ATTACH DOWNRODS
Use Center Holes in Angle Brackets(B) as a template to
mark holes on stud. Use joists 24"-42" apart.
There must be exactly 98" center to center, measuring
between center holes in Brackets(B) along the same joist
TIP-It may be easier to measure from the outside of first
bracket(B) to the inside of the next bracket (also 98").
IMPORTANT-Brackets must be mounted perfectly in
line and square to each other.
Pre-drill 3/16”holes for each screw. U
Angle Bracket(B)
se a 7/16" Socket
Wrench or Nut Driver to install two of the 1/4 x 3" Lag
Screws(H) into each
.
Center holes in Angle
Brackets must be
exactly 98" apart,
center to center
Determine hanging height and overlap & attach 2 Left Facing
Downrods(D) & 2 Right Facing Downrods(E) to each Straight
Downrod(C) using 4 Hex Bolts(I) and Hex Nuts(J). Tighten with 1/2"
Socket Wrench or Nut Driver.
Attach 4 straight Down Rods(C) to each Angle Bracket(B) using 2 Hex
Bolts(I) and Hex Nuts(J). Tighten with 1/2" Socket Wrench or Nut Driver.
Make sure one side of each Down Rod(C) is facing the inside where the
grids will be and that the Feet on Left and Right Facing Downrods(D &
E) are to the inside.
See last page
for alternate
mounting situations.
IMPORTANT-READ THROUGH ENTIRE INSTRUCTIONS BEFORE BEGINNING INSTALLATION
Using Stud/Joist finder
locate Joists
24" to 42”
apart
Ceiling Joist
1B
1A
Locate
any 2 Joists
24" to 42"
apart
1B