Equipment assembly – General Hydroponics RainForest 236 User Manual
Page 3
7. As your plants grow, maintain the appropriate level of nutrient solution in the
reservoir (14 to 16 gallons). Keep the nutrient level at the upper mark on the
drain/level tube until multiple roots have developed that hang down below
the growing cup. Once roots are well developed, you may safely allow the
nutrient level to drop as low as the lower mark on the drain/level tube. See
Maintaining Your RainForest for details.
8. After the cuttings have developed roots, add Hydroton to the cups to help
support the plants. Be sure to wash and soak the Hydroton before adding
them to the cups (see Equipment Assembly for details).
The Hydroton serve primarily as a mechanical support. If you expect to
transplant your cuttings, you may prefer to not use Hydroton at all.
To start Seeds in the RainForest:
Always use fresh, clean seeds that are free of disease and/or soil contamination
1. Fill each growing cup almost to the top with Hydroton that have been
washed and soaked overnight in tap water.
2. Place seeds on the Hydroton as you would plant them in the ground. Cover
the seeds with a layer of Hydroton.
Most seeds prefer to be planted one Hydroton diameter below the surface.
Larger seeds may prefer to be planted deeper, smaller seeds closer to the
surface. Place very small seeds on a tiny piece of fine nylon netting, or other
non-absorbent support, just under the surface of the Hydroton.
3. Insert the cups firmly in the holes in the reservoir cover. Cover any unused
holes in the reservoir cover to retard water loss.
4. Place the RainForest in a warm, well-lit location.
Seedlings generally develop faster if the nutrient is warm (75-80 F); keep
the RainForest in a warm room or place the reservoir on top of a small elec-
tric heating pad. Place the RainForest in bright, indirect sunlight ~~ or use
color-corrected, or sun light simulating, lamps placed close to the
RainForest reservoir.
5. If using artificial lights, set the light timer to simulate a normal day/night
cycle. If using a motor timer, connect and set the timer. Plug in the sprayer
motor.
When sprouting seeds, it is preferable (but not required) to have the
RainForest motor cycle 1-hr ON/1-hr OFF, 24 hrs/day. Once seedling roots
extend through the bottom of the cups and into the nutrient solution, you can
use any of the timing options described under Cuttings: step 6.
6. As your plants grow, maintain the appropriate level of nutrient solution in the
reservoir (see Maintaining Your RainForest for details).
EQUIPMENT ASSEMBLY
1. If you are starting seeds, soak the Hydroton overnight in plain water to "con-
dition" them. Then rinse thoroughly to remove any sand or other small parti-
cles.
If you are starting cuttings, it is better not to add Hydroton to the cups till
roots have begun to form on the cuttings. If you plan to transplant the cut-
tings, you may prefer to grow them totally without Hydroton.
2. Rinse any dust or debris out of the system parts.
3. On the side of the reservoir, snap the clip into the hole that is directly above
the grommet.
4. If you are using a Controller, connect the reservoir to the Controller (see the
instructions provided with the Controller) and proceed to step 6 below.
If the reservoir is not being connected to a Controller, insert the rigid end of
the elbow for the drain/level tube through the grommet into the reservoir
(you may have to gently rock and twist the drain/ level tube as you push in
order to get the tube through the grommet).
5. Gently push the upper part of the drain/level tube into the stud.
6. Add the nutrient solution and adjust the pH as described under The
Nutrient Solution.
7. Put the lid on the reservoir and insert the motor in the lid. Briefly plug in the
motor to be sure the power source and motor are operational (the sprayer
should deliver a strong spray into the "air gap" where the growing cups nor-
mally hang). Unplug the motor.
8. Plant your RainForest as described under Planting Your RainForest.
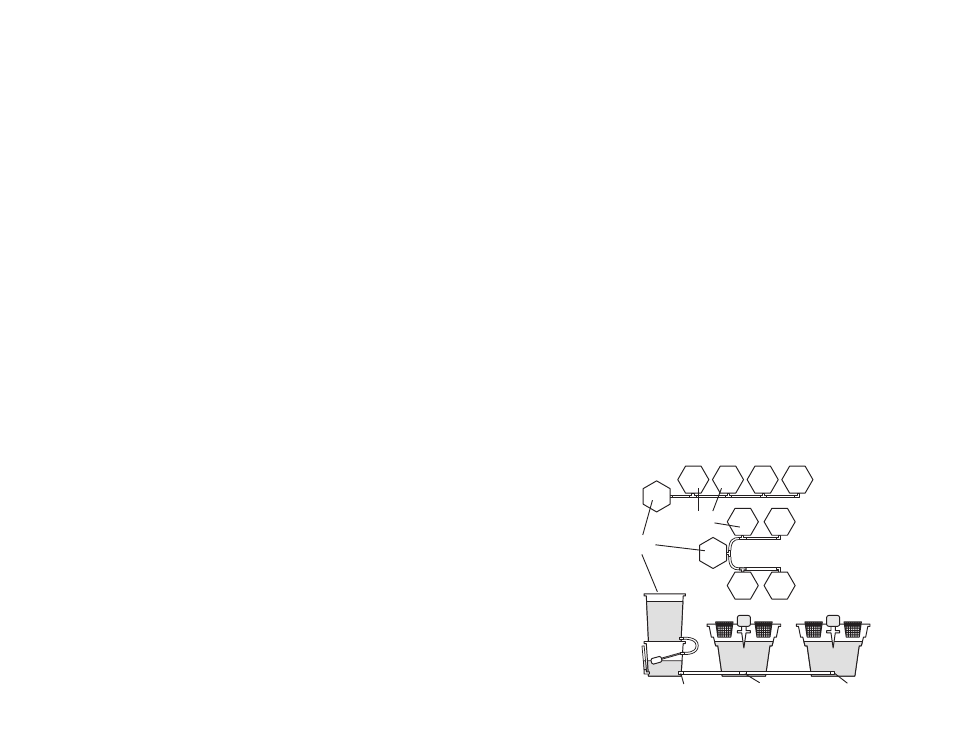
Top View of a Straight
Line Set-up
Hydroponic
Modules
Controller System
Top View of a Double
Line Set-up
Controller
Reservoir
Controller
Module
Straight Connector
Tee
Elbow