Warning, Step 2 attach the pivot arm brackets – Code 3 SuperVisor TL for 2007 Ford Expedition User Manual
Page 3
3
Mounting Hardware - All mounting hardware is packed in a small box inside the main carton. There are four brackets used to mount the
Supervisor™ TL to the vehicle. These are discussed in detail later.
Utilizing non-factory supplied screws and/or mounting brackets and/or the improper number
of screws may result in loss of warranty coverage on the equipment.
WARNING!
!
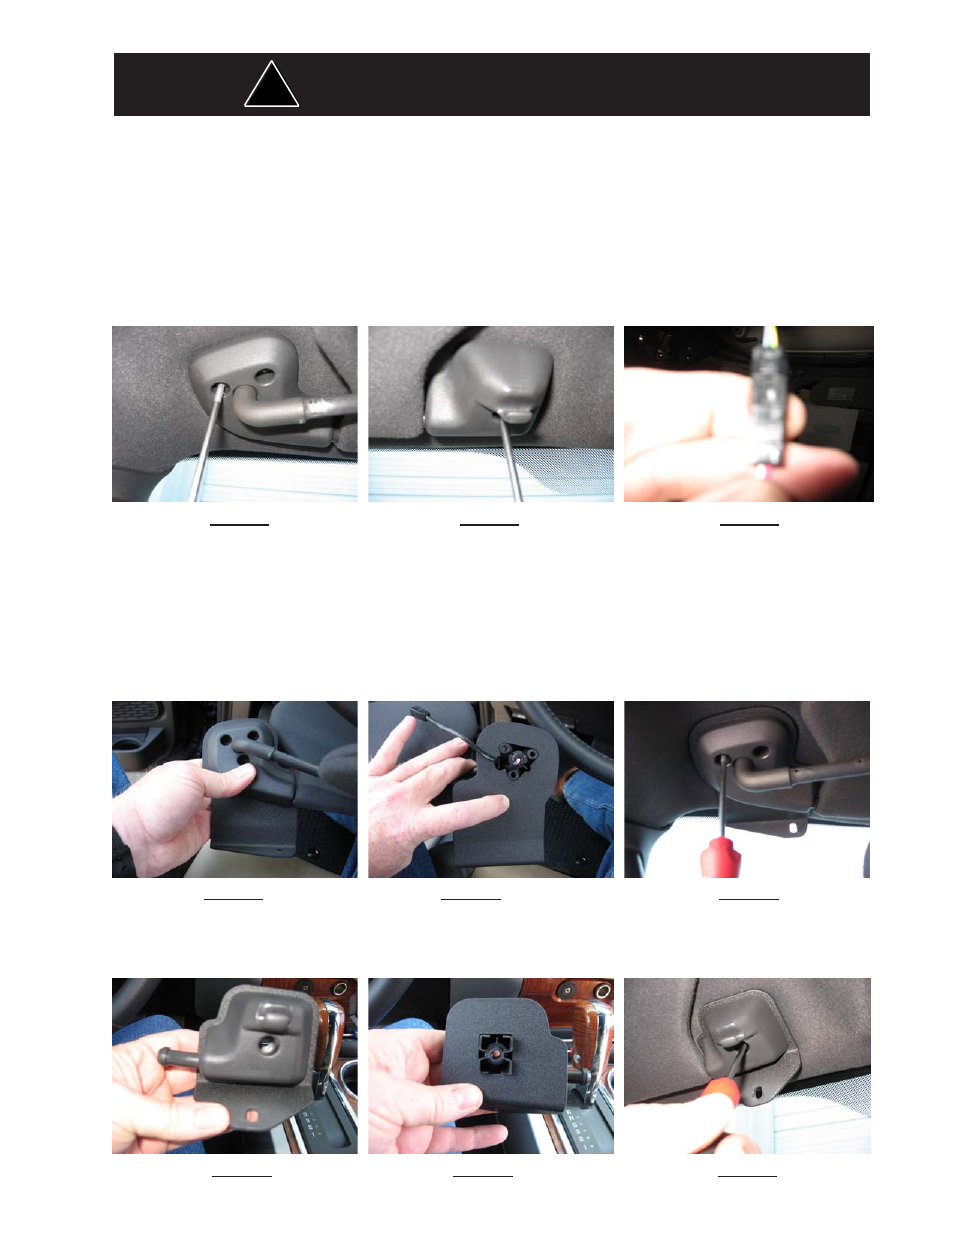
FIGURE 1 FIGURE 2 FIGURE 3
Step 1-Removing Sun Visor Pivot Brackets and Visor Clips
Begin the installation by removing the driver and passenger sun visors. Remove the three screws that hold the pivot arm bracket of the sun
visors to the headliner using a #15 Torx screwdriver as shown in Figure 1. Remove the single #15 Torx screw that holds the visor clip to the
headliner again using a #15 Torx screwdriver as shown in Figure 2. Carefully reach up above the headliner and pull the visor vanity mirror
light wire free to get access to the harness connecter. Unplug the visor vanity mirror light wire if the vehicle is so equiped by pushing in on the
small square detent (see Figure 3) while pulling on the connector to unplug the harness.
__
_________
___
>
Small Square Detent__
Step 3 Attach Brackets to Sun Visor Retaining Clips
Place the inner bracket on the retaining clip as shown in Figures 7 and 8. Attach the inner bracket and retaining clip to the headliner with
the torx screw as illustrated in Figure 9. Leave the torx screws slightly loose at this time.
Step 2 Attach the Pivot Arm Brackets
Attach the outer mounting brackets that are supplied noting the difference between passenger and driver side brackets (see Figure 4
Note:The Driver side is shown). Rotate the pivot arm on the Driver's side sun visor and verify the orientation of the outer bracket as
shown in Figure 5. Replug the Connector that goes to the visor mirror vanity light. Carefully tuck the wire and Connector back into the
hole in the headliner. Note: Make sure the connector is pushed back away from the area where the bracket attaches so thet
you don't crush it when you tighten the screws in the mounting bracket . Position the Driver's side pivot arm and attach the
three torx screws as shown in Figure 6. Repeat this operation for the Passenger side pivot arm and outer mounting bracket. Leave the
torx screws slightly loose at this time.
FIGURE
4
FIGURE
5
FIGURE
6
FIGURE
7
FIGURE
8
FIGURE
9