1d 1a, 1b 1c – Alumax P-DR2W-72-CW User Manual
Page 6
6
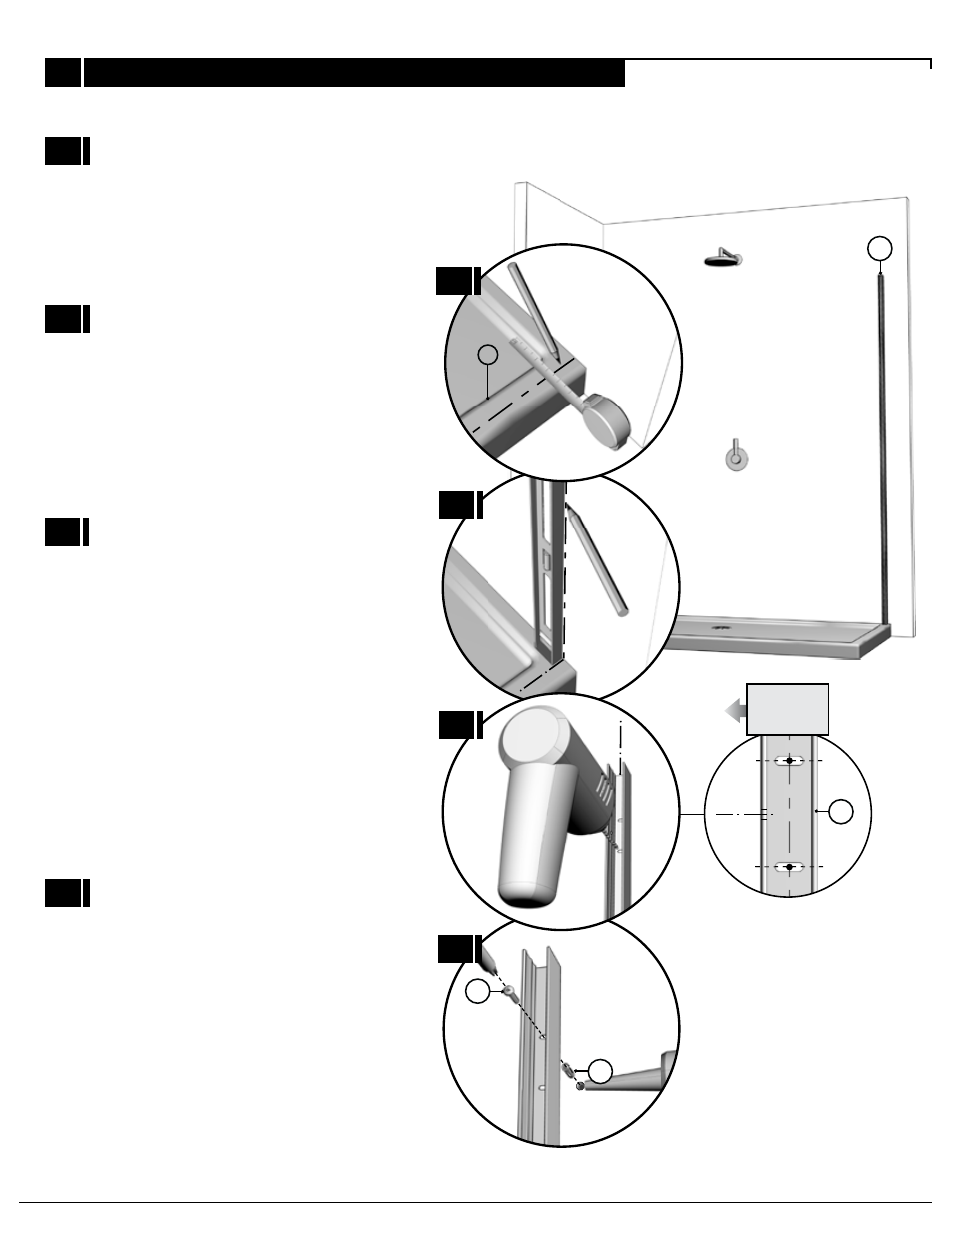
WALL JAMB INSTALLATION
1
1C
-
Put a drop of silicone into each hole drilled on the
wall prior to insert an orange wall plug (28).
Reposition and fasten the wall jamb with #8-1 1/4
Self drilling screws (27).
1D
1A
Using the marking established in the previous step,
run a second line up the wall. Use a level to ensure
verticality of this line.
Using a measuring tape, mark the center of the
threshold of the base.
1B
Place the wall jamb onto the wall while ensuring
that the wall jamb holes align themselves onto the
line running up the wall. Moreover, the side holes
of the wall jamb (16) should face the interior of the
shower. Proceed to drilling, using a 1/8 ˝ drill bit,
through the wall using the wall jamb holes as a
reference.
16
1D
1A
B
15
28
27
INTERIOR
SHOWER SIDE
16
1B
1C
- 300c (9 pages)
- 300cv (8 pages)
- 300d (9 pages)
- 338 (9 pages)
- 340 (9 pages)
- 340 Deluxe (9 pages)
- 390c Supplement (5 pages)
- 390cv Supplement (4 pages)
- 391 (12 pages)
- 392 (11 pages)
- 393 (11 pages)
- 394 (11 pages)
- 640S (8 pages)
- 640 (8 pages)
- 640D (7 pages)
- 641 Side Panel (6 pages)
- 694 (6 pages)
- 700c (7 pages)
- 733 (8 pages)
- 738 (8 pages)
- 738 Towel Bar (1 page)
- 740D (8 pages)
- 790c Supplement (4 pages)
- 791 (11 pages)
- 792 (12 pages)
- 793 (12 pages)
- 793 Buttress Supplement (1 page)
- 794 (11 pages)
- 794s (9 pages)
- 795 (10 pages)
- 890 (9 pages)
- 890c (8 pages)
- 1040 (9 pages)
- Deluxe Towel Bar (1 page)
- Transportation Latch (1 page)
- DesignLine Hinge (5 pages)
- P-DR1W-48-60 (14 pages)
- P-DR1W-72 (15 pages)
- P-DR1WT-60 (14 pages)
- P-DR2W-48-60-CRP (18 pages)
- P-DR2W-48-60-CW (19 pages)
- P-DR2W-72-CRP (19 pages)
- P-DR3W-60 (32 pages)
- P-DRA1Y (16 pages)