Se™ce amd adjustiiemts, Tine replacement – Craftsman 536.797500 User Manual
Page 16
Attention! The text in this document has been recognized automatically. To view the original document, you can use the "Original mode".
SE™CE AMD ADJUSTIIEMTS
TINE REPLACEMENT
The mini tilier/cultivator is ieft hand or right hand as
viewed from the operator's position behind the unit
All four tines on this unit are different and cannot be
interchanged The tines must be properly installed as
shown in figures 12 and 13 or the mint tilier/cultivator will
not function property
The outside tines may be removed to reduce the tilling
width to about 7 inches, for working close around plants
orinsmall areas, if desired. When reinstaiiing the outside
tines see below.
A
CAUTION: THE TINES ARE SELF-
SHARPENING
AND
WILL
BECOME
QUITE SHARP FROM USE. HANDLE
CAREFULLY.
The lines will all wear fairly eveniy. If the tines are being
replaced because of wear, we recommend that ai! four
tines be replaced at the same time To replace the tines,
do the following:
#
Place the shut-off switch to the OFF position and
disconnect the spark plug wire
@
Removethehairpinsandthedevispinslromthetines
on one side of the unit and remove the fines.
9 Clean the tine shaft and oil the shaft at the tine
locations.
® Piace the inside tine on the tine shaft and reinstall the
clevis pin and hairpin,
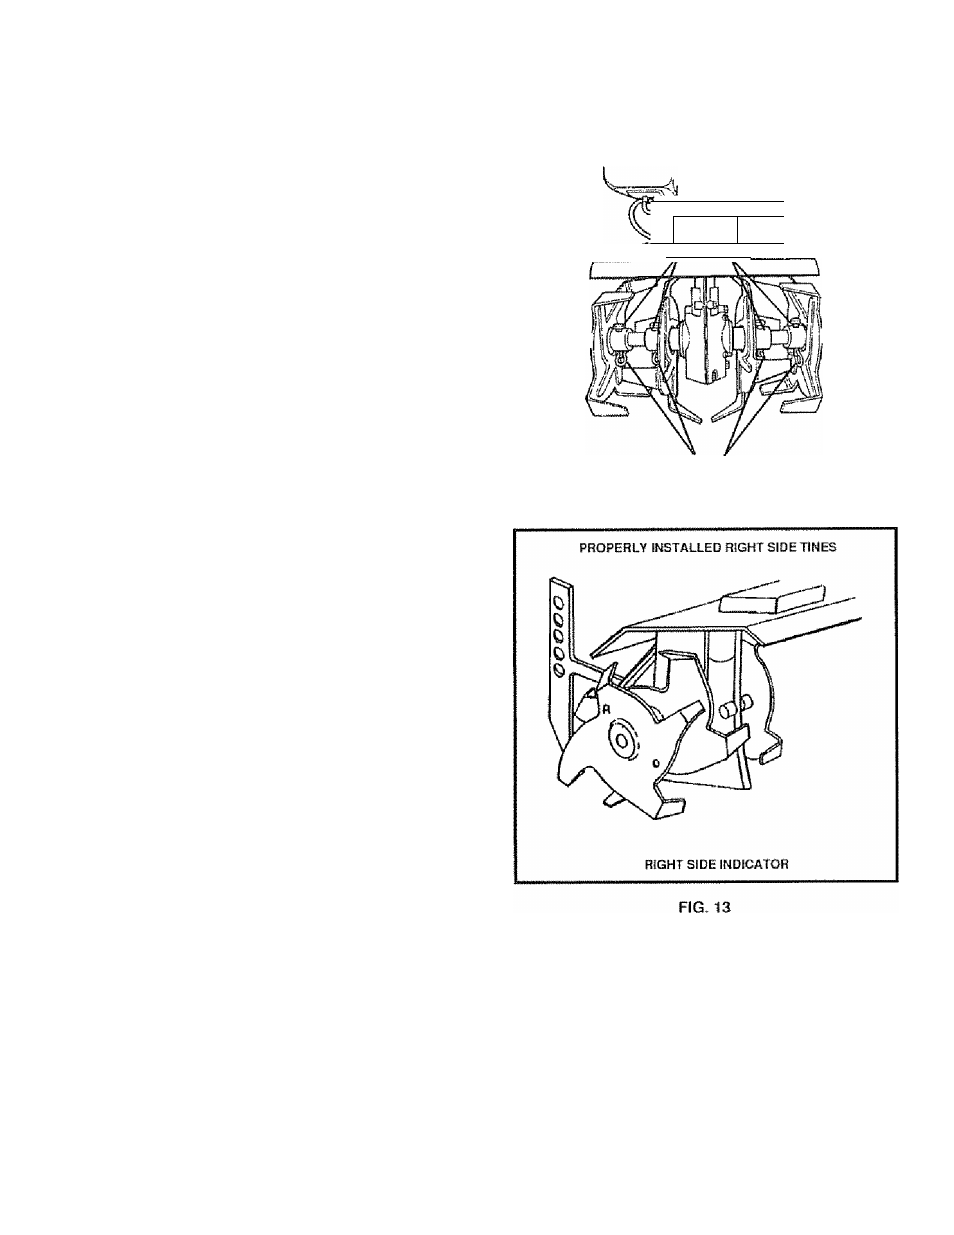
® Whenthe tines are properly installed, the letter "R" will
be visible on the outside of the right-hand tine (the
letter "L" on the left-hand tine). The letter should
appear opposite the small hole in the side of the tine
•
Place the outside tine on the tine shaft and reinstall f tie
clevis pin and hairpin cotter,
® The outside tine cutting tips wiil all bend in toward the
inside line The letter"R‘'onthe right sideorT“on the
left side should be visible from the outside of the unit,
® Repeat steps on the opposite side of the unit
® Check to make sure the tines are installed on correct
side of the unit
FRONT VIEW
ilillffHf
• 1 i'!
Í i
iLi
CLEVtg PINS
RIGHT SIDE
TINES
I LEFT SIDE
TINES
HAIRPINS
FIG. 12
16