Service & adjustments, Servicing blade, Engine adjustments – Craftsman 247.388250 User Manual
Page 15
Attention! The text in this document has been recognized automatically. To view the original document, you can use the "Original mode".
SERVICE & ADJUSTMENTS
Servicing Blade
To Remove Blade
•
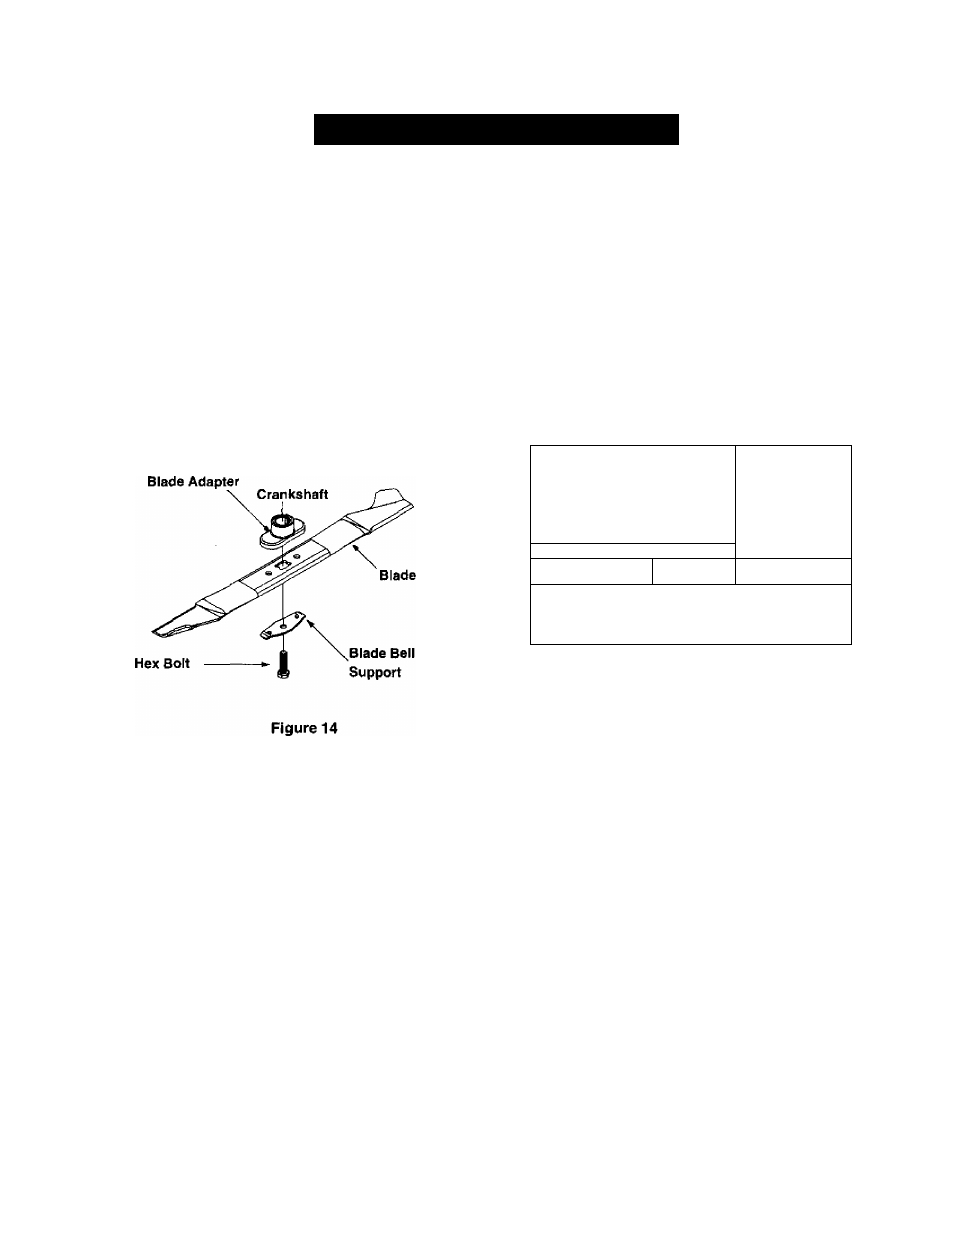
Remove the bolt, and the blade bell support
which holds the blade and adapter to the engine
crankshaft. See Figure 14.
•
Remove the blade and the adapter from the
crankshaft.
To Replace Blade:
•
Before reinstalling the blade and the blade
adapter to the unit, lubricate the engine
crankshaft and the inner surface of the blade
adapter with light oil,
•
Install the blade adapter on the crankshaft with
the “star” away from the engine. See Figure 14.
•
Place the new blade with the side marked
bottom (or with part number) facing away from
the adapter.
•
Place the bell support next. Make sure to align
the tabs in the holes of the blade with the hole in
the bell support.
•
Insert the hex bolt through the blade assembly.
Figure 14 shows the correct order of assembly.
•
Use block of wood to hold blade while you
tighten the bolt clockwise. Follow the
recommended torque for the bolt which is 450
600 in.-lbs.
IMPORTANT:
The bolt, used to secure the blade to
the engine, is specially heat-treated.
Do not
substitute.
To order replacement bolt, refer to the
Repair Parts section of this manual.
To Sharpen Blade:
The blade can be sharpened with a file or on a grinding
wheel. Do not attempt to sharpen white on the mower.
•
Follow the original angle of grind as a guide.
Make sure that each cutting edge receives an
equal amount of grinding to prevent an
unbalanced blade.
NOTE:
An unbalanced blade will cause excessive
vibration when rotating at high speeds, may cause
damage to the mower and could break, causing
personal injury.
•
Test the blade by balancing it on a round shaft
screwdriver or a blade balancer. See Figure 15.
•
If the blade is not balanced, remove metal from
the heavy side until it balances evenly.
1. Insert screw driver thro
2. Blade should be paralle
ugh hole
1 to ground
Blade
Driver__________ ___ \________
O (J) 0
Ground
A
WARNING:
To ensure safe operation of
your unit,
all nuts and bolts must be
checked
periodically for correct tightness.
Figure 15
Engine Adjustments
A
WARNING; Do not make unnecessary
adjustments
on the engine. Factory settings
are satisfactory for most conditions.
If any adjustments are made to the engine
while the engine is running,
keep clear of all
moving parts. Be careful of heated
surfaces and muffler. Keep your hands
away from these parts.
Carburetor
The carburetor has been pre-set at the factory and
should not require adjustment.
• If the engine on your mower does not operate
properly due to suspected carburetor problems,
take your lawn mower to your nearest Sears
service center.
• Engine performance may be affected in altitudes
above 4000 feet. To improve engine
performance, install a high altitude adjustment
kit, available at the Sears service center,
NOTE:
A dirty air cleaner will cause an engine to run
rough. Be certain air cleaner is clean and attached to
the carburetor.
15