8x3-strand class ii end-for-end splice, 7a 7 b – Samson 8x3-STRAND Class II End-for-End Splice User Manual
Page 3
PAGE 3 OF 3
SamsonRope.com
| Tel
+1.360.384.4669
8x3-Strand Class II End-For-End Splice
S A M S O N S P L I C I N G I N S T R U C T I O N S
8
step
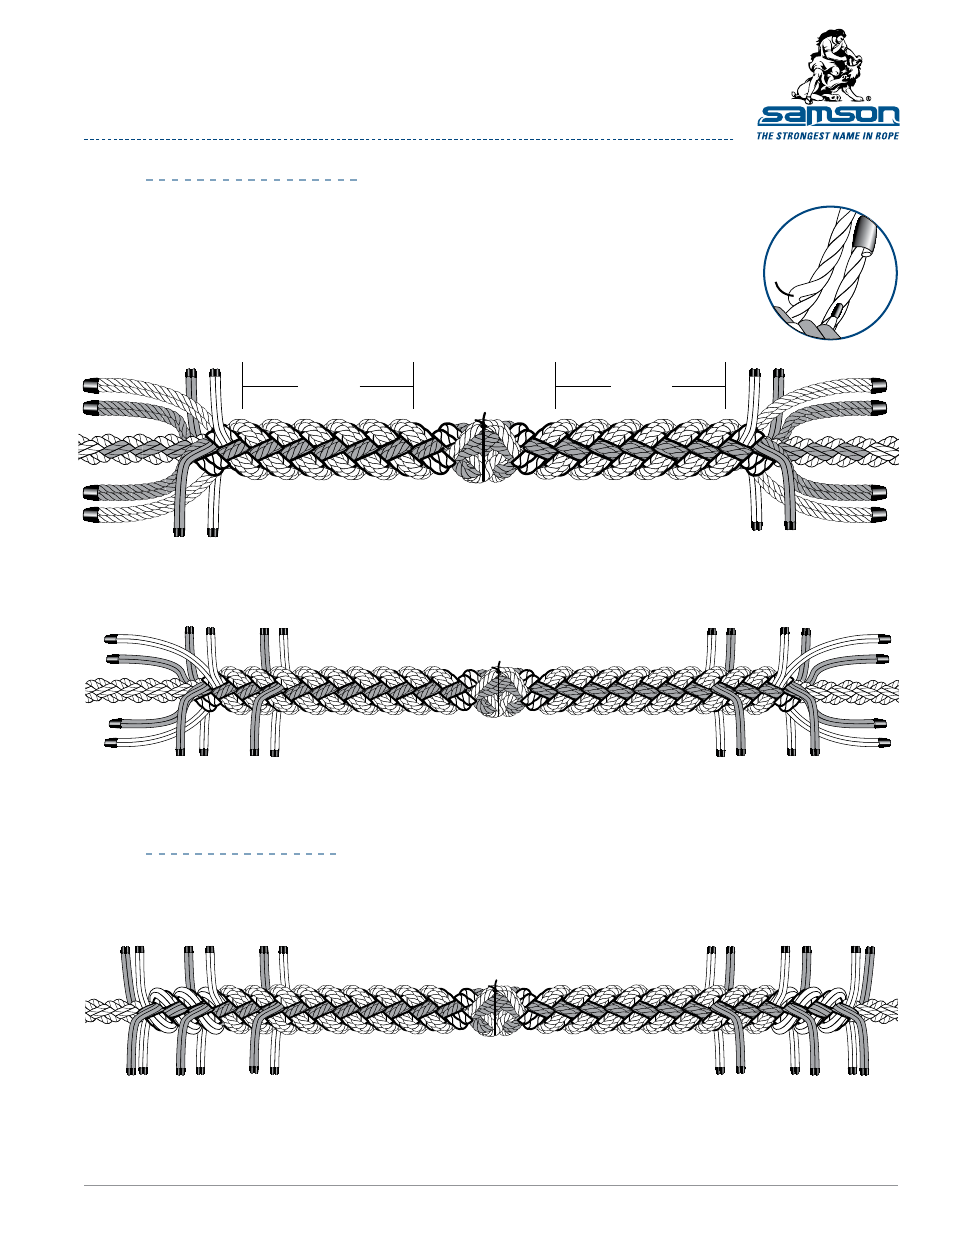
C O n t i n U i n g t U C K s
s ta rt i n g t H e t U C K s
7
step
Beginning at the marriage, tuck a marked pair of strands under the nearest unmarked pair.
Then tuck an unmarked pair under the nearest marked pair of strands.
Complete 1 full set of tucks tuck in one direction with all the strands and then do another
full set of tucks on the other side of the marriage. Pull everything tight before proceeding.
Continue tucking the strands around the rope until you have completed 6 full tucks on each
side of the marriage with all the strand pairs.
Having completed 6 full tucks for each pair of strands you will need to reduce the strand
volume by 1/3 before continuing to the next set of tucks. To do this, cut 1 of the 3 strands
out of each pair as shown in Fig. F.
Continue tucking the remaining strands, with the (gray) strands under the (white) strands, and vice versa,
for 3 more full tucks. Reduce the volume of each of the strands in the 4 pairs of strands, by 1/2 (Do this by
removing 1 of the 2 strands in each of the remaining pairs.) The splice should look like Fig. G.
Continue tucking the remaining strands for 3 more
full tucks. Tape and cut off the remaining strands, the
finished splice should look like Fig. H.
Finished splice
7
A
7
B
Pull, tape
and cut
a strand.
Figure F
Figure g
6 tucks
6 tucks
Marriage point
Figure H
DOCUMENT 8x3Strand_C2_End For End_AUG2012.pdf
© 2012 Samson Rope Technologies, Inc. All rights reserved.
S/WD #108294 7/2012