Adjustable pedestal column for oscillating fan, Oval grommet, Large round grommet – Qmark LCHHD - Heavy Duty Oscillating Air Circulator User Manual
Page 2: Rubber grommet
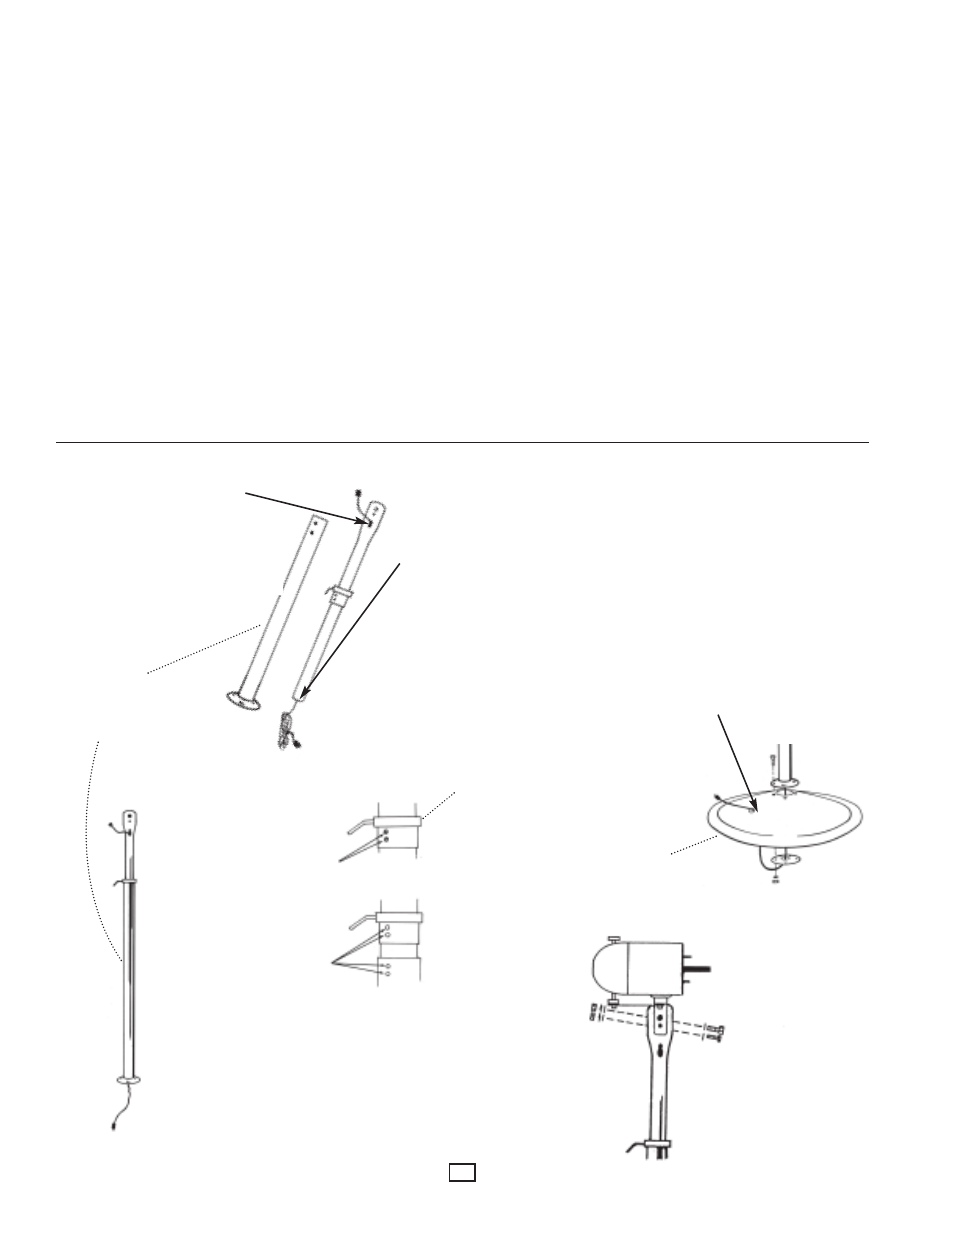
ADJUSTABLE PEDESTAL COLUMN FOR OSCILLATING FAN
IMPORTANT- REVIEW ALL THE ASSEMBLY INSTRUCTIONS AND
CHECK FOR MISSING OR DAMAGED PARTS PRIOR TO STARTING
ASSEMBLY
1. Remove 2 sections of adjustable pedestal column from carton. Remove
oval grommet from parts package and install in oval slot near top of
pedestal column. Remove large round grommet from parts package. Turn
grommet “inside out” so that the grove is on the inside and the smooth
side is on the outside. Install grommet over bottom lip of pedestal col-
umn. Feed power cord down through top of black section (end with screw
holes). Slide adjustment collar into black section, align screw holes and
secure. Secure adjustment collar to lowest height for assembly. (See
Figure 2)
2. Remove base from carton and insert medium rubber grommet into hole
on surface of fan base.(See Figure 3)
3. Feed power cord from bottom of column down through center hole of fan
base and then back through hole with rubber grommet.(See Figure 3)
4. Align holes in flange at base of column with holes in top of fan base.
Secure using 5/16” x 1” carriage bolts, lockwashers and hex nuts.(See
Figure 3). One of the carriage bolts is to be attached with the 5/16” inter-
nal tooth star washer mounted under the bolt head.
5. Secure fan head assembly to upper column using 1/2” x 1-1/2” hex bolt,
washer, lockwashers and hex nuts,1/4” x 1-1/2” bolt, washer, lockwash-
ers and hex nut. (See Figure 4).
NOTE: Loosen the lockshaft (3) Figure 1, at least 1/4 turn clockwise to dis-
engage the oscillating mechanism of the gear before installing the fan
head assembly to the pedestal column. This will avoid unnecessary
movements of the gear mechanism while the fan head is still being
installed.
6. Loosen adjustment collar and extend fan to proper height.Tighten collar
and connect power cord from column to power cord on motor.
7. Plug power cord from fan into any 120 VAC 3-prong grounded outlet.
Figure 2
Figure 4
Remove 2 phillips head screws.
Align and secure with
2 phillips head screws.
Figure 3
OVAL GROMMET
Remove oval grommet from parts
package and install in
oval slot near top pedestal.
This grommet must be installed to
prevent cord damage.
LARGE ROUND
GROMMET
Remove large round grommet from
parts package.
Turn grommet “inside out” so that the
groove is on the inside and the smooth
side is on the outside.
Install grommet over bottom lip of
pedestal column
RUBBER
GROMMET
2
Adjustable
Pedestal
Column
Adjustment Collar
Pedestal Base
NOTE: When mounting Fan Head
onto pedestal assembly, motor cord
should be on the same side as the
oval grommet on the pedestal. This
will minimize the rubbing of the
flexcord on the pedestal column as
the motor oscillates.