Casio 3246 User Manual
Page 6
6
Operation Guide 3173 3246
Using the Altitude Differential Value While Mountain Climbing or Hiking
After you specify the altitude differential start point while mountain climbing or hiking, you easily can
measure the change in the altitude between that point and other points along the way.
To use the altitude differential value
1. In the Altimeter Mode, check to make sure that an altitude reading is
on the display.
•
If an altitude reading is not displayed, press
A to take one. See “To
take an altimeter reading” for details.
2. Use the contour lines on your map to determine the difference in
altitude between your current location and your destination.
3. In the Altimeter Mode, press
E to specify your current location as the
altitude differential start point.
•
The watch will take an altitude reading and register the result as
the altitude differential value start point. The altitude differential
value will be reset to zero at this time.
4. While comparing the altitude difference you determined on the map
and the watch’s altitude differential value, advance towards your
destination.
•
If the map shows that the difference in altitude between your
location and your destination is +80 meters for example, you know
you will be nearing your destination when the displayed altitude
differential value shows +80 meters.
Specifying a Reference Altitude Value
The altitude readings produced by this watch are subject to error caused by changes in air pressure.
Because of this, we recommend that you update the reference altitude value whenever one is available
during your climb. After you specify a reference altitude value, the watch adjusts its air-pressure-to-altitude
conversion calculation accordingly.
To specify a reference altitude value
1. In the Altimeter Mode, hold down
E until the current reference altitude
value starts to fl ash. This is the setting screen.
•
Before the reference altitude value starts to fl ash, the message
SET Hold will appear on the display. Keep
E depressed until
SET Hold disappears.
2. Press
A (+) or C (–) to change the current reference altitude value
by 5 meters (or 20 feet).
•
Specify a reference altitude value based on accurate altitude
information about your current location from a map, etc.
•
You can set the reference altitude value within the range of –10,000
to 10,000 meters (–32,800 to 32,800 feet).
•
Pressing
A and C at the same time returns to OFF (no reference
altitude value), so the watch performs air pressure to altitude
conversions based on preset data only.
3. Press
E to exit the setting screen.
Types of Altitude Data
The watch can maintain two types of altitude data in its memory: manual measurement records, and auto
save values (minimum, maximum, vertical ascent, vertical descent).
•
Use the Data Recall Mode to view data stored in memory. See “Viewing Altitude Records” for details.
Manual Measurement Records
Any time you perform the procedure below in the Altimeter Mode, the watch will create and store a record
with the currently displayed altitude reading, along with the date and time the reading was taken. There is
enough memory to store up to 25 manual measurement records, which are numbered from REC01
through REC25.
To save a manual measurement
1. In the Altimeter Mode, check to make sure that an altitude reading is
on the display.
•
If an altitude reading is not displayed, press
A to take one. See “To
take an altimeter reading” for details.
2. Hold down
A until REC Hold appears on the display and then
disappears. Release
A after Hold disappears.
•
This will save the currently displayed altitude reading in a manual
measurement record, along with the measurement time and date.
•
The watch will return to the Altimeter Mode screen automatically
after the save operation is complete.
•
There is enough memory to store up to 25 manual measurement
records. If there are already 25 manual measurement records in
memory, the above operation will cause the oldest record to be
deleted automatically to make room for the new one.
Auto Save Values
Two sets of auto save values (Set 1 and Set 2) are maintained in watch memory.
Set 1
Set 2
Maximum Altitude (MAX-1)
Minimum Altitude (MIN-1)
Vertical Ascent (ASC-1)
Vertical Descent (DSC-1)
Maximum Altitude (MAX-2)
Minimum Altitude (MIN-2)
Vertical Ascent (ASC-2)
Vertical Descent (DSC-2)
•
These values are checked and updated automatically by the watch as altitude auto measurements are
taken.
How Maximum and Minimum Values Are Updated
While the watch is in the Altimeter Mode, altitude readings are taken automatically at the interval specifi ed
by the altitude auto measurement method. With each reading, the watch compares the current reading
against the MAX (MAX-1 and MAX-2) and MIN (MIN-1 and MIN-2) values. It will replace the MAX value if
the current reading is greater than MAX, or the MIN value if the current reading is less than MIN.
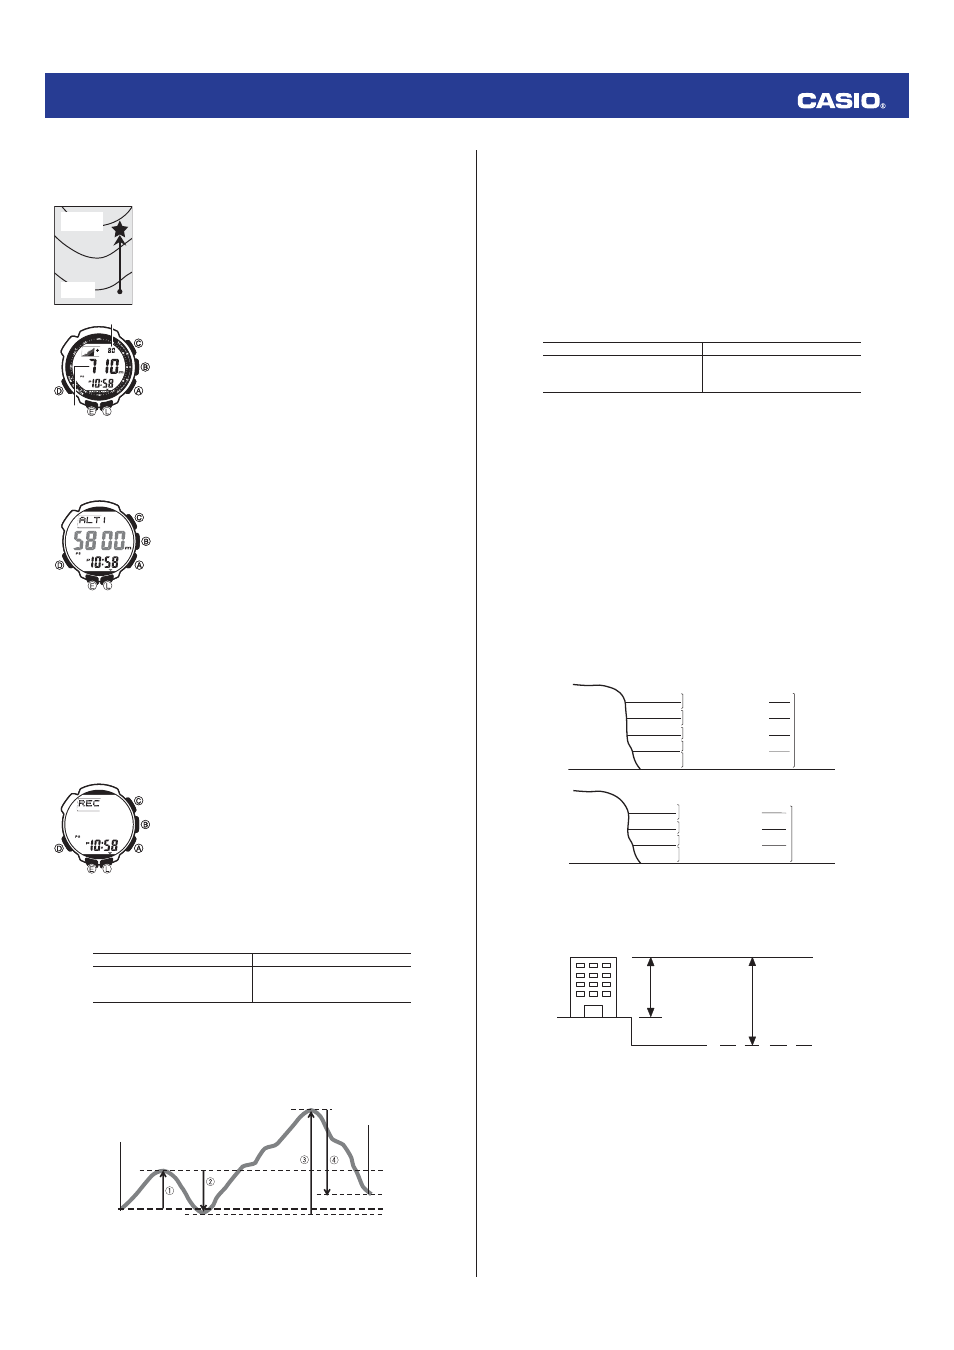
How Vertical Ascent/Descent Values Are Updated
Session start point
20 m
0 m
120 m
320 m
620 m
Session end point
The total Vertical Ascent and Vertical Descent values produced by an Altimeter Mode measurement
session during the example climb illustrated above are calculated as follows.
Vertical Ascent:
q (300 m) + e (620 m) = 920 m
Vertical Descent:
w (320 m) + r (500 m) = 820 m
Current
location
Destination
altitude
Current
location
Destination
altitude
Altitude differential
Altitude
Altitude differential
Altitude
l l l l l
lll
ll
ll
ll
ll
l l
l l l l l l l l
lll
ll
ll
ll
ll
l l
l l l ll l l l l
lll
ll
ll
ll
ll
l l
l l l l l l l l
lll
ll
ll
ll
ll
l l
l l l
•
Entering the Altimeter Mode starts a new altitude auto measurement session, but it does not reset the
current ASC (ASC-1 and ASC-2) and DSC (DSC-1 and DSC-2) values or change them in any way.
This means that the starting ASC and DSC values for a new Altimeter Mode auto measurement session
are the values that currently are in memory. Each time you complete an Altimeter Mode auto
measurement session by returning to the Timekeeping Mode, the vertical ascent value of the current
session (920 meters in the above example) is added to the session’s starting ASC value. Also, the
vertical descent value of the current auto measurement session (–820 meters in the above example) is
added to the session’s starting DSC value.
•
Note that any change in elevation when ascending that is less than 15 meters (49 feet) is not added to
the vertical ascent value for the current Altimeter Mode auto measurement session. Also, any change in
elevation when descending that is less than –15 meters (–49 feet) is not added to the vertical descent
value for the current Altimeter Mode auto measurement session.
Note
•
The maximum altitude, minimum altitude, vertical ascent, and vertical descent values are retained in
memory when you exit the Altimeter Mode. To clear values, perform the procedure under “To clear the
contents of a specifi c memory area”.
Using Auto Save Values
The watch maintains two independent sets of auto save values as shown below.
Set 1
Set 2
Maximum Altitude (MAX-1)
Minimum Altitude (MIN-1)
Vertical Ascent (ASC-1)
Vertical Descent (DSC-1)
Maximum Altitude (MAX-2)
Minimum Altitude (MIN-2)
Vertical Ascent (ASC-2)
Vertical Descent (DSC-2)
The values in Set 1 and Set 2 can be cleared independently of each other. This means you can use them
to keep track of daily and cumulative data as described in the example below.
Example: Keeping track of data on a three-day climb
Day 1
Clear both Set 1 and Set 2, and start your Day 1 climb.
At the end of the day, both sets of auto save values contain the same data (MAX-1 = MAX-2, MIN-1 =
MIN-2, etc.).
Day 2
Clear only Set 1, and start your Day 2 climb. At the end of the day, the values in Set 1 (MAX-1, MIN-1,
ASC-1, DSC-1) will show the results of Day 2 only. In Set 2, MAX-2 and MIN-2 will show the maximum
and minimum altitudes reached over the two-day span. ASC-2 will show the total vertical ascent for the
two days (Day 1 + Day 2) and DSC-2 will show the total vertical descent for the two days.
Day 3
Clear only Set 1, and start your Day 3 climb. At the end of the day, the values in Set 1 will show the
results of Day 3 only. In Set 2, MAX-2 and MIN-2 will show the maximum and minimum altitudes
reached over the three-day span. ASC-2 will show the total vertical ascent for the three days (Day 1 +
Day 2 + Day 3) and DSC-2 will show the total vertical descent for the three days.
•
For details about clearing altitude data, see “To clear the contents of a specifi c memory area”.
How does the altimeter work?
Generally, air pressure and temperature decrease as altitude increases. This watch bases its altitude
measurements on International Standard Atmosphere (ISA) values stipulated by the International Civil
Aviation Organization (ICAO). These values defi ne relationships between altitude, air pressure, and
temperature.
0 m
500 m
1000 m
1500 m
2000 m
2500 m
3000 m
3500 m
4000 m
899 hPa
795 hPa
701 hPa
616 hPa
8.5°C
2°C
–4.5°C
–11°C
15°C
1013 hPa
About 6.5°C
per 1000 m
About 8 hPa per 100 m
About 9 hPa per 100 m
About 10 hPa per 100 m
About 11 hPa per 100 m
About 12 hPa per 100 m
Altitude
Air Pressure
Temperature
0 ft.
2000 ft.
4000 ft.
6000 ft.
8000 ft.
10000 ft.
12000 ft.
14000 ft.
25.84 inHg
22.23 inHg
19.03 inHg
44.7°F
30.5°F
16.2°F
59.0°F
29.92 inHg
About 3.6°F
per 1000 ft.
About 0.15 inHg per 200 ft.
About 0.17 inHg per 200 ft.
About 0.192 inHg per 200 ft.
About 0.21 inHg per 200 ft.
Source: International Civil Aviation Organization
•
Note that the following conditions will prevent you from obtaining accurate readings:
When air pressure changes because of changes in the weather
Extreme temperature changes
When the watch itself is subjected to strong impact
There are two standard methods of expressing altitude: Absolute altitude and relative altitude. Absolute
altitude expresses an absolute height above sea level. Relative altitude expresses the difference between
the height of two different places.
Height of building 130 m
(relative altitude)
Rooftop at an altitude of
230 m above sea level
(absolute altitude)
Sea Level
Altimeter Precautions
•
This watch estimates altitude based on air pressure. This means that altitude readings for the same
location may vary if air pressure changes.
•
The semiconductor pressure sensor used by the watch for altitude measurements is also affected by
temperature. When taking altitude measurements, do not subject the watch to temperature changes.
•
Do not rely upon this watch for altitude measurements or perform button operations while sky diving,
hang gliding, or paragliding, while riding a gyrocopter, glider, or any other aircraft, or while engaging in
any other activity where there is the chance of sudden altitude changes.
•
Do not use this watch for measuring altitude in applications that demand professional or industrial level
precision.
•
Remember that the air inside of a commercial aircraft is pressurized. Because of this, the readings
produced by this watch will not match the altitude readings announced or indicated the fl ight crew.