640h azur – Cambridge Audio 640H Azur User Manual
Page 7
640H
azur
7
3.4 Testing your Network configuration
Now you have set up a basic network, it is strongly recommended to
make sure it is working before continuing. To do this you need to "ping"
(Packet InterNet Groper) the 640H from your PC. Ping is the most basic
form of communication between two devices, as it is just a confirmation
tool that the link is working correctly.
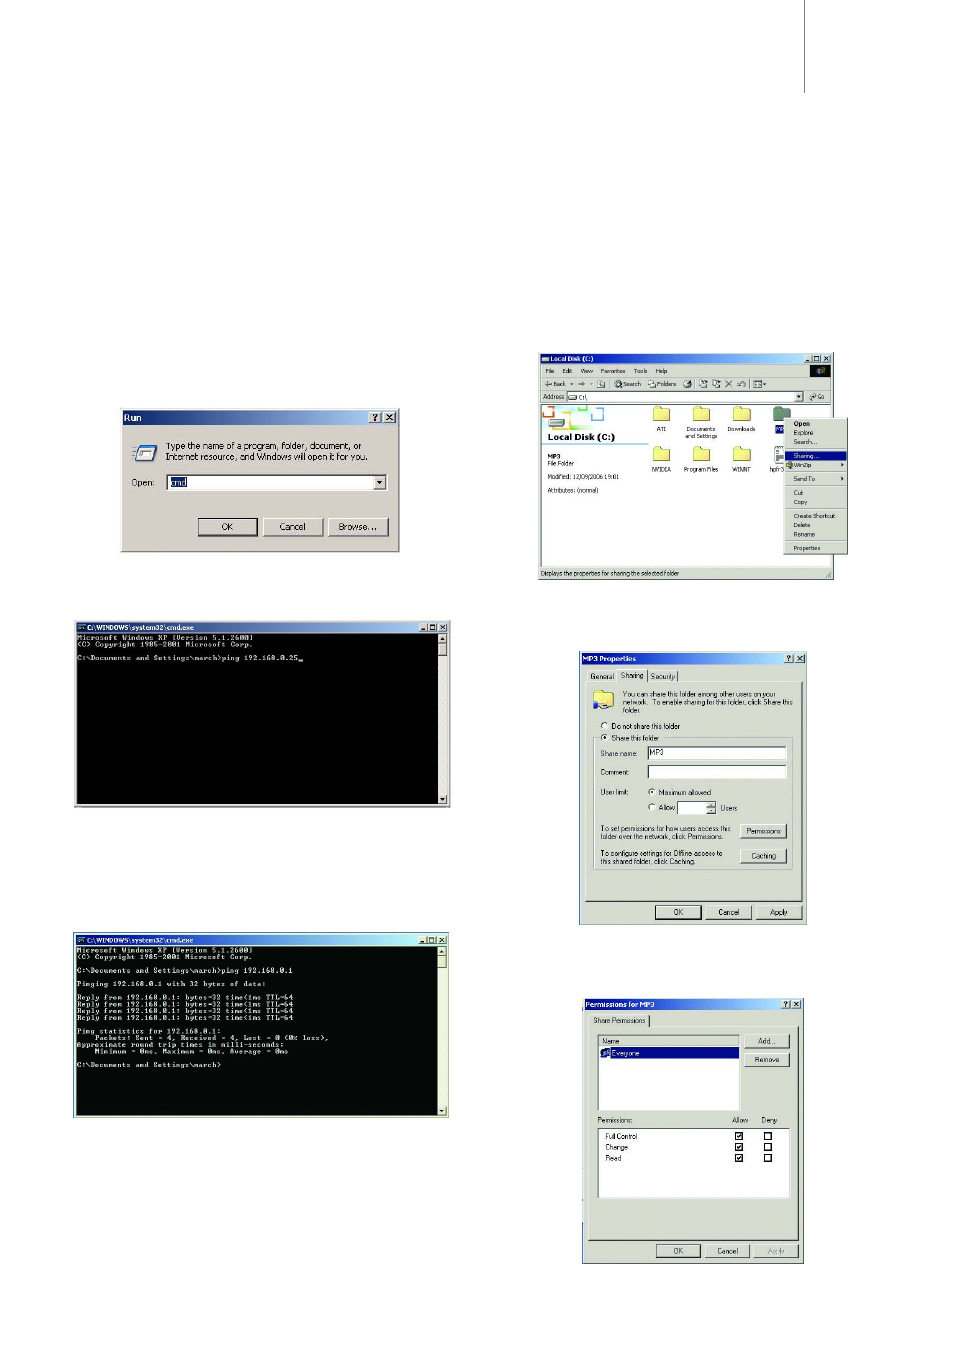
Ping a 640H from a Windows PC
1. Click "Start".
2. Select "Run".
3. Type "cmd" and press the "Enter" key. This will bring up a black
command prompt window:
4. In the command prompt, type "ping IP address" followed by the enter
key, where IP address is the IP address of the 640H (see above under
"Setting up the IP address for the 640H" to find out the IP address of
your 640H):
5. When the "Enter" key has been pressed one of three messages could
appear:
a. Destination Host Unreachable.
b. Request Time Out.
c. Reply from (IP address here): bytes=32, time (time in ms),
TTL=64
6. If you get one of the first two messages, please check your leads and
computer setup by going through the procedures listed above again.
If you see the third message then the network has been setup
correctly. Type "exit" in the command prompt and press the "Enter"
key. This will close the command prompt.
3.5 Setting up your PC to share music over a network
1. If you are using iTunes or other ripping software that has a default
folder where your MP3's are stored, please check the folder is shared
by following steps three to six below.
2. It is however recommended to create a folder in your root directory,
(i.e. C:\ drive if on the same hard drive as windows or alternate suffix
if your music is on a different hard drive, i.e. D:\, E:\ and so on) called
MP3. All your music should be placed in this folder.
3. If you right click on the folder, select "Sharing" from the menu. This
will un-grey the rest of the window:
4. In the properties window that now appears, you need to select the
button labelled "Share this folder". In the "Share name" text box type
"MP3". Ignore the comment text box and in the user limit section,
select the "Maximum Allowed" button:
5. Now press the "Permissions" button.
6. Select "Everyone" in the window that appears and set the permissions
to allow everybody "Full control", "Change" and "Read" in the buttons
below: