Dell Axim X51 User Manual
Page 2
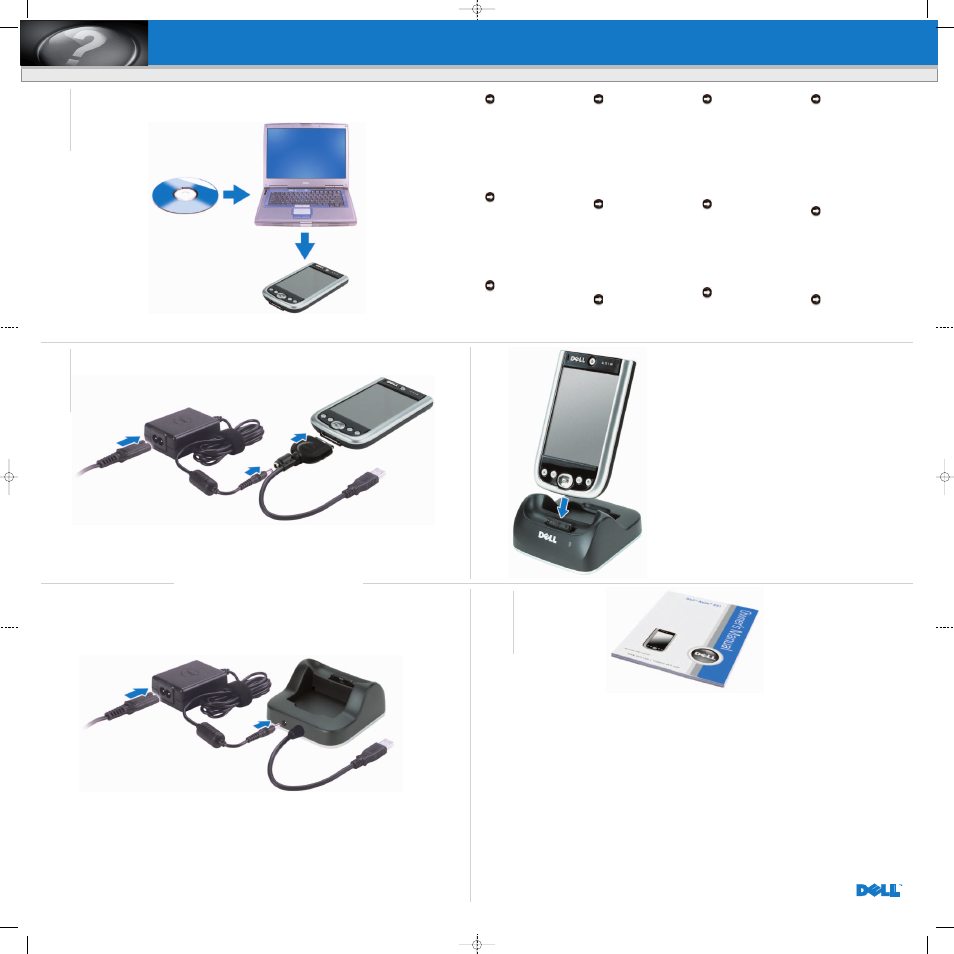
What’s Next?
En verder? | Et après ? | A continuación
Sync Cable
Connect the USB connector on the end of
the sync cable to your computer.
Synchronisatiekabel
Sluit de USB-connector aan het eind van
de synchronisatiekabel op de computer
aan.
Câble de synchronisation
Branchez le connecteur USB du câble de
synchronisation sur l'ordinateur.
Cable de sincronización
Conecte el conector USB del extremo
del cable de sincronización al equipo.
Information in this document is subject to change without notice.
© 2005-2006 Dell Inc. All rights reserved.
Reproduction in any manner whatsoever without the written
permission of Dell Inc. is strictly forbidden.
Dell, the DELL logo, and Axim are trademarks of Dell Inc.;
Microsoft and ActiveSync are registered trademarks of Microsoft
Corporation. Dell Inc. disclaims any proprietary interest in the
marks and names of others.
February 2006
De informatie in dit document kan zonder voorafgaande
kennisgeving worden gewijzigd.
© 2005-2006 Dell Inc. Alle rechten voorbehouden.
Niets uit deze uitgave mag op enige manier worden
gereproduceerd zonder de schriftelijke toestemming van Dell Inc.
Dell, het DELL-logo en Axim zijn handelsmerken van Dell Inc.;
Microsoft en ActiveSync zijn gedeponeerde handelsmerken van
Microsoft Corporation. Dell Inc. maakt geen enkele aanspraak op
de eigendomsrechten op merken en namen van anderen.
Februari 2006
Les informations de ce document sont sujettes à modification
sans préavis.
© 2005-2006 Dell Inc. Tous droits réservés.
La reproduction de ce document, de quelque manière que ce soit,
sans l'autorisation écrite de Dell Inc. est strictement interdite.
Dell, le logo DELL et Axim sont des marques de Dell Inc. ;
Microsoft et ActiveSync sont des marques déposées de
Microsoft Corporation. Dell Inc. rejette tout intérêt propriétaire
dans les marques et noms appartenant à des tiers.
Février 2006
La información contenida en este documento puede modificarse
sin aviso previo.
© 2005-2006 Dell Inc. Todos los derechos reservados.
Queda prohibida su reproducción en cualquier medio sin la
autorización por escrito de Dell Inc.
Dell, el logotipo de DELL y Axim son marcas comerciales de
Dell Inc.;
Microsoft y ActiveSync son marcas comerciales
registradas de Microsoft Corporation. Dell Inc. renuncia a
cualquier interés sobre la propiedad de marcas y nombres
comerciales que no sean los suyos.
Febrero de 2006
Cradle Cable
Connect the USB connector on the end of
the cradle cable to your computer.
Houderkabel
Sluit de USB-connector aan het eind van
de houderkabel op de computer aan.
Câble de la station d'accueil
Branchez le connecteur USB du câble de
la station d'accueil sur l'ordinateur.
Cable de la base
Conecte el conector USB del extremo
del cable de la base al equipo.
Charge de l'appareil sur la
station d'accueil
Alignez l'avant de l'appareil sur l'avant de
la station d'accueil, puis abaissez-le
jusqu'à ce qu'il soit bien positionné dans
la station. Lorsque l'appareil est connecté
à la station d'accueil, l'icône d'état de la
connexion apparaît sur la barre de
commande.
Acoplamiento con la base
Mantenga el frente del dispositivo
nivelado con el frente de la base y baje el
dispositivo hasta que quede firmemente
asentado en la base. Cuando el
dispositivo esté acoplado, aparecerá el
icono de estado de la conexión en la
barra de comandos.
Docking With the Cradle
Keep the front of the device flush with the
front of the cradle, and lower the device
until it is firmly seated in the cradle. When
the device is docked, the connection
status icon appears on the command bar.
Koppelen aan de houder
Houd de voorzijde van het apparaat gelijk
met de voorzijde van de houder en laat
het apparaat zakken totdat het stevig in
de houder zit. Wanneer het apparaat is
gekoppeld, wordt het verbindings-
statuspictogram weergegeven op de
opdrachtbalk.
Printed in Ireland.
Gedrukt in Ireland.
Imprimé en Irlande.
Impreso en Irlanda.
Connect the sync cable OR cradle to your computer.
Sluit de synchronisatiekabel OF de houder op de computer aan.
Connectez le câble de synchronisation OU la station d'accueil à l'ordinateur.
Conecte el cable de sincronización O la base al equipo.
3
Finding Information
Informatie zoeken
Recherche d'informations
Localización de información
4
• Dell
Owner’s Manual — Using
Your Device.
• Microsoft Pocket PC Help — Tap
Start
→ Help.
•
Getting Started CD — Additional
programs that you can install.
• ActiveSync Help — Click Help
→
Microsoft ActiveSync Help on
your computer.
• support.dell.com — Up-to-date
information on your device.
• Dell
Gebruikershandleiding — Het
apparaat gebruiken.
• Microsoft Pocket PC Help — Tabblad
Start
→ Help.
•
Aan de slag-CD — Extra programma's
die u kunt installeren.
• ActiveSync Help — Klik op Help
→
Microsoft ActiveSync Help op de
computer.
• support.dell.com — Actuele informatie
over het apparaat.
•
Manuel du propriétaire de Dell —
Utilisation de votre appareil.
• Aide Microsoft Pocket PC —
Choisissez Start
→ Help.
• CD
Mise en route — Programmes
supplémentaires éventuels.
• Aide ActiveSync — Cliquez sur
Help
→ Microsoft ActiveSync Help sur
l'ordinateur.
• support.dell.com — Informations
récentes sur l'appareil.
•
Manual del propietario de Dell: Uso
del dispositivo.
• Ayuda de Microsoft Pocket PC: Puntee
en Inicio
→ Ayuda.
• CD de
Inicio: Programas adicionales
que puede instalar.
• Ayuda de ActiveSync: Haga clic en
Ayuda
→ Ayuda de Microsoft
ActiveSync.
• support.dell.com: Información
actualizada sobre el dispositivo.
OR | OF | OU | O
NOTICE: Do not connect your device
to the computer until the instructions
prompt you to do so.
After the battery is fully charged, press
the power button and follow the
on-screen instructions to complete the
initial setup. Then use ActiveSync to
synchronize the data on your device with
the data on your computer.
1. Insert the
Getting Started CD.
2. Click Getting Started and click
Start Here.
NOTICE: Install and configure
Microsoft Outlook only if it is not
already installed and configured on
your computer and you do not have a
more recent version.
3. Click Install ActiveSync, click Install,
and follow the instructions on
the screen.
4. When prompted, use the instructions
below to connect your device to
the computer.
NOTE: See
ActiveSync Help on your
computer for more information.
KENNISGEVING: Sluit het apparaat
niet op de computer aan voordat dit
in de instructies wordt aangegeven.
Nadat de batterij volledig is opgeladen,
drukt u op de aan/uit-knop en volgt u de
instructies op het scherm om de eerste
installatie te voltooien. Vervolgens
gebruikt u ActiveSync om de gegevens
op het apparaat te synchroniseren met
de gegevens op de computer.
1. Plaats de cd
Aan de slag.
2. Klik op Aan de slag en klik op
Hier beginnen.
KENNISGEVING: Installeer en
configureer Microsoft Outlook alleen
als dit nog niet gebeurd is en u niet
over een meer recente versie
beschikt.
3. Klik op ActiveSync installeren, klik op
Installeren, en volg de instructies op
het scherm.
4. Wanneer daarom wordt gevraagd,
gebruikt u onderstaande instructies om
het apparaat op de computer aan te
sluiten.
OPMERKING: Zie
ActiveSync Help op
de computer voor meer informatie.
AVIS : Ne connectez pas l'appareil à
l'ordinateur avant d'être invité à le
faire.
Une fois la batterie chargée, appuyez sur
le bouton d'alimentation et suivez les
instructions qui s'affichent à l'écran pour
terminer la configuration initiale. Utilisez
ensuite Microsoft ActiveSync pour
synchroniser les données de l'appareil
avec celles de votre ordinateur.
1. Insérez le CD
Mise en route.
2. Cliquez sur Mise en route, puis sur
Commencez ici.
AVIS : Installez et configurez
Microsoft Outlook uniquement s'il
n'est pas encore installé et configuré
sur votre ordinateur et que vous
n'avez pas de version plus récente.
3. Cliquez sur Installer ActiveSync, sur
Installer puis suivez les instructions qui
s'affichent à l'écran.
4. À l'invite, suivez les instructions ci-
dessous pour connecter l'appareil à
l'ordinateur.
REMARQUE : Pour des informations
supplémentaires, reportez-vous à
l'
Aide ActiveSync sur votre
ordinateur.
AVISO: No conecte el dispositivo al
equipo hasta que las instrucciones le
indiquen hacerlo.
Una vez que la batería se haya cargado
completamente, pulse el botón de
alimentación y siga las instrucciones que
se indican en pantalla para realizar la
configuración inicial. A continuación,
utilice ActiveSync para sincronizar los
datos de su dispositivo con los datos de
su equipo.
1. Introduzca el CD de
Inicio.
2. Haga clic en Inicio y en
Comience aquí.
AVISO: Instale y configure Microsoft
Outlook sólo si no ha sido instalado y
configurado ya en su equipo y no
tiene una versión más reciente.
3. Haga clic en Instalar ActiveSync, de
nuevo en Instalar y siga las
instrucciones que se indican en
pantalla.
4. Cuando se le indique, siga las
instrucciones que se indican abajo
para conectar el dispositivo al equipo.
NOTA: Para obtener más
información, consulte
Ayuda de
ActiveSync en su equipo.
Install the Microsoft
®
ActiveSync
®
Program
Installeer het programma Microsoft
®
ActiveSync
®
Installez le programme Microsoft
®
ActiveSync
®
Instale el programa Microsoft
®
ActiveSync
®
2
NC395em1.qxd 3/2/2006 3:36 PM Page 2