LaserMax CF LCR User Manual
Cent er fire, Laser series for ruger, Installation instructions
C
ENT
ER
FIRE
Laser Series
for Ruger
®
LCR
®
Installation Instructions
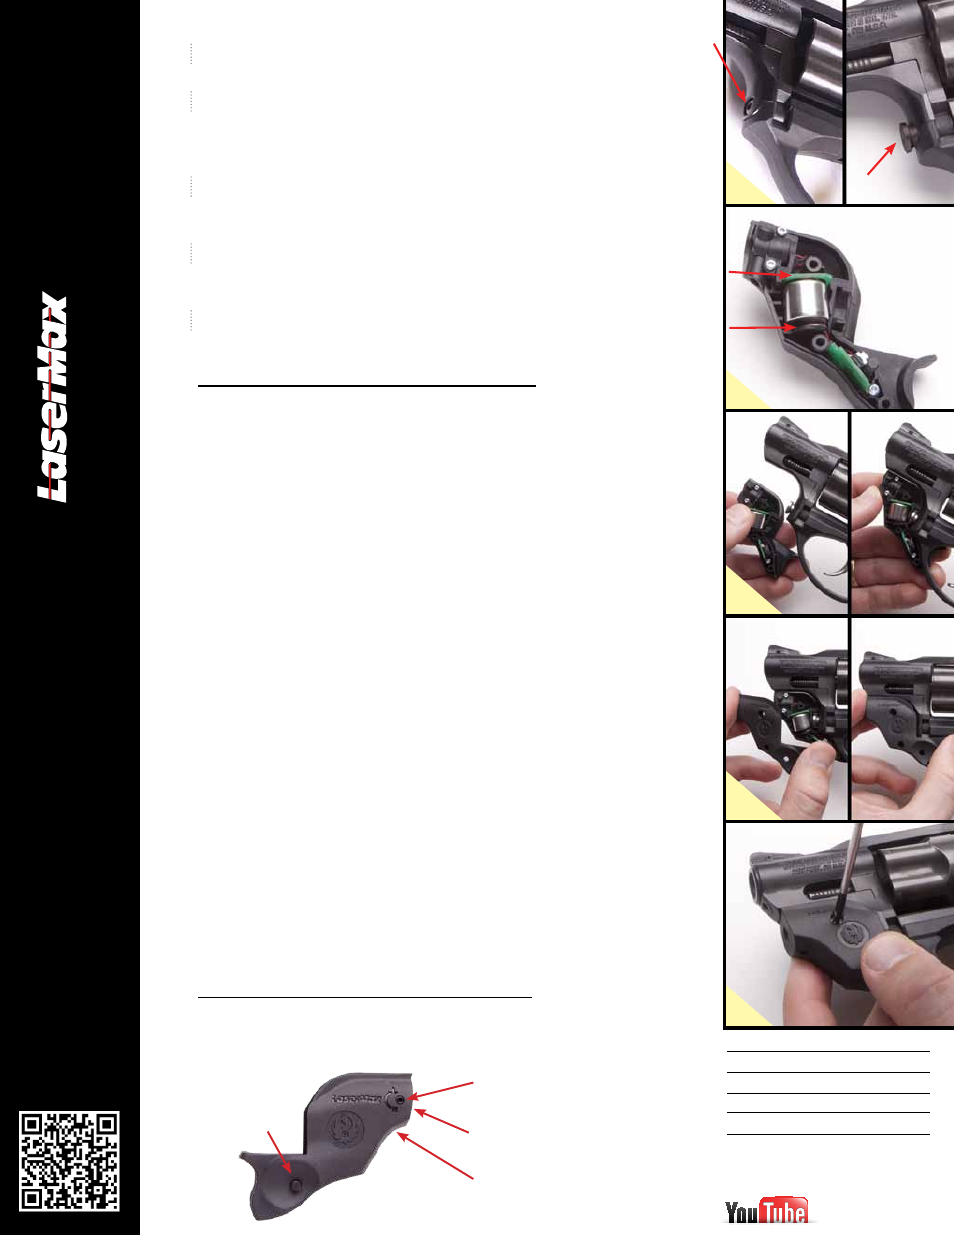
Make sure the firearm is unloaded by opening the cylinder, ensuring all the
chambers are empty. Visually and physically check to ensure it is empty. Check again.
Close the cylinder. While leaving the cylinder in place, use the provided Torx wrench
to take out the factory pivot screw. In its place, install the LaserMax provided pivot
screw, making sure it is firmly seated in the frame per the Ruger LCR instruction
manual (1).
If battery installation is required (2), install with the negative (–) side up, positive
(+) side against the spring. (One 1/3N Lithium included, or Two 357 Silver Oxide
batteries).
Align the channel in the Right Housing with the trigger guard of the firearm. The top
of the laser housing should sit flush to the frame of the firearm (3). Push the trigger
guard into the channel.
Bring left housing together with the right housing, making sure the activation switch
is through the hole in the housing. Squeeze the two halves together with fingers so
there is no gap (4). Insert the three self tapping screws into the laser housing. Hand
tighten the screws with a small Phillips head screwdriver until they are firmly set (5).
1
2
3
4
5
[–]
[+]
Insert trigger
guard into
channel
Make sure
activation switch
is through hole
in housing, then
squeeze together
until no gap,
then insert and
tighten screws
See it installed at
LaserMax.com or find it on
2
4
3
LaserMax Pivot Screw
Factory
Pivot Screw
1
5
Operating Instructions
Activate the laser by pushing in on the activation switch
from either side (center position is OFF).
Activation
Windage
Elevation
Laser Aperture
Figure A
Adjustments, Warning and
Cleaning Procedures
Check Alignment
(Refer to figure A below for location of windage & elevation ports).
To check for proper alignment, turn laser on and check laser position
relative to iron sights at 5–10 yards. The laser dot should be centered
slightly above the top of your iron sights.
Adjust Alignment
If laser needs adjustment, while pointing downrange, turn windage screw
clockwise to move laser left, counterclockwise (CCW) to move laser right.
Turn elevation screw clockwise to move laser up, CCW to move the laser down
into the proper alignment.
A slight shift in alignment may be noticed after firing the first few rounds after
installing the CenterFire
™
. Recheck alignment and readjust if necessary.
WARNING:
Do not turn alignment screws more than ½ turn in either direction from factory
position. This may cause damage to the CenterFire™ and may void your warranty.
Cleaning
Over time and after numerous rounds of ammunition, your laser lens could
become clouded with gun shot residue. In order to remove this residue:
Keep firearm pointed in a safe direction. Be sure to unload your firearm
by opening the cylinder and checking that the chambers are empty. Keep
hands from passing in front of the muzzle. Confirm laser is off.
Take a standard cotton swab and dampen end with isopropyl alcohol.
Apply dampened swab to the laser lens, and rotate in a small circular pattern
removing any residue. Be sure to clean around the edges of the lens.
For best results, it’s recommended that the laser lens is cleaned at
the end of each day you shoot – similar to routine firearm cleaning.
•
•
•
*
Spare Parts List:
LMS–AT50
LMS–2X13N
CF–MS
CF–LCR–PS
CF–LCR–TORX
Adjustment Tool
1/3N Batteries
Mounting Screws
Pivot SCREW
Torx wrench
Patent Pending
01785–0–41 REV A
08/31/12
™
Easy To Use, Easy To Install