Step 1 – FASS T F16 220G User Manual
Page 8
B.
Secure Relay in an upright position, as shown, to prevent moisture
from entering. Di-electric grease may be applied to prevent corrosion.
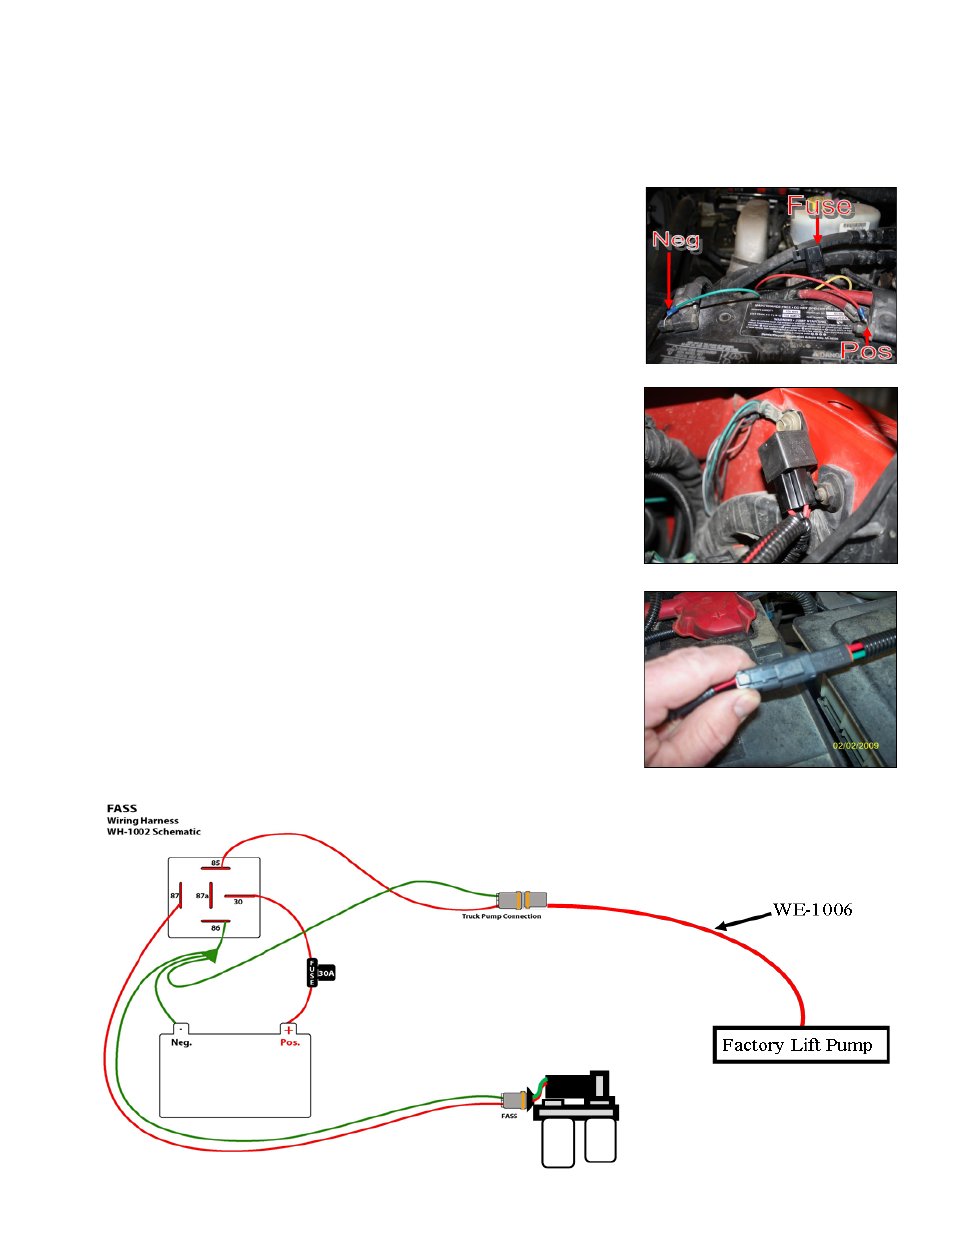
A.
Using ring terminals, attach red wire of the WH-1002 to the positive
battery terminal. Attach green wire to a clean ground, preferably the
negative battery terminal. Secure fuse block in a location protected
from outside elements. The use of a corrosion preventative on electri-
cal connections is recommended.
C.
Connect WE-1006 to the female lead of the WH-1002 coming off
the relay. Route the WH-1002 and WE-1006 along frame rail to the
factory lift pump. Completion of this step will be addressed in the
mounting step.
Step 1:
Install Electrical Harness
The installation of the electrical harness is done first, allowing power to be applied to the pump for
lubrication purposes later in the installation.
- T D07 095G (20 pages)
- T D07 220G (20 pages)
- T D08 095G (19 pages)
- T D08 220G (21 pages)
- T D09 095G (19 pages)
- T D10 125G (20 pages)
- T D02 095G (19 pages)
- T F17 125G (21 pages)
- T F17 200G (21 pages)
- T F17 220G (21 pages)
- T F16 095G (19 pages)
- T F16 260G (20 pages)
- T F14 125G (21 pages)
- T F14 200G (21 pages)
- T F14 220G (21 pages)
- T C11 095G (20 pages)
- T C10 095G (20 pages)
- T C10 220G (21 pages)
- T 095G (23 pages)
- T 220G (23 pages)
- T 260G (23 pages)
- T UIM 150G (23 pages)
- T UIM 220G (23 pages)
- T UIM 260G (23 pages)
- T 080G (23 pages)
- T 125G (23 pages)
- T 200G (23 pages)
- FA D05 095G (16 pages)
- FA D05 220G (16 pages)
- FA D05 260G (16 pages)
- FA D07 095G (16 pages)
- FA D07 220G (16 pages)
- FA D07 260G (16 pages)
- FA D08 095G (16 pages)
- FA D08 220G (18 pages)
- FA D08 260G (18 pages)
- FA D09 095G (15 pages)
- FA D10 125G (18 pages)
- FA D10 220G (19 pages)
- FA D10 240G (19 pages)
- FA D02 095G (15 pages)
- FA F17 125G (19 pages)
- FA F17 200G (19 pages)
- FA F17 220G (19 pages)