Connecting the connect dante unit – ClearOne Connect Dante User Manual
Page 5
CONNECT NETwOrk BridgEs
QuiCk-sTarT guidE
6
7
upDATiNG CONNECT AND BEAmFOrmiNG
miCrOpHONE ArrAy FirmwArE
NOTE: All CONNECT Dante, CONNECT CobraNet, and
Beamforming Microphone Array units in the site must be running
the same level of firmware (4.3.X) to be compatible with the
CONVERGE Pro/SR units in the site.
1. Connect the E-bus cable between the CONVERGE Pro units and
the CONNECT audio network bridge or Beamforming Microphone
Array.
2. Connect the CONVERGE Pro units with CONVERGE Console.
3. Open the Firmware loader screen.
4. Browse for the corresponding firmware file:
connect_dante.mdo for the CONNECT AVB
cobranet.mdo for the CONNECT CobraNet
bf_mic.mdo for the Beamforming microphone Array
5. Download the firmware.
6. The CONNECT audio network bridge will default and reboot after
the download of the firmware. (Check the unit properties screen
for the device to verify the level.)
7. Units are fully upgraded. (All units connected via the E-bus on the
site are simultaneously updated.)
8. Restore the saved site file to the system using CONVERGE
Console.
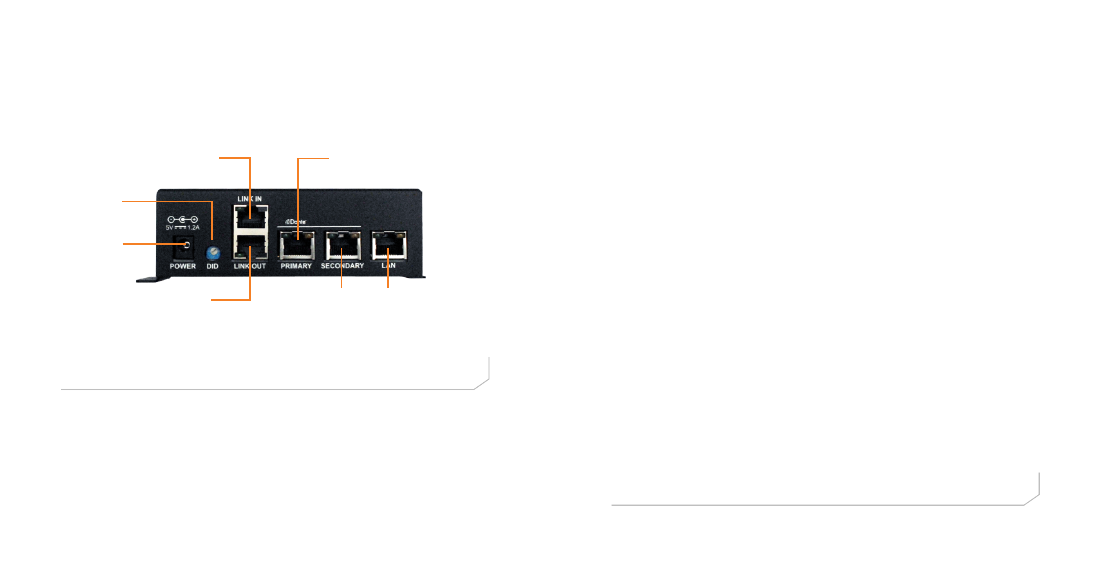
Device ID
Switch
E-bus LINK IN from Stack
E-bus LINK OUT
LAN Passthrough
- Connects to
CONVERGE, PC,
or any device
requiring Ethernet
5V DC
Power
Input
Primary to Dante Network
Secondary to
Dante Network
CONNECTiNG THE CONNECT DANTE uNiT
Connect the CONNECT Dante units to the CONVERGE Pro/SR stack via
the E-bus connections using CAT5/CAT6-24AWG solid conductor RJ45
cables. Power to the CONNECT Dante is supplied by a standard power
adapter supplied with the unit.