Quoizel RBN2823MN Ribbons User Manual
Page 3
Thank you for purchasing a Quoizel product.
Need assistance with parts or assembly? Call Quoizel customer service at 1-631-273-2700
or visit us on-line at www.quoizel.com
3of4
6 CORPORATE PARKWAY
GOOSE CREEK SC 29445
www quoizel com
,
.
.
.
2014 QuoizelInc.
Assembly Instruction Sheet #IS-RBN2823MN
For Style RBN2823MN
June2014
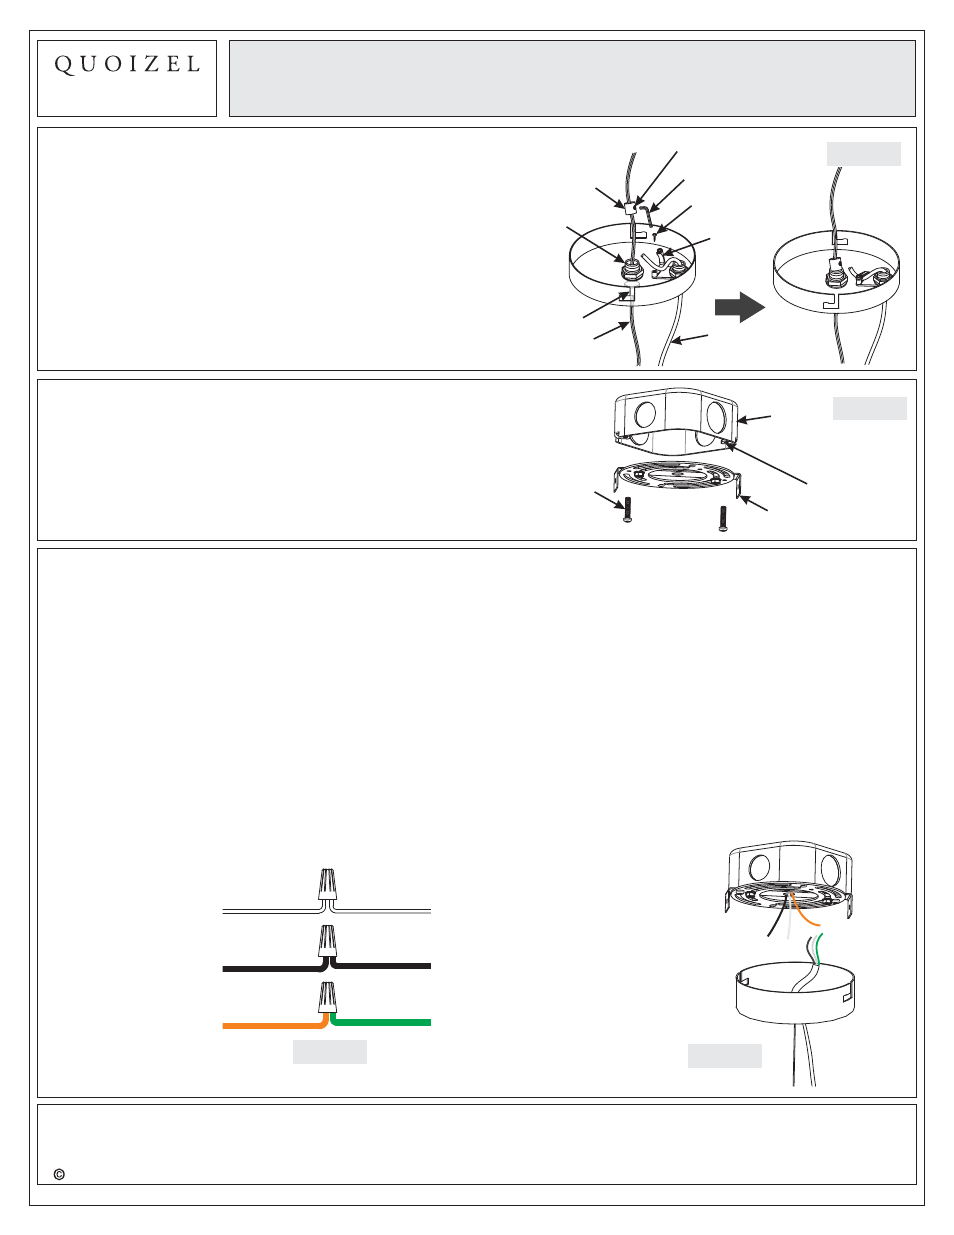
STEP 2
- Attach Crossbar to Outlet Box
A. Attach the Crossbar (A) to Outlet Box and secure by
threading Outlet Box Screws (not supplied) into the
Mounting Holes on the Outlet Box. Tighten until snug.
Crossbar
Outlet
Box
Outlet Box
Screw
Mounting
Hole
Figure 2
Figure 3
Wire Rope
Button
Allen Wrench
Wire
Clasp B
Wire
Clasp A
Screw
Inner Hexagon
Screw
Nipple
Figure 1
Wire
STEP 1
Adjust the Fixture Body
-
A. Push the Button and pull the Wire Rope to adjust the
length of Wire Rope to achieve your desired fixture
height. Then adjust the Wire Clasp A touch the Nipple in
the Canopy, secure by using
I thread the
Inner Hexagon Screw into the Wire Clasp A, tighten
until sung.
B. Remove the Screw to open the Wire Clasp B.
Secure by reinstalling the Screw, Loosen Clasp B prior
to Step A if Necessary.
Allen Wrench ( )
adjust the
length of Wire to achieve your desired fixture height.
STEP 3
Make Wire Connections
-
A. Use standard wire connectors to make all wire connections. (Connectors are not included with fixture.) Strip
and prepare wire ends according to instructions supplied with connectors.
B. If the electrical wire is going to be cut shorter than provided you will need to identify the "L" line wire and the "N"
wire before you cut the excess wire off. One is labeled N and the other labeled L. The third wire has a green
stripe on it. To do this strip back the clear wire covering the 3 fixture wires as far as you need to. This will
expose each fixture wire individually. Separate the "L" wire from the other two and re-label the wire near where
you want to make the cut. Be sure to mark the wire on the side of the fixture and not on the excess wire being cut
and removed. Do the same labeling with the "N" wire.
C. Connect White Supply Wire from the Outlet Box to Wire Labeled "N" from fixture.
D. Connect Black (or Red) Supply Wire from the Outlet Box to Wire Labeled "L” from fixture.
E. Connect Ground Wire from the Outlet Box to Green Striped Wire from fixture.
F. Twist connectors until wires are tightly joined together.
G. Wrap each connection with approved electrical tape and carefully stuff all the connected wires into the Outlet
Box.
Figure 4
White wire from supply
Wire Labeled "N" from fixture
Black wire from supply
(or Red)
Wire Labeled "L" from fixture
Ground wire from supply
Green Striped wire from fixture