Quoizel LP5009IB La Parra User Manual
Page 7
6 CORPORATE PARKWAY
GOOSE CREEK SC 29445
www quoizel com
,
.
.
.
Thank you for purchasing a Quoizel product.
Need assistance with parts or assembly? Call Quoizel customer service at 1-631-273-2700
or visit us on-line at www.quoizel.com
2011 QuoizelInc.
August2011
7of8
Figure 7
Figure 8
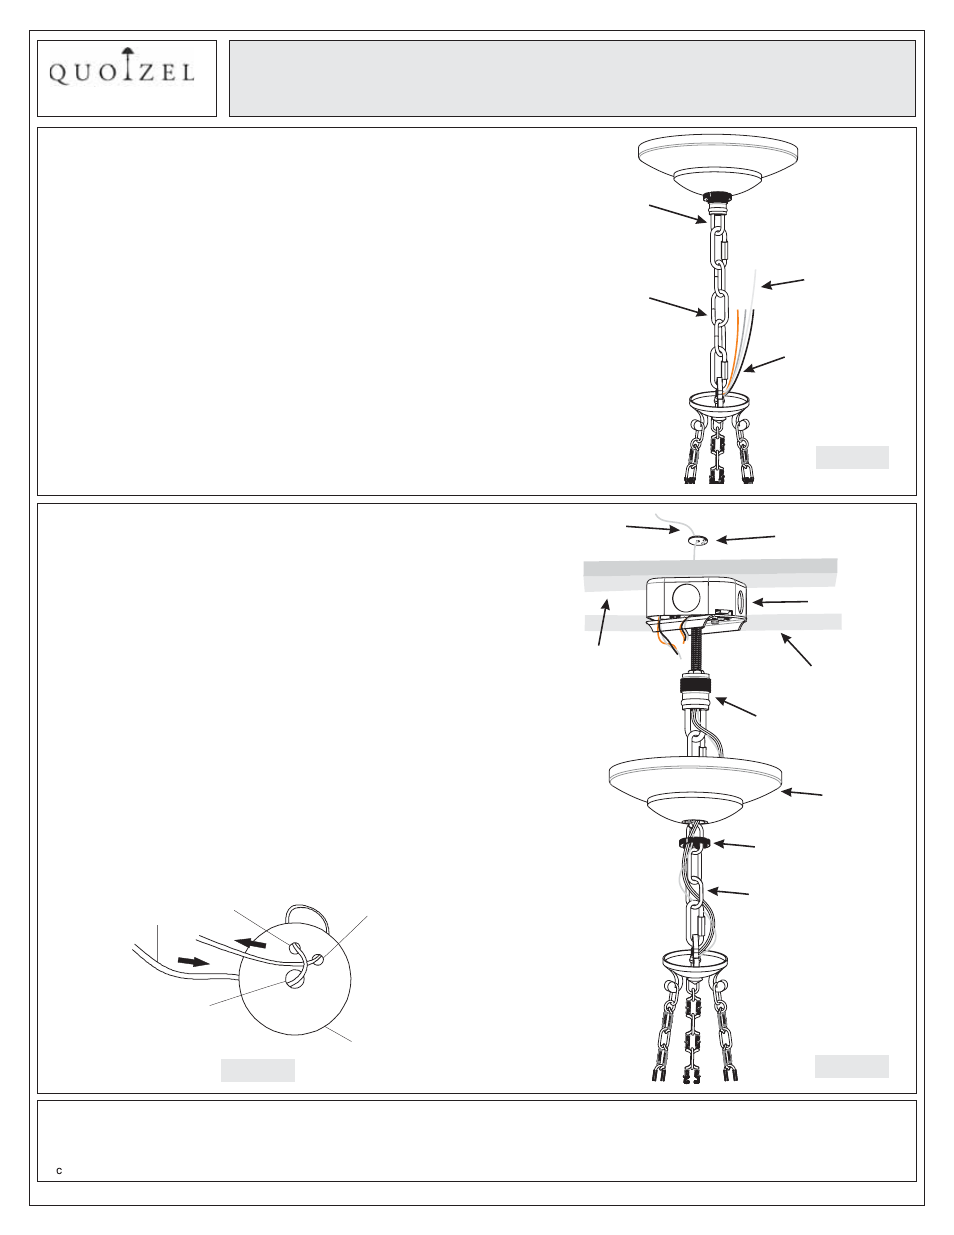
STEP 8
Install
-
Safety Cable
A. Un-thread the Canopy Lock Ring (H) and slide Canopy Lock
Ring (H) and Ceiling Canopy (F) down the Fixture Chain (J).
B. Push all slack Safety Cable through Canopy Chain Loop (G),
Nipple (C) and Outlet Box.
C. Pull all of the Safety Cable up through the Center Hole of the
Tuck Washer (K).
D. Push the Cable down through the 12 O’clock Hole. Leaving
½”of slack.
E. Push the Cable up through the 1 O’clock Hole and tuck it
under the cable between the Center Hole and the 12 O’clock
Hole.
F. Pull all of excess cable through all of the holes until the Tuck
Washer is very close to the Structural or Bridging Member.
Remove as much slack as possible out of the Tuck Washer.
About ½”of slack between Tuck Washer and the hole is
acceptable.
Supply Wire
and Ground
Wire
Fixture Chain
Outlet Box
Canopy Chain Loop
Tuck Washer
Canopy
Chain Loop
STEP 7
Pass Supply Wires through Fixture
Chain
-
A. Pull the Supply Wires, Ground Wire and Safety Cable
up through the Fixture Chain (J) alternating links. Push
the wires and Safety Cable up through the Canopy
Chain Loop (G) into the outlet box.
Ceiling
Canopy
Canopy Lock Ring
Safety Cable
Fixture Chain
Safety
Cable
Structural or
Bridging Member
12
1
Safety
Cable
12 O clock
Hole
'
1 O clock Hole
'
Center Hole
Tuck Washer
Figure 9
Assembly Instruction Sheet #IS-LP5009
For Style LP5009IB
Ceiling Line