Step 4, Step 5, Step 6 – Quoizel KD5003MM Kendra User Manual
Page 3: Installation instructions
3 OF 4
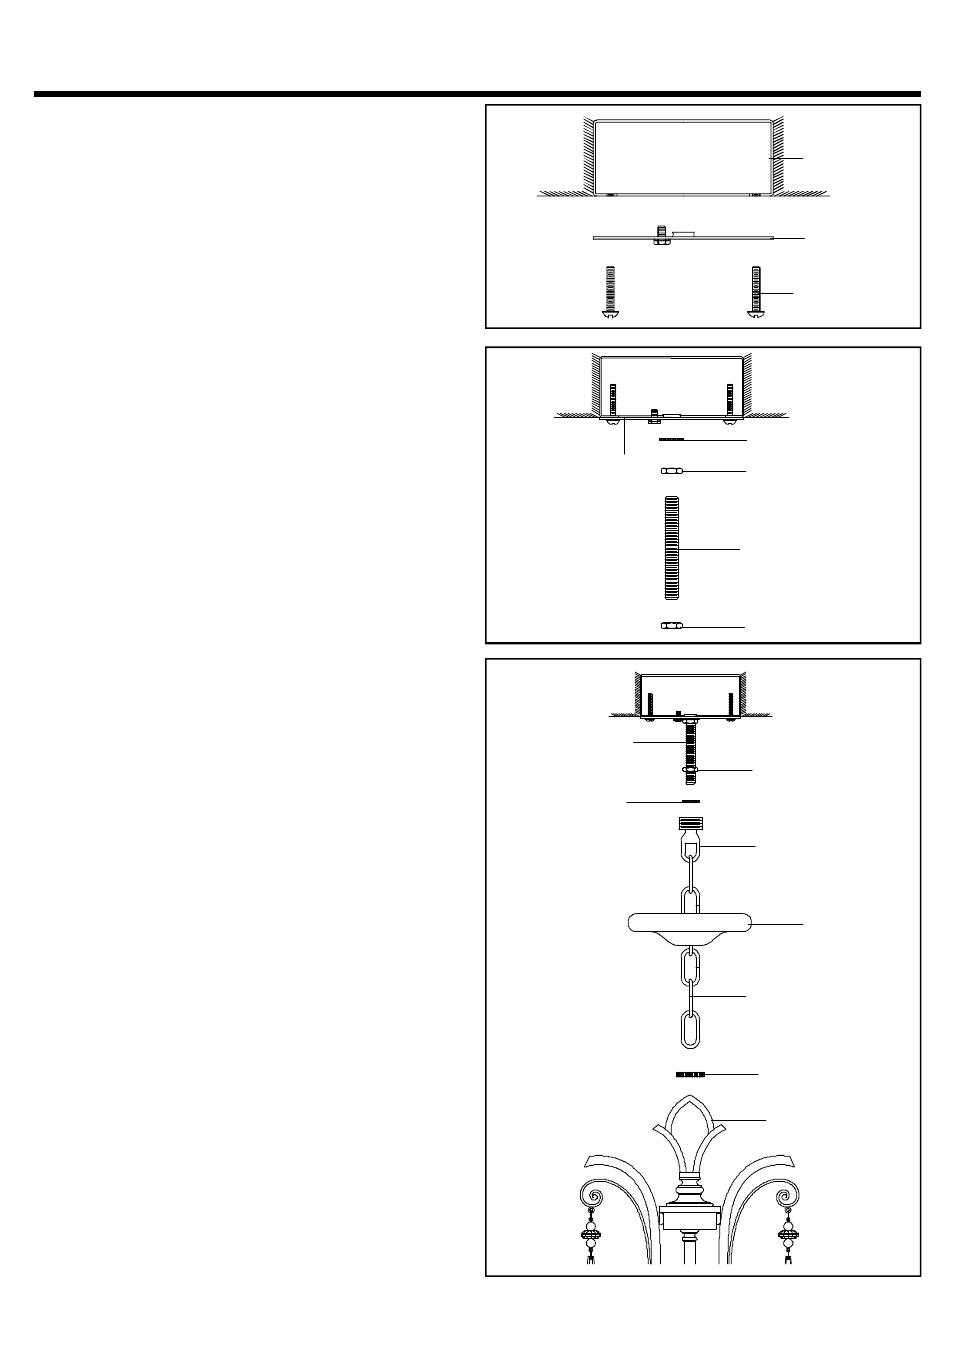
STEP 4:
.
a
Secure the Crossbar onto the Outlet Box with
Outlet Box Screws
Tighten until snug
.
.
STEP 5:
*
.
.
.
.
.
,
.
.
.
Plier is required on this step
Thread one Hex Nut onto top end of the Nipple
Place one Lock Washer over the top end of the
Nipple and then thread the Nipple into the
center lock hole of the Crossbar
Us
plier
thread the Hex Nut against the
rossbar and hand tighten until snug
Thread another Hex Nut onto the bottom end of
the Nipple
.
a
b
c
ing
c
d
Crossbar
Outlet Box
Outlet Box Screw
Crossbar
Lock Washer
Hex Nut
Hex Nut
Nipple
STYLE NUMBER KD5003MM
:
Nipple
Lock Washer
Canopy Chain Loop
Ceiling Canopy
Fixture Chain
Canopy Lock Ring
Hex Nut
Fixture Loop
STEP 6
:
a
Adjust the Fixture Chain to your desired length by
removing the links if needed
P lease note that depends on chain material
thickness
you might be required to use chain
pliers to spread links open
b
Pull the supply wir es through the Fixture Chain
alternating links
And then pull the wires thr ough
the following components in turn
Canopy Lock Ring
Ceiling Canopy
Canopy
Chain Loop, Lock Washer
and Nipple
c Place Lock Washer over the end of the Nipple and
thread the Canopy Chain Loop onto the end of the
Nipple
d
Using plier thread the Hex Nut against the
Canopy Chain Loop and tighten until snug
e
Attach one end of the Fixture Chain onto the
Fixture Loop and attach the another end of the
chain onto the Canopy Chain Loop
f
Refer to S tep 7
Wire Connections to connect
wires
g Push the Ceiling Canopy upward over the Outlet
Box
h Thread the Canopy Lock Ring onto the Canopy
Chain Loop and tighten until snug to secure the
Ceiling Canopy
.
.
*
,
.
.
.
:
,
,
,
.
.
.
.
,
.
.
.
.
-
.
.
.
.
.
INSTALLATION INSTRUCTIONS