Installation instructions, Step 8, Step 10 – Quoizel DW5009C Downtown User Manual
Page 4: Step 9
4 OF 5
INSTALLATION INSTRUCTIONS
STYLE NUMBER
DW5009C
:
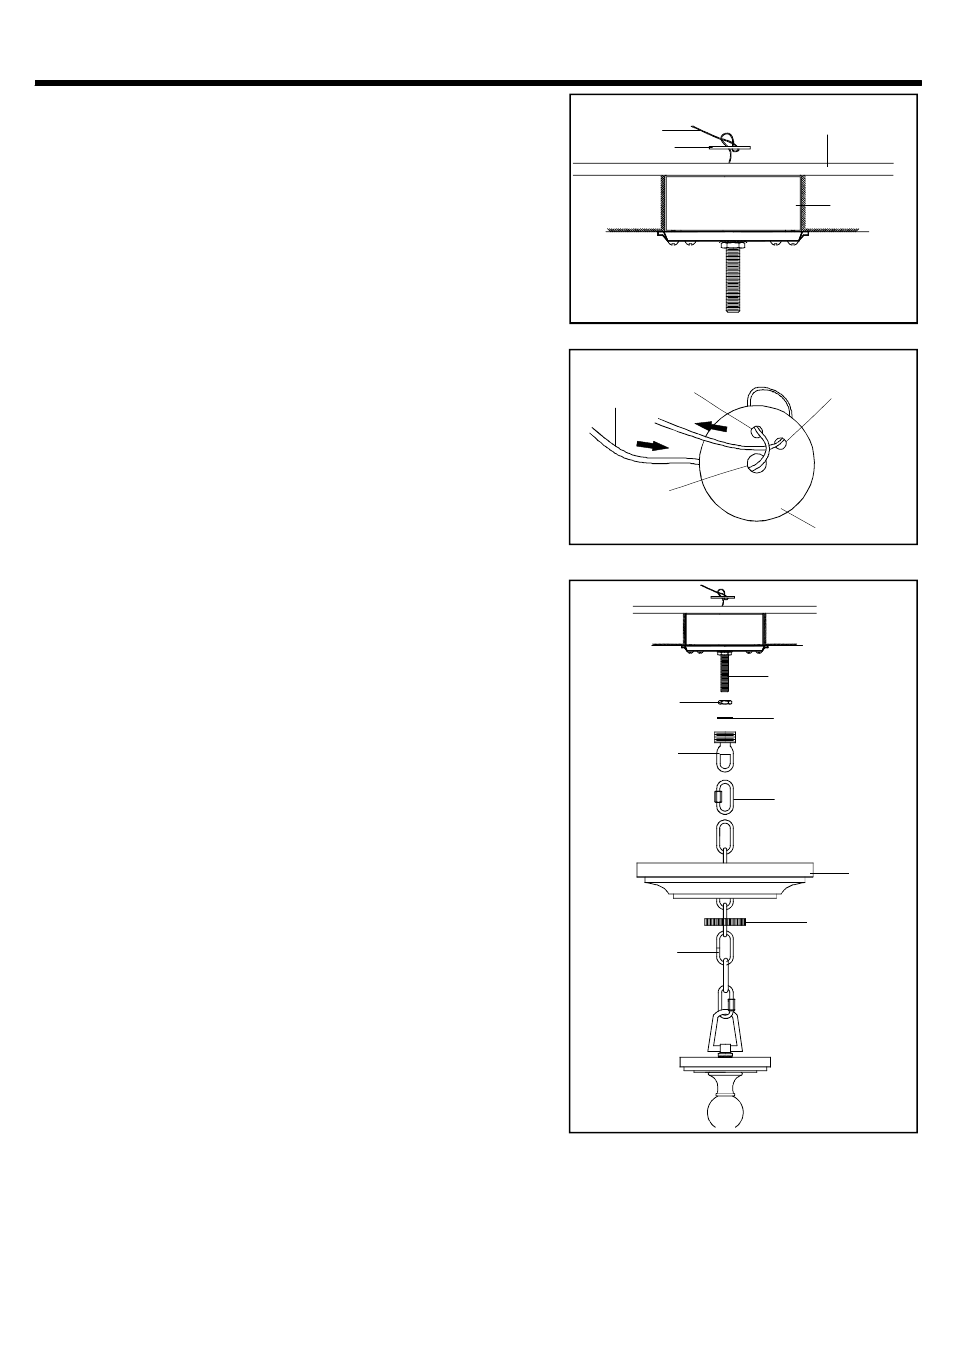
STEP 8:
.
a
Work the Safety Cable end through the Fixture Chain
alternating every other link
Proceed to pass the
Safety Cable end through the Nipple
Crossbar and
Outlet Box
Make up the Tuck Washer Knot
refer to
Step 9
Pull all of excess cable through all of the holes until
the Tuck Washer is very close to the opening at the
end of the 3 8 18 Pipe
Remove as much slack as
possible out of the Tuck Washer
About ½ of slack
between Tuck Washer and the hole is acceptable
,
.
,
.
,
.
/ -
.
.
"
.
Safety Cable
Tuck Washer
Outlet Box
Structureal or
Bridging Member
STEP 10:
a
Thread Hex Nut onto the end of the Nipple and then place
Lock Washer over the end of the Nipple. Thread the
Canopy Chain Loop onto the end of the Nipple
b
Using plier
thread the Hex Nut against the Canopy
Chain Loop and tighten until snug
c
Attach the top end of the Fixture Chain onto Canopy
Chain Loop by using Quick Link
d
Refer to Step 11
Wire Connections to connect wires
e
Push the Ceiling Canopy upward over the Outlet Box
f
Thread the Canopy Lock Ring onto the Canopy Chain
Loop and tighten until snug to secure the Ceiling
Canopy
.
.
.
,
.
.
.
.
-
.
.
.
.
.
Nipple
Hex Nut
Lock Washer
Canopy
Chain Loop
Quick Link
Ceiling
Canopy
Fixture Chain
Canopy
Lock Ring
STEP 9:
a
Pull all of the Safety Cable up through the Center Hole
b
Push the Cable down through the 12 O clock Hole
Leaving ½
of slack
c
Push the Cable up through the 1 O clock Hole and
tuck it under the cable between the Center Hole and
the 12 O clock Hole
.
.
.
'
.
"
.
.
'
'
.
12
1
Safety
Cable
12 O clock
Hole
'
1 O clock Hole
'
Center Hole
Tuck Washer