Teradek T-RAX User Manual
Page 3
2
3
www.teradek.com
www.teradek.com
CONNECT AND POWER
BASIC CONFIGURATION
encoder cards.
4. Connect SD/HD-SDI outputs via BNC cable to your monitor/switcher/router.
Connect to T-RAX
T-RAX can be configured using its built-in web interface. This is accessible over your network,
or via the built-in Wi-Fi.
Ethernet defaults
IP mode: DHCP, T-RAX will request an IP address from your network. View the IP address by
pressing the < and > button on T-RAX until the Network screen is displayed.
Bonjour: Bonjour is enabled by default, and can be used to find T-RAX without using the IP
address. If your web browser supports Bonjour, T-RAX will appear as a Webpage with the
default friendly name T-RAX xxxxx Administrative Console where xxxxx is the last 5 digits of the
controller card’s serial number.
Wi-Fi defaults
ESSID
Teranet-0
Security Mode
WPA2 Personal
Password
terawifi
IP Address
172.16.116.1
Subnet Mask
255.255.255.0
Login information
Once you’ve connected a computer or tablet to the same
network as T-RAX, view the admin panel by opening a web
browser and either selecting the Bonjour friendly name or
navigating to the IP address.
The T-RAX admin page contains status information and configuration options for the T-RAX
system and all of the connected cards.
Stream information
T-RAX encoder cards are configured to stream via RTSP by default. When an active video
signal is connected, you can preview the stream using a computer or mobile device.
Note: video streaming is only supported over the Ethernet interface.
Stream to a Computer:
Use an RTSP player (such as VLC) to open the following URL.
rtsp://ip.address:port/stream1
ip.address: T-RAX’s Ethernet IP address.
port: 255x, where x corresponds to the T-RAX card slot.
Configuration
T-RAX has a number of options available to help it fit into
your existing IT and video workflow requirements. This section
discusses some of the most commonly adjusted parameters,
separated into Network, Streaming, and Encoder sections.
Network
From the web UI, configure the T-RAX Ethernet interface and
other network options by opening Network > Configuration,
and the Wireless interface by opening Network > WiFi.
Username
admin
Password
admin
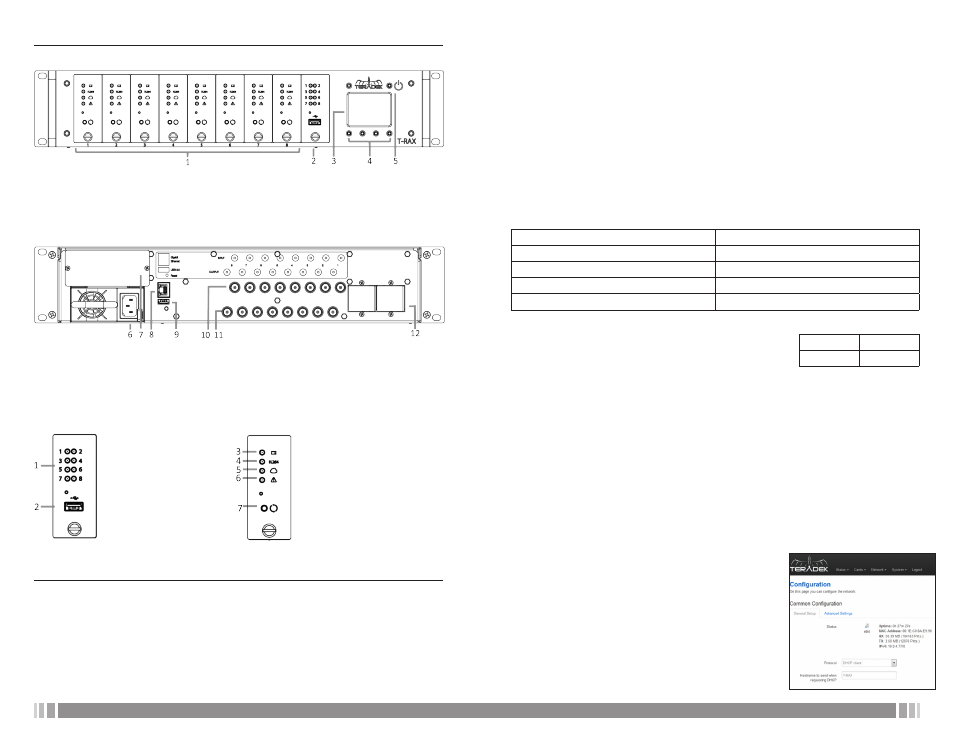
FIRST TIME USE
Installing T-RAX
1. Connect 100-240v A/C power to the power input (6) on T-RAX via the included IEC cable.
Connect a second cable if your device includes a redundant power supply (7).
2. Connect an Ethernet cable between the 10/100/1000 Ethernet port (x) and a network
switch.
3. Connect SD/HD-SDI video sources to any input BNCs corresponding to installed
1. Encoder/Decoder card slots 1-8
2. Controller card
3. Display
4. Display operation buttons
5. Power on/off button
6. 110-240V A/C input
7. Power supply #2 (optional)
8. 10/100/1000 Ethernet (RJ45)
9. USB 2.0 port
10. SD/HD-SDI inputs
11. SD/HD-SDI outputs
12. Expansion plates
1. Card Status LEDs
2. USB 2.0 port
3. Video Status
4. Codec status
5. Broadcast Status
6. Warning
7. Reset button
FRONT
REAR
LED OPERATION