Teradek Bolt User Manual
Device operation
NEED MORE HELP?
1. Support forum: http://support.teradek.com → Contains tips, information and all the latest firmware & software updates.
2. Training videos: http://www.teradek.com/trainin
g
TERADEK SUPPORT STAFF:
support
@teradek.com or call 888−941−2111 ext2 (Mon−Fri 7am to 6pm PST)
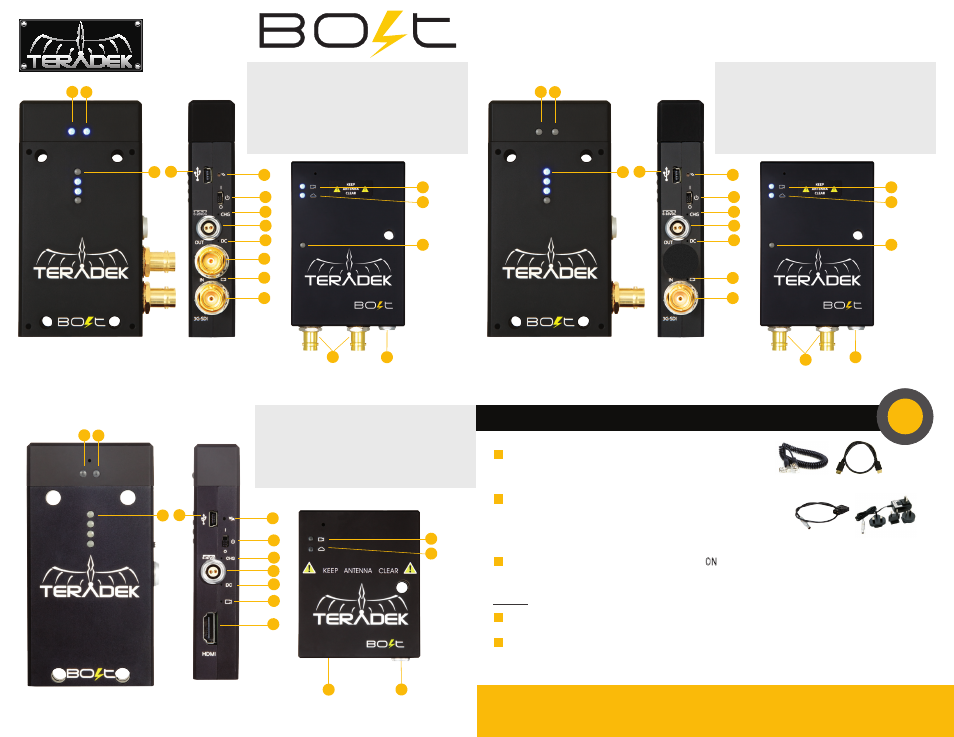
A:
Battery Level
B:
USB Port
C:
Configuration Button
D:
Power Switch
E:
Charge LED
F:
6
-28VDC Input
G:
DC LED
H:
SD/HD/3G
-SDI Output
I:
Video LED
J:
SD/HD/3G
-SDI Input
K:
Video LED
L:
Link LED
M:
Ready LED
A B
C
F
H
J
I
G
E
D
Bolt Pro 3G-SDI Transmitter
Bolt 3G-SDI
Receiver
H
F
L
K
M
L K
A:
Power indicator
B:
USB Port
C:
Configuration Button
D:
Power Switch
E:
Charge LED
F:
6
-28VDC Input
G:
DC LED
H:
Video LED
I:
SD/HD/3G
-SDI Input
J:
Video LED
K:
Link LED
L:
Ready LED
M:
SD/HD/3G
-SDI Output
A B
C
F
H
I
G
E
D
Bolt 3G-SDI Transmitter
Bolt 3G-SDI
Receiver
M
F
K
J
L
K J
A:
Battery Level
B:
USB Port
C:
Configuration Button
D:
Power Switch
E:
Charge LED
F:
6
-28V DC Input
G:
DC LED
H:
Video LED
I:
HDMI Input
J:
Video LED
K:
Link LED
L:
HDMI Output
A B
C
F
H
I
G
E
D
Bolt HDMI Transmitter
Bolt HDMI
Receiver
L
F
K
J
K J
DEVICE OPERATION
Keep the transmitter mounted vertically to ensure optimal signal transmission.
Do not bundle Bolt receivers or transmitters together. For optimal performance, place multiple
transmitters or receivers a few feet away from one another or other wireless devices.
Notes:
1
2
Connect the Bolt Transmitter to your camera’s SDI or HDMI output.
Connect the Bolt Receiver to your monitor’s SDI or HDMI input.
Move the Bolt Transmitter power switch
(D)
to the
ON
position.
Video appears within a few seconds.
Connect power to your Bolt Transmitter using the P
-Tap to Lemo cable
and Bolt Receiver using the included AC adapter. The transmitter
contains an internal battery (in BOLT SDI Pro and HDMI versions)
that lasts for up to 60 minutes.
1
3
2
AC adapter
P
-Tap to Lemo
Cinecoil SDI
HDMI Cable