Repeat playback, Random playback, Programmable cd playback – SONIQ IM311B User Manual
Page 5: Listening to your ipod
1. In CD stop mode, press the
PROG/MEM/ button and “MEMORY” & “- -” will
blink on the display.
2. Press the
or
button to select the desired track then press the
PROG/
MEM/ button to store the track in memory.
3. To add additional tracks, repeat step 2 (up to 20 tracks).
4. To start playback, press the
PLAY/PAUSE button. During programmed
playback, “MEMORY” remains on.
To Check the Program:
• Press the
STOP/BAND button and the
or
button. Each time the
or
button is pressed, the track number
appears on the display.
To Change the Programmed Tracks during Program Playback:
• Press the
STOP/BAND button and press the PROG/MEM/ button repeatedly to search the program number, then
press either the
or button to select the desired track. Press the
PROG/MEM/ button again to register the newly
selected track into program.
To Erase the whole Program, Do One of the Following:
• Press the
STOP/BAND button twice.
• Press the
FUNCTION button to change to radio/iPod/AUX IN mode.
• Press the
STANDBY/ON button to turn off the unit.
• To open the CD door.
-
7 -
-
8 -
rePeat Playback
Repeat Current Track
• Press the
/MEM. UP button on the remote control until “
” blinks on the display. The current track will be played
repeatedly.
Repeat the Entire CD
• Press the
/MEM. UP button on the remote control until “
” stops blinking and remains on. All tracks will be played
repeatedly.
Cancel Playback Mode
• Press the
/MEM. UP button on the remote control until “
” disappears.
ranDom Playback
All tracks on the disc can be played in random order (Using the remote control only).
Random Playback
• Press the
RANDOM button on the remote control until “RANDOM” appears on the display. All tracks will be played
randomly.
After all tracks have played, the unit will stop automatically.
Cancel Random Playback
• Press the
RANDOM button on the remote control until “RANDOM” disappears. The unit will return to normal playback.
A program of up to 20 tracks can be set to play in a preset order.
Programmable cD Playback
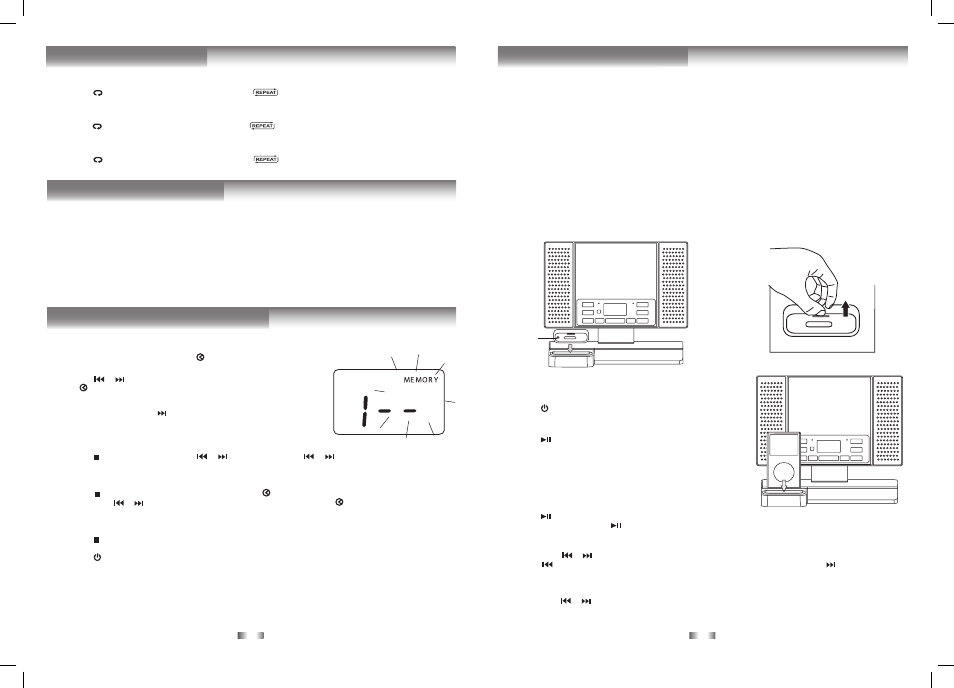
Removing the iPod Dock Adapter
1. Remove the iPod Dock Adapter as shown in the
figure to the right.
2. Replace it with another one you need.
iPod Dock
Adapter
(not
included)
Compatible iPod Types
• iPod nano (1st generation) 1GB, 2GB, 4GB
• iPod nano (2nd generation) 2GB, 4GB, 8GB
• iPod nano 3rd generation (video) 4GB, 8GB
• iPod nano 4th generation (video) 8GB, 16GB
• iPod 5th generation (video) 30GB, 60GB, 80GB
• iPod classic 80GB, 120GB, 160GB
• iPod touch 1st generation 8GB, 16GB, 32GB
• iPod touch 2nd generation 8GB, 16GB, 32GB
Installing the iPod Dock Adapter
1. Choose the iPod Dock Adapter that fits your iPod (The adapter
is not included in the accessory, please use it that comes with
your iPod).
2. Insert your iPod Dock Adapter into the dock until it sits firmly in
place.
Inserting Your iPod
1. Ensure the appropriate iPod Docking Adapter is installed.
2. Insert your iPod into the connector in the dock.
3. Press the
STANDBY/ON button to turn on the unit.
4. Press the
FUNCTION button repeatedly until the indicator “iPod”
appears on the display.
5. Press the
PLAY/PAUSE button to start playing.
Notes:
• The iPod will charge automatically (until fully charged) once it is
docked in the cradle.
• To prevent interference to the MW signal, please switch off the
iPod while the radio is playing.
Pausing Playback
• Press the
PLAY/PAUSE button.
• To resume playback, press the
PLAY/PAUSE button again.
Skipping to a Another Track
• Press either the
or button according to the desired direction.
• Press the
button to skip to the beginning of the current track or previous track. Press the
button to skip to the
beginning of the next track.
Locating a Particular Point on a Track
• Keep either the
or
button pressed during playback, according to the desired direction, and release at the desired
point.
Note: Please refer to the owner’s manual that was included with your iPod for more details.
liStening to your iPod