Power sources, Volume adjustment clock setting, Listening to the radio cd playback – SONIQ IM311B User Manual
Page 4
-
5 -
-6 -
CAUTIONS:
• Before use, ensure the rated voltage of the adapter matches your local voltage.
• The included AC adapter is for use with this unit only. Do not use it with other equipment.
• If you are not going to use the unit for a long time, disconnect the AC adapter from the wall outlet completely.
• Whenever the AC adapter is plugged into a wall outlet, electricity is running through the unit, even when the power switch
is turned off.
FM ANTENNA
• Do not connect the FM antenna to an outside antenna.
Power SourceS
To Adjust the Volume
Use the
VOL + / - buttons to adjust the VOLUME levels.
For Personal Listening
Connect headphones(Ø3.5mm stereo mini plug) to the PHONES jack. Adjust the VOLUME levels to obtain the desired
volume.
When headphones are connected, the speakers are automatically disconnected.
CAUTION:
Excessive sound pressure from earphones and headphones can cause hearing loss
.
volume aDJuStment
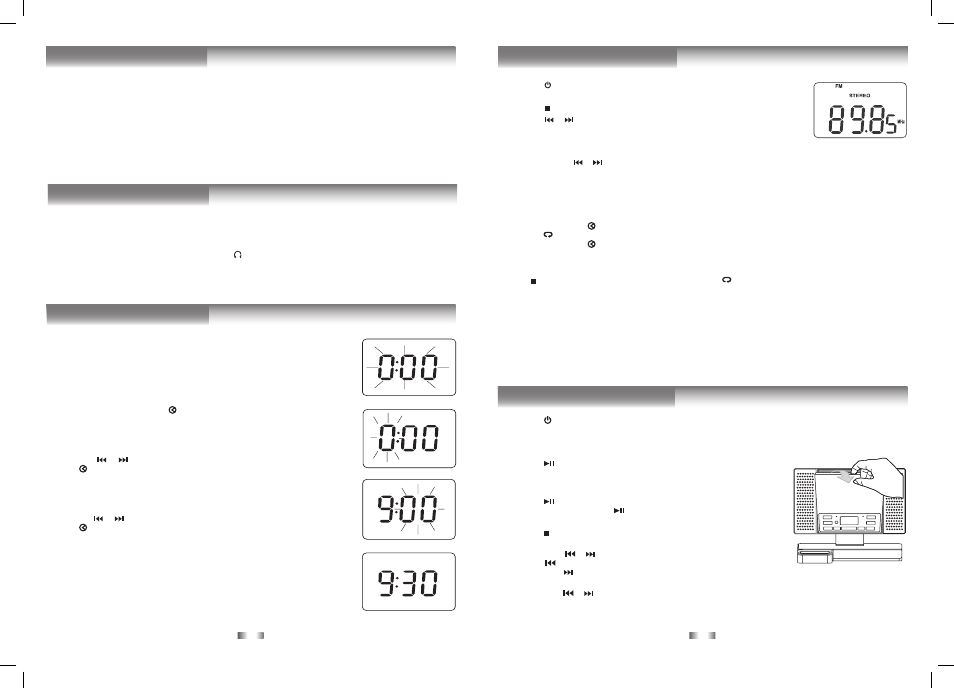
clock Setting
1. Press and hold the
PROG/MEM/ button until the hour digits blink.
2. Press the
or
button to adjust the desired hours then press the
PROG/
MEM/ button once to confirm. The minute digits will blink.
3. Press the
or button to adjust the desired minutes then press the PROG/
MEM/ button once to start clock.
Notes:
• If the AC power is interrupted, the clock will restore to “0:00”, and you need to reset
it.
• In CD/RADIO/ iPod/ AUX IN mode, press the
DISPLAY button once to display the
current time.
Setting the clock can only be done in STANDBY mode.
• If the unit is plugged in with the supplied AC adapter and the unit is in standby
mode, the standby indicator illuminates.
1. Press the
STANDBY/ON button to turn the unit on.
2. Press the
FUNCTION button to radio mode.
3. Press the
STOP/BAND button to select a band (MW/FM).
4. Press the
or button to tune in to a station.
• Adjust the VOLUME levels to obtain the desired volume.
Searching for a Station Automatically
• Press and hold the
or button until the tuner starts searching for a station, then release. After tuning in a station, the
search stops.
• The search may not stop at a station with a very weak signal.
Presetting Stations
The unit can store a total of 20 stations in memory (10FM, 10MW). Presetting allows you to tune in to a station directly.
1. Tune in to a desired station.
2. Press the
PROG/MEM/ button. The preset number and “MEMORY” will blink.
3. Press the
/
MEM.UP button to select the preset number.
4. Press the
PROG/MEM/ button again to store it in memory.
5. Repeat steps 1-4 to store other stations.
Tuning in to a Preset Station
Press the
STOP/BAND button to select MW or FM then press the
/
MEM.UP button to select a preset number.
For Better Reception
FM: Fully unwind the antenna wire. Extend the antenna wire and place it in the position that sounds best.
Note: Do not connect the FM antenna to an outside antenna.
When the reception is good, the “
(
(
STEREO
)
)” indicator will appear on the display.
MW: Reposition the unit to get better MW reception.
Note:
To prevent interference to the MW signal, please keep the AC adapter 1 meter (3.17 feet) away from the main unit.
(
)
(
)
liStening to tHe raDio
cD Playback
1. Press the
STANDBY/ON button to turn on the unit.
2. Hold the notch to open the CD door as the right figure shown. Place a disc in the centre with the label side facing front
and then close the CD door gently.
3. Press the
FUNCTION button to CD mode. “- -” blinks on the display, then the total track no. is shown on the display.
4. Press the
PLAY/PAUSE button to start playing.
•
Adjust the VOLUME levels to obtain the desired volume.
To Pause Playback
• Press the
PLAY/PAUSE button.
• To resume playback, press the
PLAY/PAUSE button again.
To Stop Playback
• Press the
STOP/BAND button.
Skipping to Another Track
• Press either the
or button according to the desired direction.
• Press the
button to skip to the beginning of the current track or previous
track. Press the button to skip to the beginning of the next track.
Locating a Particular Point on a Track
• Keep either the
or button pressed during playback, according to the desired direction, and release at the desired
point.