HK Audio LUCAS NANO 600 User Manual
Page 6
Lucas Nano 600 1.0
6
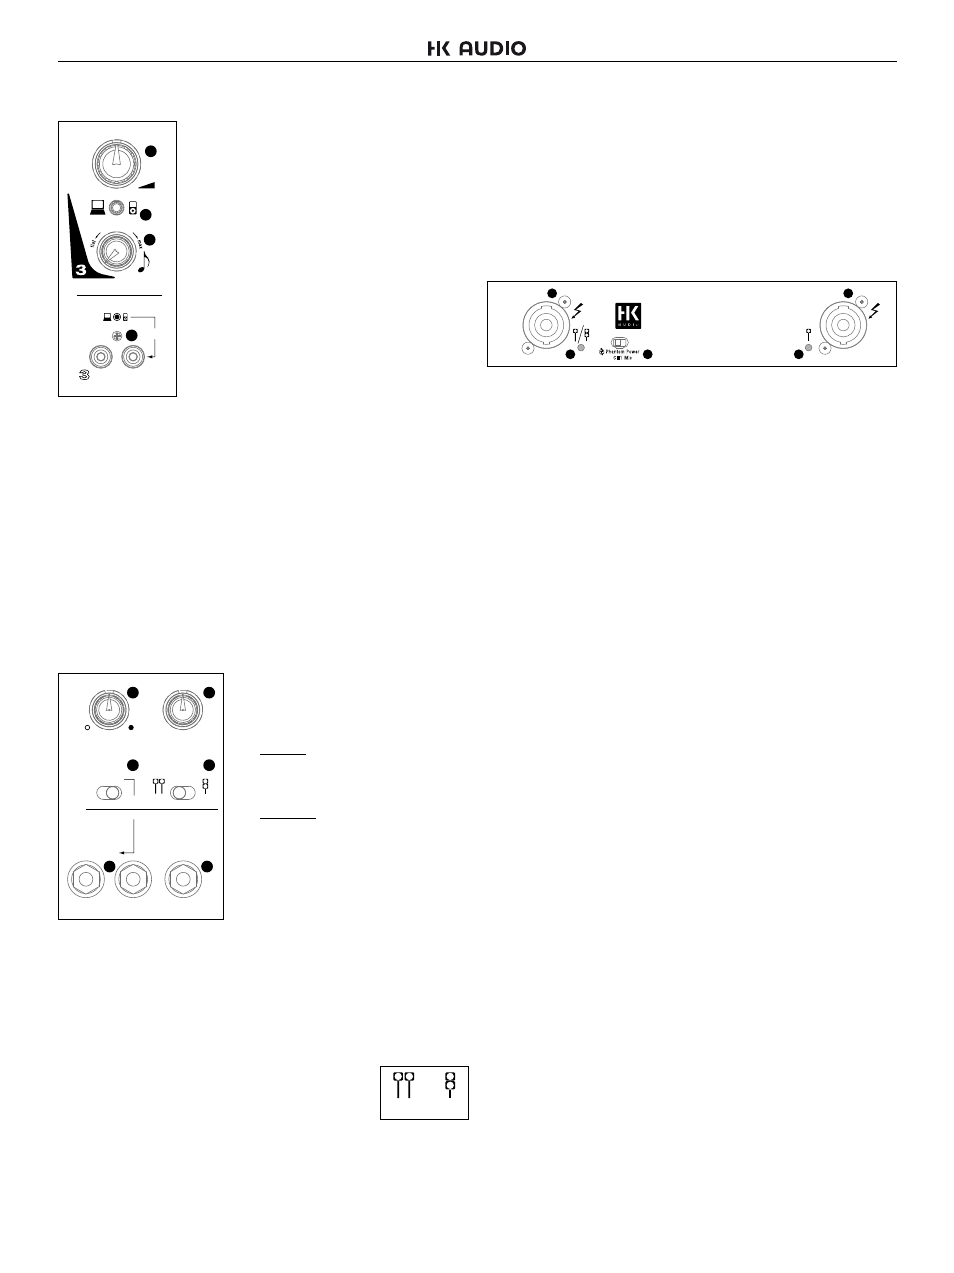
2.4 Input Section 3
11 Volume
See Input Section 1 for a description.
12 Mini-Jack Input (3.5 mm)
Use this stereo input to connect MP3 players or
the headphones output of a laptop.
Heads up: Plugging a connector into this input
mutes the Stereo RCA Input (14).
13 Contour
This rotary knob adjusts the audio signal’s tone. It
also rolls off midrange frequencies when it boosts
high and low frequencies.
• Far left position = no change in tone
• Far right position = maximum effect
14 Stereo RCA Input
Use this RCA jack (also called a phono or cinch jack) to connect audio
sources such as CD/ DVD players, keyboards, DJ mixing consoles and
computers that provide unbalanced, high-gain signals. Note that L/R
means stage left and stage right from the perspective of a performer
looking out towards the audience.
2.5 Output Section
15 Sub
This rotary knob adjusts the subwoofer’s volume level from -∞ to +6 dB.
16 Balance
This rotary knob adjusts the relative levels of the left and right channels.
17 Mode A/B
This switch configures the output signal
sent to Out L/R (19):
• A: Rec Out: This mode sends the
composite signal of channels 1 to 3
and Link In (20) to a connected audio
recorder.
• B: Ch 2 Thru: This mode sends the
signal routed into Input 2 (10) through
to this output for monitoring. See the
example in the appendix called Personal
Monitoring.
18 Out L/R
This is an electrically balanced 1/4" (6.3 mm) output jack. Depending
on the Mode A/B switch setting, it sends out a composite of all input
signals (including Link In) or just the signal patched into Input 2.
19 Setup
Use this switch to configure LUCAS NANO 600 for single or twin
operation. LUCAS NANO 600 is muted for about five seconds after you
press the Setup switch to prevent switching noise.
The status LED turns red during this time and changes
back to green when the system is ready for operation.
20 Link In/Out
This 1/4" (6.3 mm) stereo jack serves to connect this LUCAS NANO 600
to another LUCAS NANO 600 or NANO 300. Please be sure to use a
cord equipped with stereo 1/4" (6.3 mm) jack plugs to do this. No other
cables will do.
You can use both mixing consoles simultaneously when operating two
LUCAS NANO 600s as a double stereo set as shown in the DJ and
Band + Recording examples on page 62 of the appendix. This increases
the overall system’s input channel count to six (10 inputs), the signals of
which are rendered in stereo.
A great way to cover two rooms is to combine a LUCAS NANO 600
and a LUCAS NANO 300 system in Link mode (see page 63 of the
appendix).
2.6 Speaker Out Section
Speaker Out
to Satellite
On
Off
Speaker Out
to Satellite
L
R
6 O O
n a n o
L u c a s
Phantom Power
CH 1 Mic
21
22
23
22
21
21 Speaker Out to Satellite L / R
Connect the Speaker outputs – they’re compatible with Speakon
connectors – to the left and right LUCAS NANO 600 satellites using
speaker cables equipped with Speakon NL2-compatible connectors
(+1/-1). Do not connect any other devices. If you do, that device and
LUCAS NANO 600 may be irreparably damaged. Note: Be sure to rotate
speaker connectors clockwise until they lock in place!
22 Speaker Status Indicators
This dual-color LED tells you what’s going on with the Speaker Outs of
LUCAS NANO 600 (green = speaker output is active, red = inactive).
Enable and disable outputs using the Setup switch in the output section.
Note: LUCAS NANO 600’s outputs are muted during a system check
(see Status LED). The Speaker Status LEDs light up red during this
time (about 5 seconds).
23 Phantom Power Ch 1 Mic
This switch activates phantom power for a mic that you have connected
to Channel 1. Please check if your microphone requires this power
before you engage the switch. LUCAS NANO 600 is muted for about five
seconds after you press the Phantom Power switch to prevent switching
noise. The status LED lights up red during this time and changes back
to green when the system is ready for operation.
2.7 Connector Panel
Auto Sleep (Auto Stand-by)
LUCAS NANO 600 also features an Auto Sleep function. Its on/off
switch is in the satellite transport bay. The system comes with the
switch set to the On position (Auto Sleep function enabled). If LUCAS
NANO 600 does not get an input signal for no less than 120 minutes,
the power amp will go into hibernation. To power the system up again,
engage the Power On/Off switch or disconnect and reconnect mains
power. Set Auto Sleep (Auto Stand-by) to the Off position if you wish
to disable this function and ensure LUCAS NANO 600 remains up and
running.
Mains Socket
Use the factory-included mains cord to connect this socket to a wall
outlet.
Caution! Make sure the local mains voltage matches the voltage
specified on LUCAS NANO 600. Connecting it to the wrong mains
voltage may destroy its electronic components.
Out
Link In/Out
Sub
Mode
Setup
Balance
Bal.
Connect a 2nd
LUCAS NANO
L
R
Stereo
L
R
A
B
A: Rec Out
B: CH 2 Thru
15
16
17
19
18
20
L
R
Mute
3
11
12
13
14
Single
Twin