Heatseal sprint h925 - operation, Heatseal sprint h925 - load film, Step 1 – GBC H925 User Manual
Page 4: Step 5, Step 2, Step 4, Step 3, Step 6, Step 7
6
7
STEP 1
Adjust side
guides and place
document(s) in
feeder.
Side
Guides
STEP 5
Laminated
document(s) will
stack in exit tray.
Lamination will
stop when job is
complete*.
Start
Stop
3 mil / 75 mic
5 mil / 125 mic
STEP 2
Press start and
lamination will
begin after warm
up. (See page 13
for additional
information).
Start
Stop
3 mil / 75 mic
5 mil / 125 mic
STEP 4
Machine ready,
lamination in
process.
(Power LED)
Start
Stop
3 mil / 75 mic
5 mil / 125 mic
STEP 3
Ready LED
will flash during
process warmup.
At the beginning
of each job, first
output will be film
only as film aligns to
edge of document.
(Ready LED)
For optimal laminator performance, see “Tips” page 15.
HeatSeal Sprint H925 - Operation
TM
®
*First output will be film only as film aligns to leading edge of document.
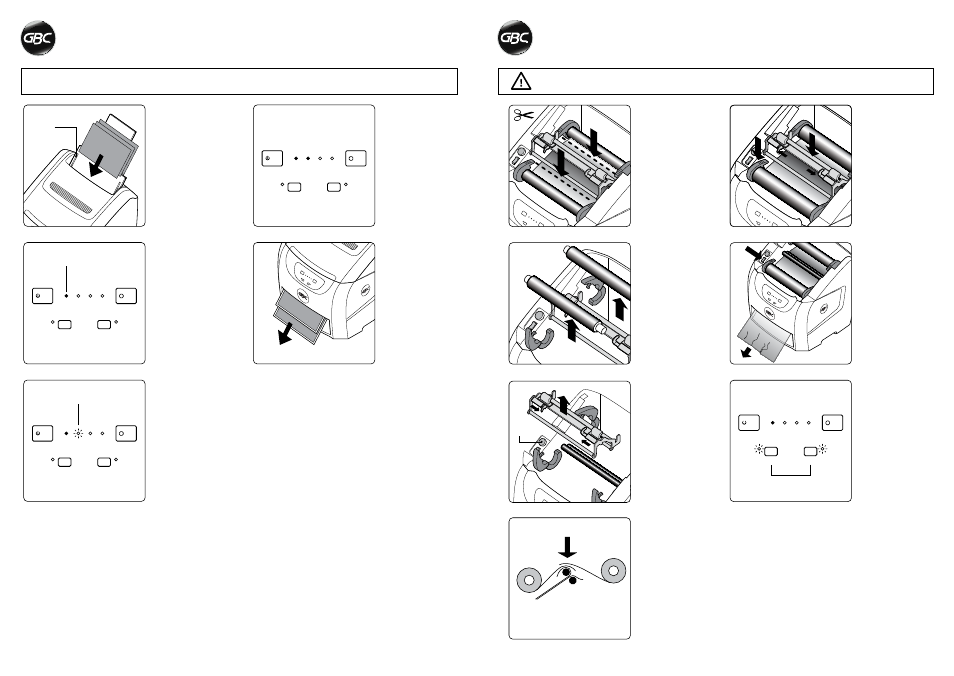
If possible, always load film before running completely out.
STEP 1
Cut laminating
film as indicated
in diagram at left.
If film is not
present see next
page.
STEP 4
Insert new film,
overlap film on
heat shoe.
Note: Match colors
of film core ends to
EZload levers.
STEP 5
Insert and lock
idler bar assembly,
then close 4
EZload levers.
STEP 6
Press feed switch
(forward) and
hold until
wrinkle-free
lamination.
Close top.
STEP 2
Open all 4 EZload
levers and
remove film.
STEP 3
Remove idler bar
assembly, then
press “Heat”
button. Ready
LED will flash
during warmup.
Heat
Button
Start
Stop
3 mil / 75 mic
5 mil / 125 mic
STEP 7
Select film
thickness.
(Film Select)
HeatSeal Sprint H925 - Load Film
TM
®