CAA RONI User Manual
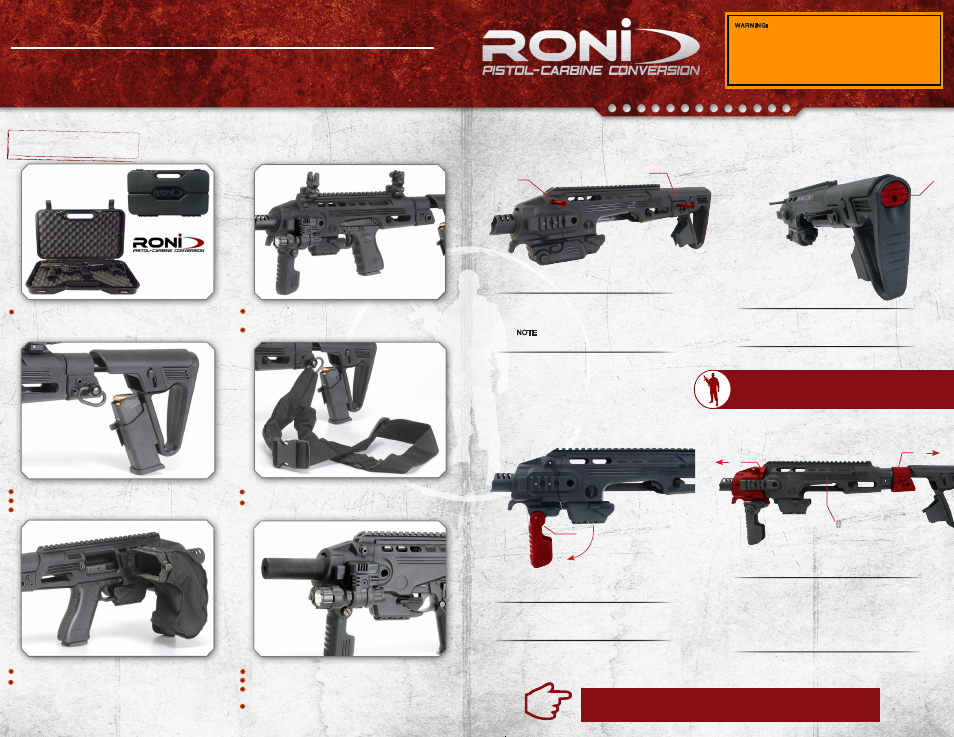
New product, Roni pistol carbine assembly instructions, Roni features & accessories
MAKE SURE THE PISTOL IS UNLOADED AND THE CHAMBER IS EMPTY BEFORE INSTALLING.
PRACTICE SAFE FIREARM HANDLING PROCEDURES AT ALL TIMES.
YOU MUST READ AND FOLLOW THE MANUAL. FOR MORE INFORMATION VISIT OUR WEBSITE.
2
1
Remove the 2 locking pins
(#1)
&
(#2)
by first pushing
them from the right side of the RONI. You will then be
able to pull the locking pins from the left side of the
RONI. NOTE: The locking pins have detents to prevent
them from being pulled out completely.
Step 1.
Lay the RONI down on its right side. The muzzle should
be pointed to the left. Pull the front barrel housing end
cap
(#6)
to the left by grasping onto the finger guard and
forward grip. Pull the rear housing end cap
(#7)
to the
right. This will fully expose both ends of the hinged pistol
housing.
(#8)
Step 4.
Grasp stock, press the stock extension button
(#14)
on
rear of stock and pull back on carbine stock to extend
stock to its longest position.
Step 2.
RONI Pistol Carbine Assembly Instructions
WARNING: The addition of the RONI stock set to a pistol results in the
manufacture of a short barreled rifle (SBR) which the classification of a
firearms subject to NFA controls (Section 5845(a)(3). The manufacture of
SBR’s is generally lawful when preformed after the receipt of a properly
submitted ATF Form 1(Application to make and register a firearm) and
submission of a $200.00 making tax payment. . BATF Classification
Letter - May 6, 2010
14
7
6
8
5 position buttstock adjusts for length of pull
Cheek rest adjusts for height
Spare magazine holder
OPS / OPS1 - One Point Slings
PBSS - Push Button Sling Swivel
Features two aluminum Picatinny rails for additional light/laser
mount.
RBCG1 (GLOCK) / RBCF (Other Models) - Optional Brass Catcher
Accepts suppressors - up to 1.39” diameter
PLS1 / PLS34 - 1” or 3/4” Low profile offset polymer light mounts
PLS1Q / PLS34Q - 1” or 3/4” Quick detach low profile offset
polymer light mounts
AL1 / AL34 / AL134 - 1” or 3/4” or 1 + 3/4” Offset aluminum light
mounts
New Product
FFS / FRS - Front & Rear Flip Up Sights. No tools necessary to
adjust front sight
Features Detachable folding forearm grip
RONI FEATURES & ACCESSORIES
1-866-611-9576 / WWW.COMMANDARMS.COM
215-949-9944 / WWW.EMATACTICAL.COM
RONI CASE - A lockable place to store your RONI with
accessories. Case Dimensions - 12” x 21.5” x 4”
Step 3.
4
5
Open the foregrip
(#4)
to a vertical position by pushing
the release button on the side
(#5)
and pull the grip
down into a vertical position.
WARNING:
State and local laws supersede
NFA controls. Title 27 CFR Chapter ll Section 479.52.