Page 8, Page 13 – Blizzard Lighting RokPix (Rev A) User Manual
Page 8
Page 8
R
okPix Manual R
ev
. A
© 2013 Blizzard Lighting, LL
C
Cable Connectors Cables must ha
ve
a male XLR connector on one end and a female XLR
connector on the other end. (Duh!)
CAUTION:
Do not allow contact between the common and the
fi x-
ture’
s chassis ground. Grounding the common can cause a ground
loop
, and y
our
fi
xture ma
y perform err
atically
. T
est cables with an
ohm meter to v
erify correct polarity and to mak
e sure the pins are not
grounded or shorted to the shield or each other
.
3-Pin??? 5-Pin??? Huh?!?
If y
ou use a controller with a 5 pin DMX output connector
, y
ou will need to use a 5 pin to 3 pin adapter
.
They are widely a
vailable o
ver the internet and from specialty retailers If y
ou’d lik
e to build y
our own, the
chart below details a proper cable con
version:
Conductor
3-Pin Female (Output)
5-Pin Male (Input)
Ground/Shield
Pin 1
Pin 1
DMX Data (-)
Pin 2
Pin 2
DMX Data (+)
Pin 3
Pin 3
Not Used.
No Connection.
No Connection.
Not Used.
No Connection.
No Connection.
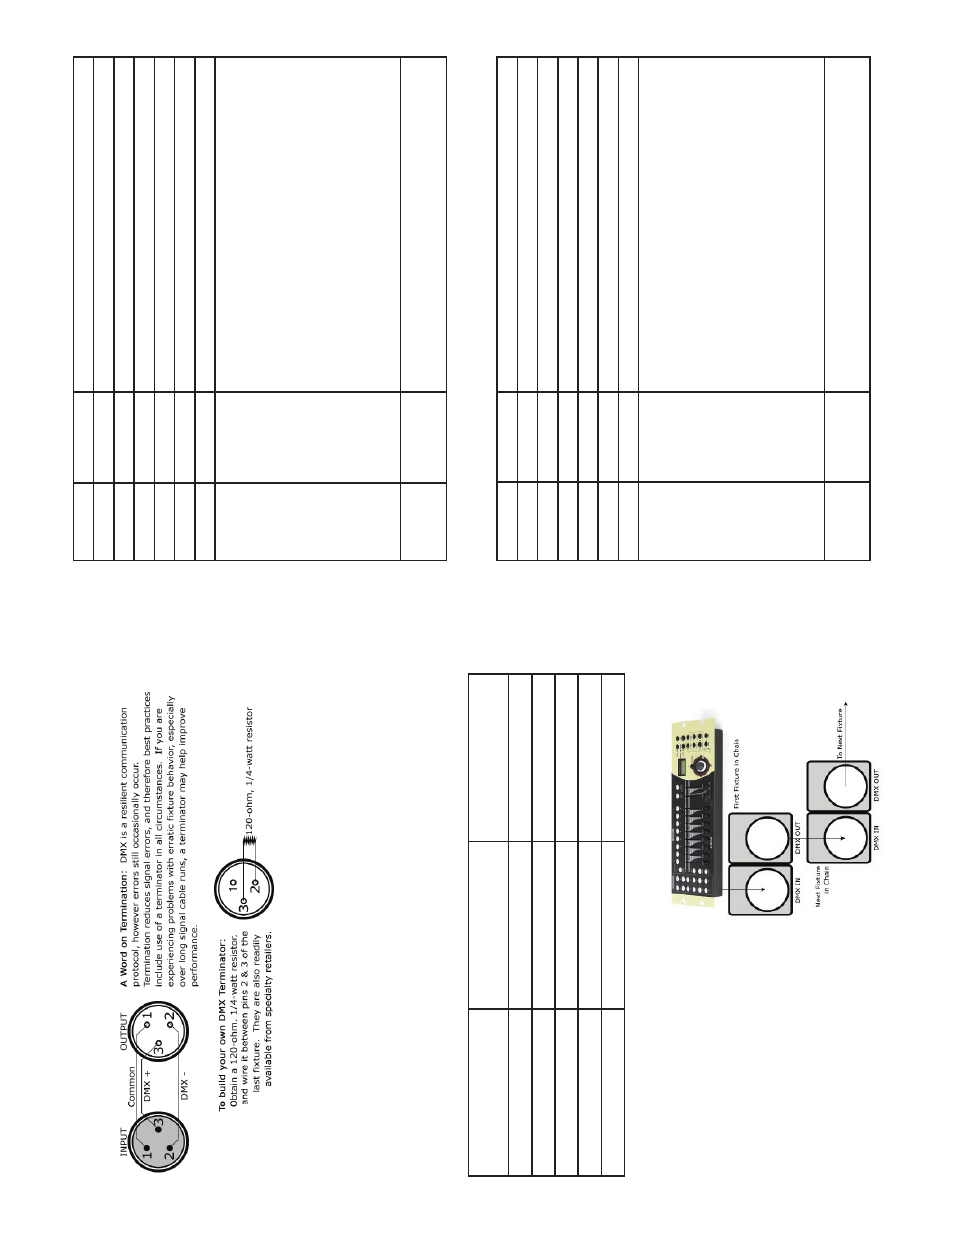
Take It To The Next Level: Setting Up DMX Control
Step 1:
Connect the male connector of the
DMX cable to the female connector (output) on the controller
.
Step 2:
Connect the female connector of the
DMX cable to the
fi rst
fi
xture’
s male connec
-
tor (input).
Note:
It doesn’
t matter which
fi
xture address is the
fi
rst one connected.
W
e recommend connecting the
fi xtures
in
terms of their pro
ximity to the controller
,
rather than connecting the lowest
fi xture
number
fi
rst, and so on.
Step 3:
Connect other
fi
xtures in the chain
from output to input as abo
ve. Place a DMX
terminator on the output of the
fi nal
fi xture
to ensure best communication.
Page 13
R
okPix Manual R
ev
. A
© 2013 Blizzard Lighting, LL
C
DMX Values In-Depth (79-Channel Mode)
Channel
Value
What It Does
1
000 <--> 255
Pix
el 1 - R
ed Intensity (0% <--> 100%)
2
000 <--> 255
Pix
el 1 - Green Intensity (0% <--> 100%)
3
000 <--> 255
Pix
el 1 - Blue Intensity (0% <--> 100%)
4
000 <--> 255
Pix
el 1 - White Intensity (0% <--> 100%)
5-76
000 <--> 255
Pix
els
2-19
, R/G/B/W Intensity (0% <--> 100%)
77
000 <--> 255
Strobe (Slow <--> F
ast)
78
000 <--> 014 015 <--> 039 040 <--> 059 060 <--> 079 080 <--> 099 100 <--> 119 120 <--> 139 140 <--> 159 160 <--> 179 180 <--> 199 200 <--> 219 220 <--> 239 240 <--> 255
Pixel Effects Dimmer (0% <--> 100%) Pattern 1 (Slow <--> F
ast)
Pattern 2 (Slow <--> F
ast)
Pattern 3 (Slow <--> F
ast)
Pattern 4 (Slow <--> F
ast)
Pattern 5 (Slow <--> F
ast)
Pattern 6 (Slow <--> F
ast)
Pattern 7 (Slow <--> F
ast)
Pattern 8 (Slow <--> F
ast)
Pattern 9 (Slow <--> F
ast)
Pattern 10 (Slow <--> F
ast)
Pattern 11 (Slow <--> F
ast)
Pattern 12 (Slow <--> F
ast)
79
000 <--> 014 015 <--> 255
Color Fade No function Color F
ade Effect (Slow <--> F
ast)
DMX Values In-Depth (16-Channel Mode)
Channel
Value
What It Does
1
000 <--> 255
Dimmer (0% <--> 100%)
2
000 <--> 255
Pix
el Group 1 - R
ed Intensity (0% <--> 100%)
3
000 <--> 255
Pix
el Group 1 - Green Intensity (0% <--> 100%)
4
000 <--> 255
Pix
el Group 1 - Blue Intensity (0% <--> 100%)
5
000 <--> 255
Pix
el Group 1 - White Intensity (0% <--> 100%)
6-14
000 <--> 255
Pix
els Group
2-3
, R/G/B/W Intensity (0% <--> 100%)
15
000 <--> 014 015 <--> 039 040 <--> 059 060 <--> 079 080 <--> 099 100 <--> 119 120 <--> 139 140 <--> 159 160 <--> 179 180 <--> 199 200 <--> 219 220 <--> 239 240 <--> 255
Pixel Effects Dimmer (0% <--> 100%) Pattern 1 (Slow <--> F
ast)
Pattern 2 (Slow <--> F
ast)
Pattern 3 (Slow <--> F
ast)
Pattern 4 (Slow <--> F
ast)
Pattern 5 (Slow <--> F
ast)
Pattern 6 (Slow <--> F
ast)
Pattern 7 (Slow <--> F
ast)
Pattern 8 (Slow <--> F
ast)
Pattern 9 (Slow <--> F
ast)
Pattern 10 (Slow <--> F
ast)
Pattern 11 (Slow <--> F
ast)
Pattern 12 (Slow <--> F
ast)
16
000 <--> 014 015 <--> 255
Color Fade No function Color F
ade Effect (Slow <--> F
ast)