Dip switch settings, Dip switches 6, 7, 8 (other hd formats) – AJA GEN10 User Manual
Page 8
GEN10 Mini-Converter v1.0r2
www.aja.com
8
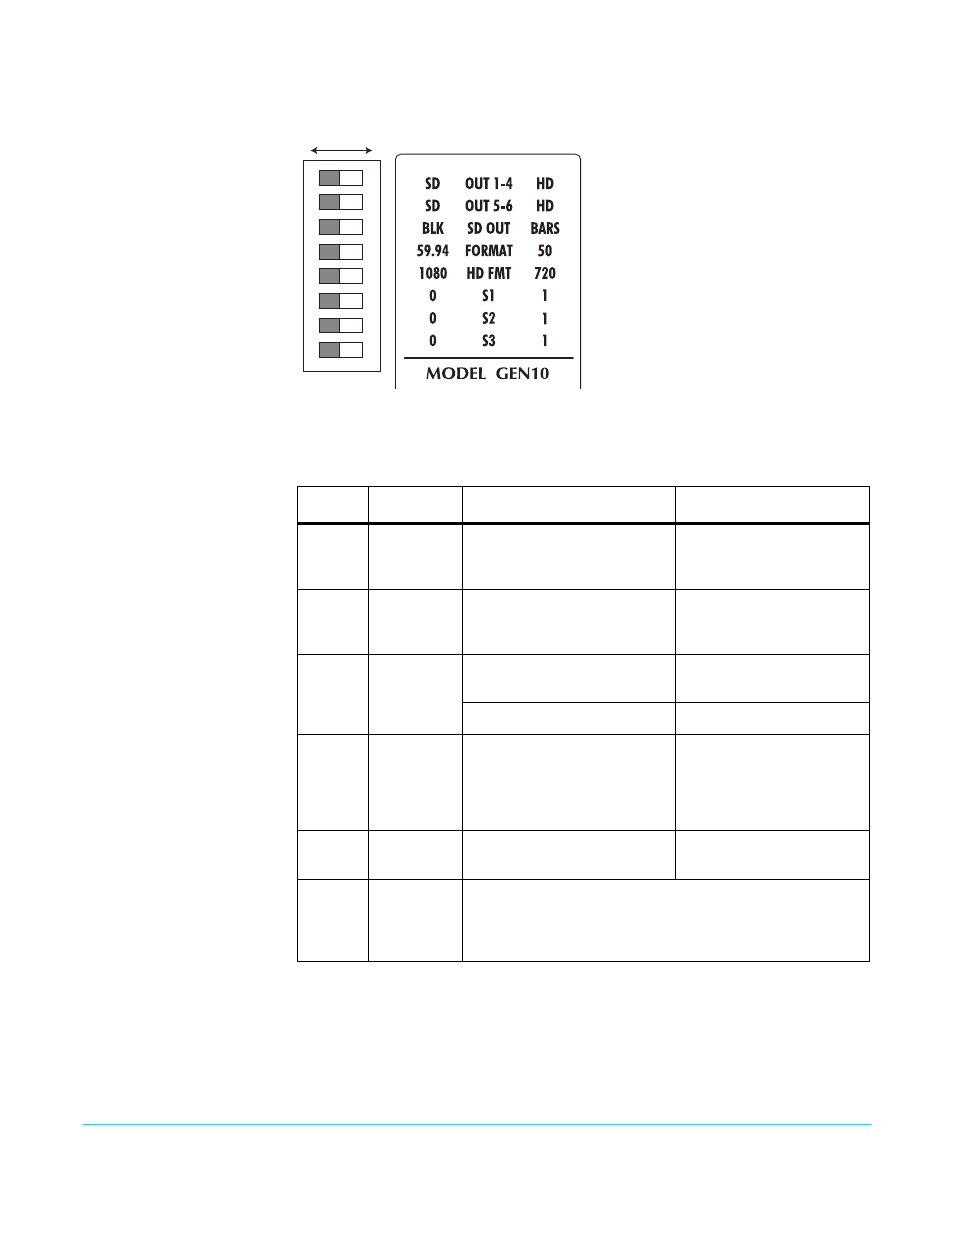
Figure 2. GEN10 DIP Switches and Label
DIP Switch Settings
The combination of switch settings determines the overall operation of the GEN10..
DIP Switches 6, 7, 8
(Other HD Formats)
For the most popular HD formats switches 6, 7, and 8 should be set to the default
position (all three switches set to LEFT or “000”, as listed in the following table. Switches 6,
7, and 8 should only be changed to select other HD formats that are more rarely used.
Table 2
shows how to select those formats using switches 4 through 8 in combination.
To use the table, first locate the video format you want in the columns on the right, and
then set switches as shown in the corresponding left hand columns.
1 2 3 4 5 6 7 8
DIP Switch Setting
LEFT RIGHT
Table 1. GEN10 DIP Switch Setting Descriptions
SWITCH
FUNCTION
DIP Set LEFT (default)
DIP Set RIGHT
1
Sync format
for outputs
1 through 4
Select SD sync (SD).
Select HD sync (HD).
2
Sync format
for outputs
5 and 6
Select SD sync (SD).
Select HD sync (HD).
3
SD output
and AES
signals
SD Output is Color Black
(BLK)
SD Output is 75% Color Bars
(BARS)
AES-11 output is silent
AES-11 output is tone
4
Frame Rate
Format
Select NTSC related frame
rates (59.94)
NOTE: For true 60/24 frame
rates see
Table 2
below.
Select PAL related frame
rates (50)
5
HD Line
Rate Format
Select 1080 line formats
(1080)
Select 720 line formats
(720)
6, 7, 8
HD Formats
(other)
These three DIP switches (S1, S2 , S2) act together with
switches S4 and S5 to select other, less common HD formats.
Zero (0) is Left position, one (1) is Right position. See
Table 2
below for setting information.