Cleaning – Wolo 7000 SERIES Infinity 1 User Manual
Page 6
Warranty
Wolo Manufacturing Corporation (“Wolo”) warranties to the original purchaser, for three months from the date of purchase, that
this product is free from defects in workmanship and materials. If there is such a proven defect, Wolo, at its option, will either
repair or replace the item free of charge, if it is returned to Wolo within three months from the date of purchase together with
proof of purchase as described below. Wolo reserves the right to inspect any defect prior to settling any warranty claim by repair
or replacement. This warranty is limited as above provided and Wolo will not be responsible for fire or other casualty or accident,
due to neglect, abuse, abnormal use, modifications, faulty installation of this product, or natural causes.
ANY EXPRESSED WARRANTY NOT PROVIDED HEREIN IS EXCLUDED AND DISCLAIMED. THE IMPLIED WARRANTIES OF
MERCHANTABILITY AND OF FITNESS FOR A PARTICULAR PURPOSE ARE EXPRESSLY LIMITED TO A TERM OF THREE (3) MONTHS.
UNDER NO CIRCUMSTANCES SHALL WOLO BE LIABLE TO PURCHASER OR ANY OTHER PERSON FOR ANY SPECIAL OR
CONSEQUENTIAL DAMAGES, WHETHER ARISING OUT OF BREACH OF WARRANTY OR OTHERWISE.
To obtain warranty service, return the product prepaid, and include the original bill of sale showing the date of purchase. Provide with the
return a brief description of the problem with a daytime telephone number. Also, include with the return a check or money order in the amount
of $20.00 to cover return shipping. Mail to:
Wolo Manufacturing Corp.
Attn: Warranty Service
One Saxwood Street
Deer Park, NY 11729
E-mail: [email protected]
© 2009 Wolo Mfg. Corp
All Rights Reserved.
41. Place the lens back on the light bar's base and secure in place using the four screws removed
earlier. IMPORTANT: There is a rubber gasket on the edge of the lens, make sure the gasket is
positioned properly to prevent water and dirt from entering inside
the light. Use care not to over tighten screws that secure lens.
BULB REPLACEMENT FOR MARKER LIGHTS, ALLEY LIGHTS &
TAKEDOWN LIGHTS
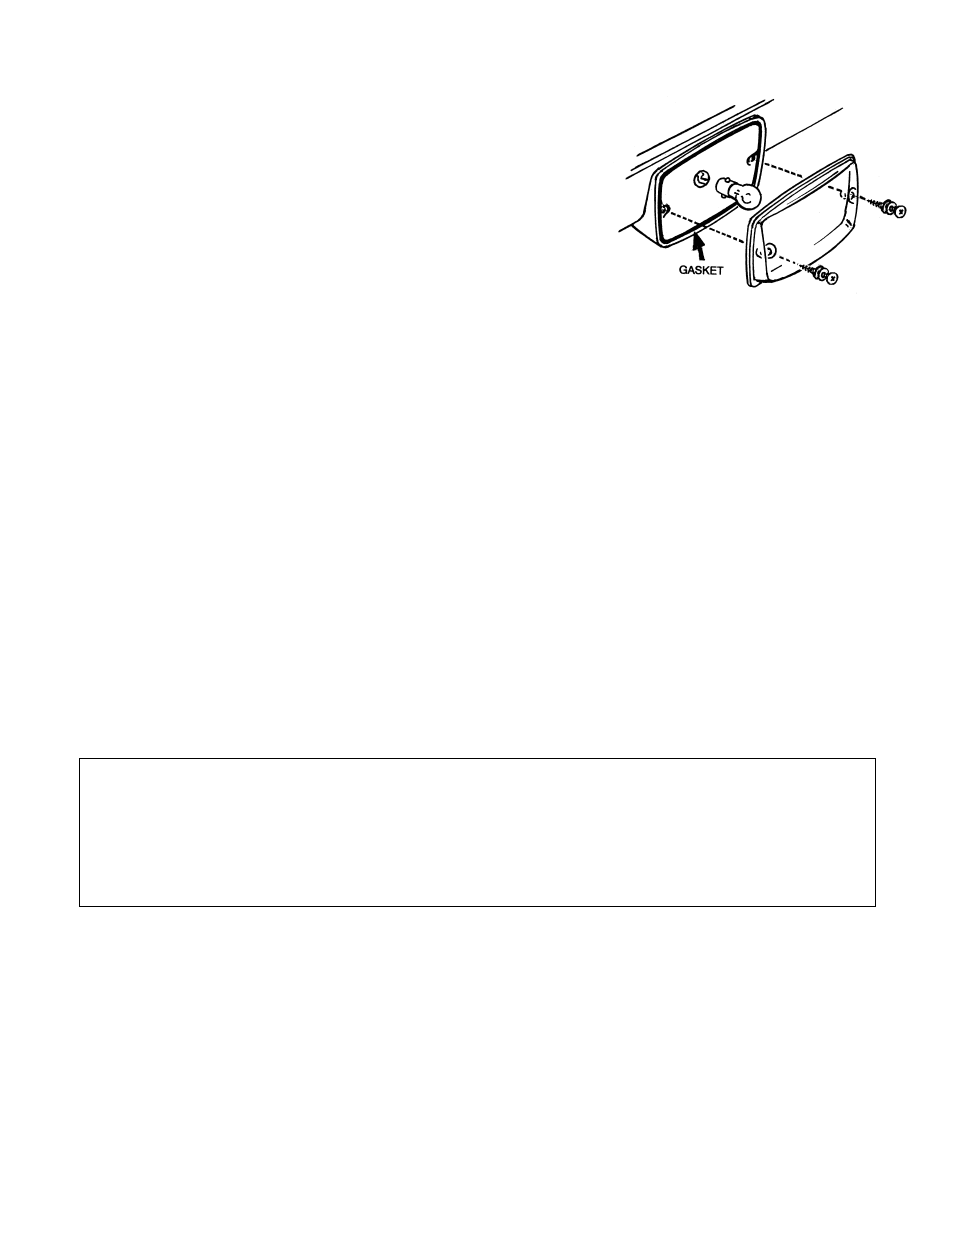
42. You will need to remove the marker light lens to change the bulb.
Remove the two Philips screws that secure the lens to the lights.
Once the two screws are removed the lens can be removed from
the light's base. See fig. 13.
43. Replacement bulb type: use only 1156 or Sylvania P21W, 12 volt. Current draw: 2.1 amps.
44. To remove bulb simply press inward and turn counter clockwise. The bulb should easily be able to
be removed from the socket. Dispose the bad bulb out of reach of children and in an
environmentally safe manner.
46. Position the new bulb into the socket, depress the bulb and turn clockwise. IMPORTANT: There is a
rubber gasket on the edge of the light base. Make sure the gasket is positioned properly to prevent
water and dirt from entering inside the light. Use care not to over tighten screws and secure the
lens.
47. Place the lens into position and secure with the two screws removed earlier. Be careful not to over
tighten screws.
CLEANING
A scratched, dull or dirty lens, reflector or mirror can cause a reduction in brightness of warning light.
Never use a caustic or petroleum base cleaner on any surface of the warning light. For best cleaning
results, always use household glass cleaner or mild soap with a soft lint free rag. If the lens, reflector or
mirror have scratches, or are dull, it is recommended those components be replaced so to ensure
maximum brightness of the warning light.
Fig. 13
LENS