S&S Cycle Standard and Easy Start Chain Drive Camshafts for 2006 Harley-Davidson Dyna models and all 2007-up Big Twins User Manual
Page 6
6
3. Thoroughly clean the flange bolts and apply a small amount of
Loctite® 262, 271, or 272 to the threads. Apply a drop of clean
20W-50 engine oil under the bolt flanges.
4. Install the sprocket locking tool and tighten the crankshaft gear
bolt to 25 ft.-lbs. torque. Torque the camshaft gear bolt to 34
ft.-lbs.
5. Install primary cam chain tensioner, tighten fasteners to 100-120
in-lbs.
6. Inspect the blind tapped holes for the cam cover in the
crankcase for cleanliness. Remove any foreign debris.
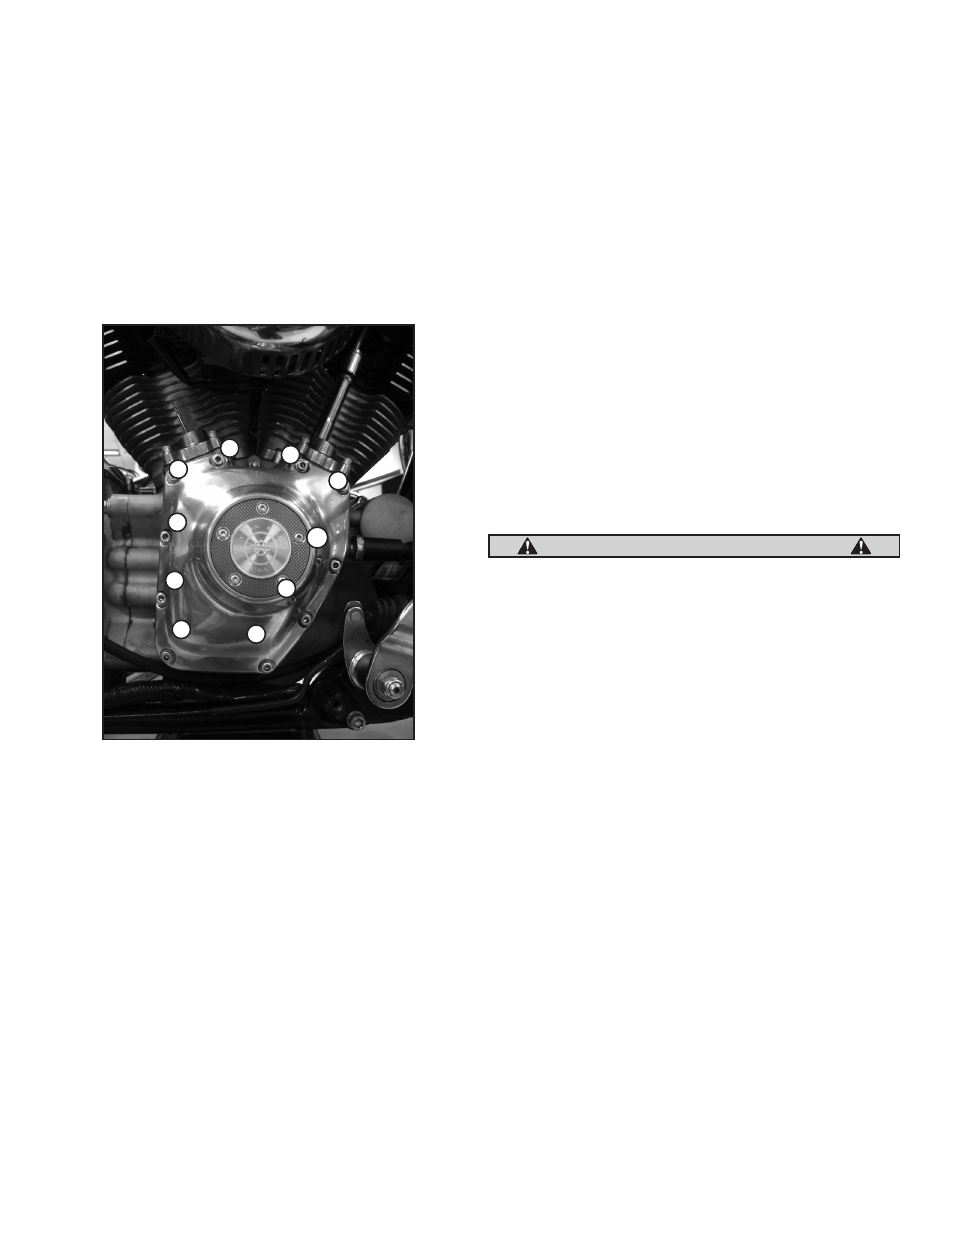
7. Install cam cover with new gasket. Torque the 10 bolts to 125-
155 in-lbs in the sequence shown below in Picture 8.
8. Remove the clips holding the tappets in place.
Adjustable Pushrod Installation And Adjustment
1. Rotate engine so one piston is at TDC compression, by rotating
the rear tire while feeling the tappets. When both tappets are
at the bottom of their lift, and the piston is at TDC, the cylinder
is at TDC compression. If equipped with compression releases,
you must use extra care when installing pushrods. Because
the decompression lobe is near TDC, it is possible to adjust the
pushrod while the tappet is on the lobe if it is not exactly at
TDC. This will cause incorrect exhaust pushrod adjustment. To
verify correct position, you can rotate the engine in the forward
direction and feel for the exhaust tappet to slightly lift ( about
.030") and set back down on base circle. This is the proper point
to install the pushrods.
2. Insert the adjustable pushrods into the collapsed pushrod
tubes. Make sure the proper o-rings are installed in the tappet
covers, and on the cylinder head end of the pushrod covers.
3. If the pushrod kit contains different length pushrods, the longer
pushrods go in the exhaust locations and the shorter pushrods
are for the intakes.
4. Insert the top of the pushrod into the hole in the head, then
drop the bottom into the tappet cover.
5. While holding the top of the pushrod into the cup of the rocker
arm, extend the bottom end into the tappet until the pushrod is
just making contact with the cup of the tappet. From this point,
extend the pushrod 24 flats (4 full turns). Move the jam nut on
the threaded portion of the pushrod to lock the end in place
and tighten.
NOTE: S&S® adjustable pushrods have 32 threads per inch, and 24 flats
will place the pushrod in the optimal position of the stock style tappet.
If pushrods other than S&S adjustable or quickee's are used, refer to the
manufacturer's instruction sheets to find the number of flats needed.
6. Allow the tappet to bleed down until you are able to rotate the
pushrod freely by hand, before adjusting the next pushrod.
7. Repeat steps 5 and 6 for the other pushrod on the same
cylinder.
8. Ensure both pushrods rotate freely, then repeat steps 1 through
6 for the other cylinder.
9. Install pushrod clips.
10. Shift transmission into neutral.
11. Lower motorcycle onto lift and remove jack.
12. Install spark plugs and plug wires.
13. Reconnect Negative battery cable.
If the engine is rotated before the tappets have bled down and
the pushrods can be rotated by hand, valve to valve or valve to
piston contact may occur. Serious engine damage could result.
Stock Non-Adjustable Pushrod Installation
NOTE: Using stock pushrods is only possible if the camshafts installed
have the same base circle as stock, and no more than .585" lift. S&S® labels
these cams as "Bolt-In" for easy reference. Currently S&S 510, 551 and 583
cams are bolt-in.
1. Rotate engine so one piston is at TDC compression, by rotating
the rear tire while feeling the tappets. When both tappets are at
the bottom of their lift, and the cylinder is at TDC, the cylinder
is at TDC compression. If equipped with compression releases,
you must use extra care when adjusting pushrods. Because
the decompression lobe is near TDC, it is possible to adjust the
pushrod while the tappet is on the lobe if it is not exactly at
TDC. This will cause incorrect exhaust pushrod adjustment. To
verify correct position, you can rotate the engine in the forward
direction and feel for the exhaust tappet to slightly lift (about
.030") and set back down on base circle. This is the proper point
to adjust the pushrods.
2. Insert the pushrods into the collapsed pushrod tubes. Make
sure the proper o-rings are installed in the tappet covers, and
on the cylinder head end of the pushrod covers.
3. Verify the correct locations for the pushrods that were removed.
The longer pushrods go in the exhaust locations and the
shorter pushrods are for the intakes.
4. Insert the top of the pushrod into the hole in the head, then
drop the bottom into the tappet cover.
5. Apply assembly lube or suitable clean engine oil to the pushrod
tips where they will contact the rocker arms.
6. Insert the rocker arm support assembly into the rocker box.
7. Ensure that the pushrod tips are fully engaged in the rocker
arms.
Picture 8
7
6
4
10
8
1
9
5
3
2
CAUTION