S&S Cycle Standard and Easy Start Chain Drive Camshafts for 2006 Harley-Davidson Dyna models and all 2007-up Big Twins User Manual
Page 5
5
Cam Installation
1. Place the cam support plate on a flat surface with the outside of
the support plate facing down. Place supports under the cam
support plate so that the cams can be easily installed.
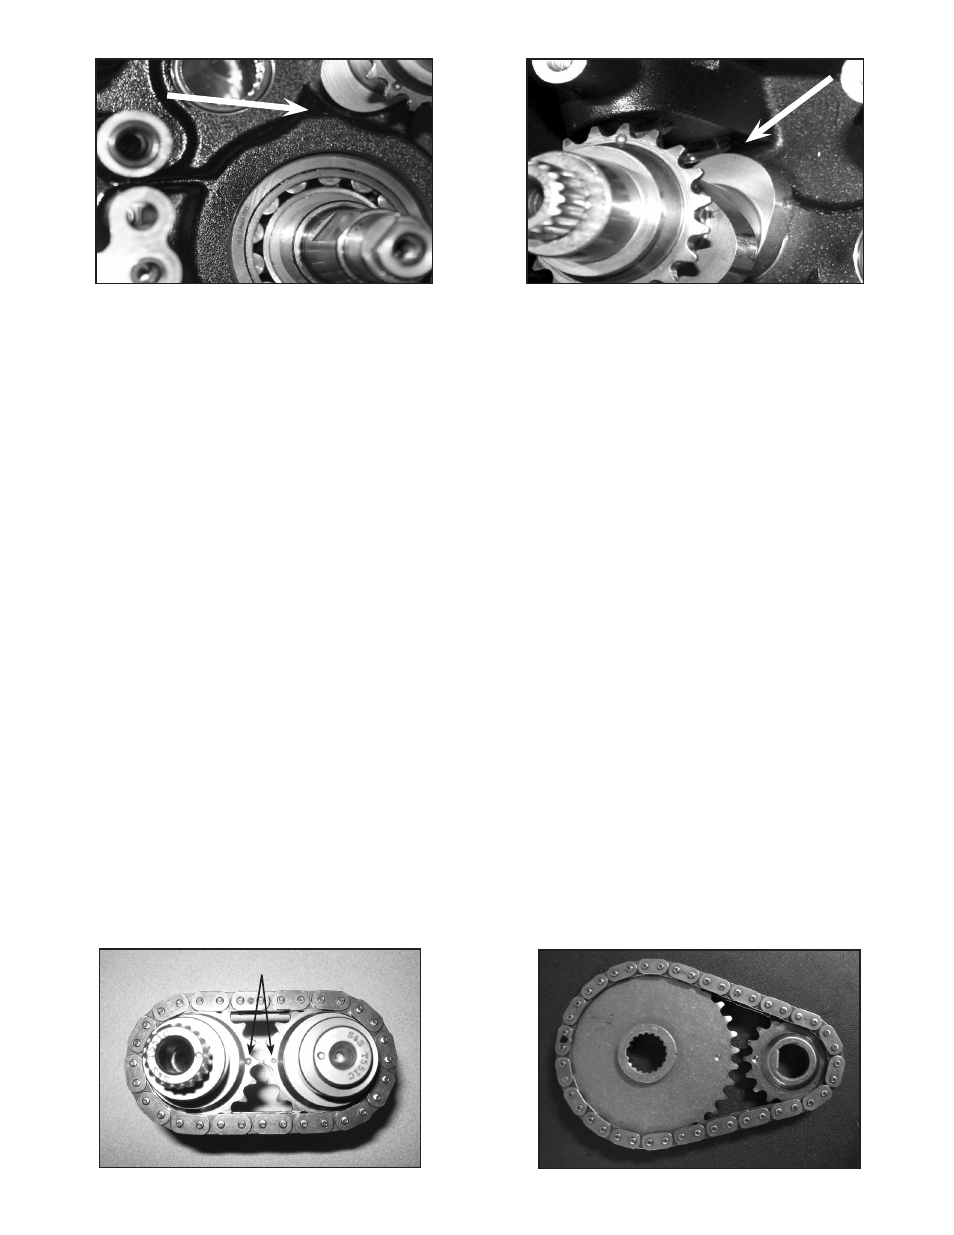
2. Install the secondary cam chain around the front and rear cam
sprockets. Ensure that the timing marks are still aligned. Also,
the timing chain should be installed in its original direction of
rotation. See Picture 6, below.
3. Lubricate the cam bearing cavities on the cam support plate
with engine assembly lube, or suitable clean engine oil.
4. Install the cams into the cam support plate. Be careful not to
damage the cam support plate while installing the cams.
5. Install the secondary cam chain tensioner. Apply Locite® 243
and torque bolts to 100-120 in-lbs.
6. Turn the cam support plate over. Take care so that the cams do
not slide out of the support plate. Install the 0.100" spacer over
the end of the front cam. Install the new retaining ring.
7. Double check to make sure the oil pump has not pulled out of
the crankcase.
8. Lubricate the cam needle bearings and decompression lever, if
equipped, with assembly lube and install the cam support plate
assembly.
9. Apply a small amount of Loctite 243 to the six bolts that hold
on the cam support plate and torque in the sequence shown in
Picture 3, page 4. Torque to 100-120 in-lbs.
10. Apply a small amount of Loctite 243 to the four bolts that hold
the oil pump to the cam support plate. While rotating the
engine, alternatively tighten bolts 1 and 2 until the bolts are
snug. Tighten bolts 3 and 4 until they are snug. Finally, torque
the four bolts in the sequence shown in to 90-120 in-lbs. This
procedure ensures that the oil pump is properly centered.
Rear Cam Endplay Adjustment
1. Install the spacer over the end of the rear cam. Install the
primary cam sprocket to the rear cam and hand tighten bolt.
2. Install the crank sprocket to the crankshaft and hand tighten
bolt.
3. Align the timing marks and install the sprocket locking tool and
torque each bolt to 15 ft-lbs.
4. Push crank sprocket towards the drive side of the motorcycle to
eliminate end play. Push the rear cam inwards to eliminate end
play.
5. Lay a straight edge across the face of the crank sprocket and
the primary cam sprocket. If the gap between the straight edge
and the sprocket faces is smaller than 0.010", no adjustment of
the spacer behind the rear cam sprocket is necessary. Select
the proper spacer for the rear cam so that this gap is no greater
than 0.010". Spacers are available from Harley-Davidson® in the
following sizes and part numbers:
.100" thick H-D® Part Number 25729-06
.110" thick H-D Part Number 25731-06
.120" thick H-D Part Number 25734-06
.130" thick H-D Part Number 25736-06
6. Remove sprockets so that the outer drive chain can be installed
for the final assembly.
Final Assembly
1. Place primary chain over the rear cam sprocket. Install the crank
sprocket into the primary chain so that the timing marks on
both sprockets are aligned as shown in Picture 7.
2. Install the primary timing chain assembly onto the crankshaft
and rear cam.
NOTE: Align the crankshaft and rear cam so that the primary timing
chain assembly fits so that the timing marks are aligned.
Picture 6
Timing Marks
Picture 4
Picture 5
Picture 7