Field panels, Field panel installation, Hip & ridge – Metal Sales DECRA User Manual
Page 4: Ridge vent option
■
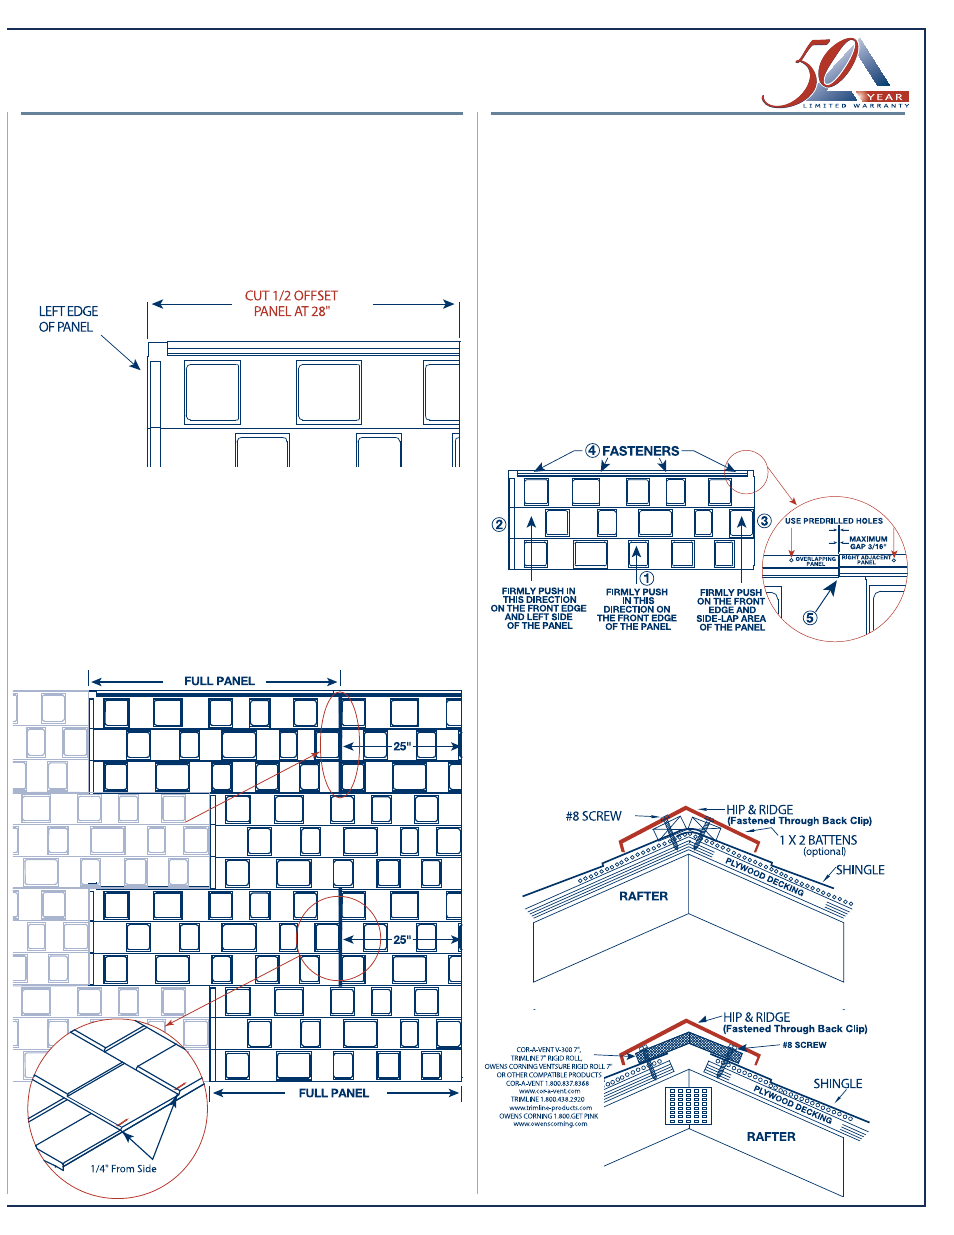
Field Panels
DECRA Shingle Installation PATTERN Uses Full and 1/2 Panels.
The first course of panels lock into the Starter Clip w/Drip Edge.
Subsequent courses of panels simply lock into place by sliding the nose of
each panel onto the clip that is formed at the top edge of each panel. The
right side of each panel must be compressed and pushed into position to
engage the Side-Lap locking mechanism. This will secure the right Side-
Lap and provide a clean appearance. Stagger Shingle panels and install
from right to left. Make sure the front Clip-Lock at the nose of each panel
is not bent.
1.
FIRST COURSE:
Start at the rake edge, valley or hip and continue course with full panels
locking into the Starter Clip w/Drip Edge.
2.
SECOND COURSE:
Start at the rake edge, valley or hip with a panel that is 28" in length (panel
exposure is 25"). Measure from the left side of the panel 28" to make the cut.
3.
THIRD COURSE:
Start at the rake edge, valley or hip and continue course with full panels.
4.
FOURTH AND SUBSEQUENT COURSES:
Continue application, repeating second and third course instructions.
■
Field Panel Installation
(suggested)
1.
Set the panel into the top Clip-Lock of the panels on the course below.
Firmly push (by hand or foot) at the front edge of the panel in the area
that overlaps the joint of the two panels below.
2.
After positioning the panel in Step #1, firmly push (by hand or foot) on
the left side of the panel until it is locked firmly into the Clip-Lock of
the panels on the course below. Install a fastener straight down into
the upper left portion of the panel as shown.
3.
Firmly push (by hand or foot) on the right side of the panel and make
sure it is locked into the previously installed panel. Install a fastener in
the upper right portion of the panel. Placing this fastener at a
slight upward angle (45°) will help draw the Shingle panel into the
proper locking position.
4.
Install the remaining fasteners straight down into the panel as shown.
5.
When installing panels, the Clip-Lock on the left will drop down
approximately 1/8” to 1/4” below the Clip-Lock on the right panel.
The maximum allowable gap between panels should be 3/16”.
■
Hip & Ridge
Overlap Shingle panels at hips/ridges and cut along a parallel line
beyond the crest of the hip or ridge overlap that provides adequate
protection. Install a 1 x 2 batten directly over the Shingle using
fasteners sufficient to penetrate the roof deck. The DECRA Shingle
Hip/Ridge should be attached directly to the battens. Each Hip/Ridge
piece should clip together by inserting the return at the nose of each
piece into the clip that is located at the top of the Hip/Ridge piece.
LEFT
LEFT PANEL CLI
ANEL CLIP-LOCK
OCK
DROPS D
OPS DOWN APP
WN APPROX.
X.
1/8
1/8” TO 1/4
O 1/4”.. MAKE SURE
AKE SURE
OVERLAP IS
OVERLAP IS TIGHT
TIGHT
NOTE: Do
Not Rack
Panels
NOTE: In situations where the Side-Lap
disengages, use one or two stitch screws to pull
panels together and eliminate gapping.
THIS SHOULD ONLY BE DONE IF THE PANELS
BECOME DISENGAGED.
Cover Screw Heads Using Touch-Up Kit.
Care should be taken to
avoid stepping in the
Side-Lap Area after panels
are installed.
CUT THE PANELS
USING A CIRCULAR
SAW WITH A
COMBINATION
BLADE OR A TENRYU
STEEL PRO BLADE
red to ISO9001:2000 • ICC Evaluation Service Report ESR-1483 • CCMC #13085-R
na, CA 92882 •
1.800.258.9740
■
Ridge Vent Option
Revised
NSSN0505 06/09