Ride on, Ergo iii adjustable cruise mount care, Installation – Kuryakyn 3990 BLACK ERGO III ADJUSTABLE CRUISE MNTS w/ TRIDENT DUALLY PEGS User Manual
Page 6
PAGE
6
STEP 25
Test fit the assembly on the Ergo III mount. With the Helix engaged on the cogs of the Ergo III
mount, pull up on the arm to ensure that the Arm assembly is parallel with the engine guard and
valve cover.
STEP 26
Remove the End Cap and install an included Fixed Position Stopper in place of the Spring and
Steel and Brass Bushings. Reinstall the Rotating Arm and Helix (still aligned exactly as shown in
PIC 12 or 13).
STEP 27
Insert the 1/2” Screw, Small Flat Washer, and Large Flat Washer (removed in STEP 20) through
the Rotating Arm assembly. Thread it into the Mount. Torque the 1/2” Screw to 30 FT/LBS.
STEP 28
Repeat STEPS 20 through 27 for the other side.
STEP 29
If necessary, make any other adjustments by referring to STEPS 10 through 19.
ERGO III ADJUSTABLE CRUISE MOUNT CARE:
Do not wash with a pressure washer. The water pressure may remove the grease.
Periodic greasing may be necessary to maintain proper function.
BLACK ERGO III ADJUSTABLE CRUISE MNTS w/ TRIDENT DUALLY PEGS
Ride On!
INSTALLATION
It is the end user’s responsibility to ensure that all of the fasteners
(including pre-assembled) are tightened before operation of the motorcy-
cle. Küryakyn will not provide warranty coverage on products or compo-
nents lost due to improper installation or lack of maintenance. Periodic in-
spection and maintenance are required on all fasteners.
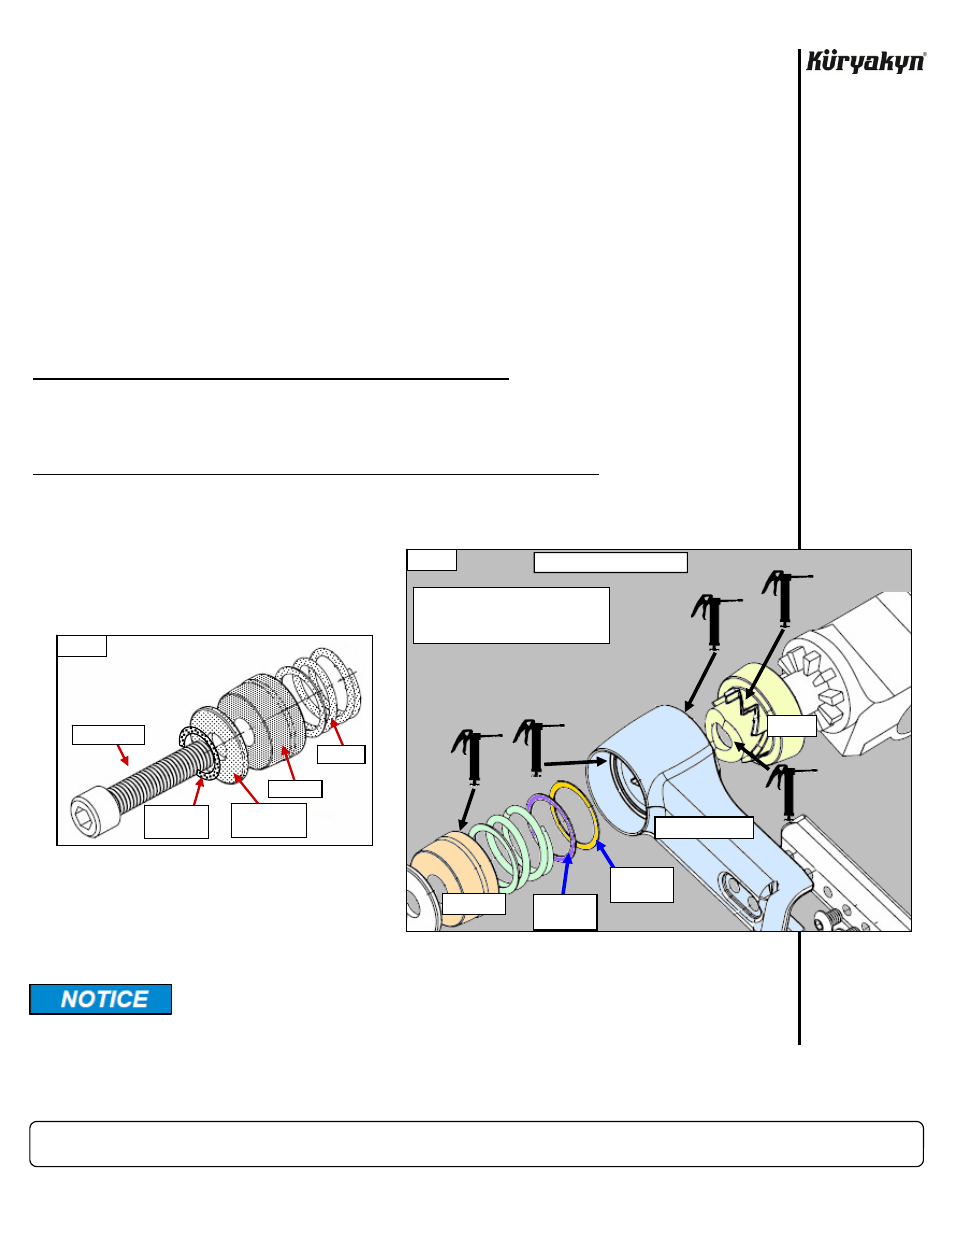
CLUTCH-SIDE (LEFT) SHOWN
FIG 2
APPLY A LIBERAL AMOUNT OF GREASE
TO THE HELIX, BOTH INSIDE SUR-
FACES OF THE ROTATING ARM AND
THE INSIDE OF THE END CAP
STEEL
BUSHING
BRASS
BUSHING
END CAP
ROTATING ARM
HELIX
1/2” SCREW
LARGE
WASHER
END CAP
SPRING
FIG 1
IF DISASSEMBLED, RE-TORQUE
1/2” SCREW TO 30 FT/LBS
SMALL
WASHER