L.e.d. saddlebag extensions, Installation – Kuryakyn 7273 L.E.D. SADDLEBAG EXTENSIONS User Manual
Page 3
PAGE
3
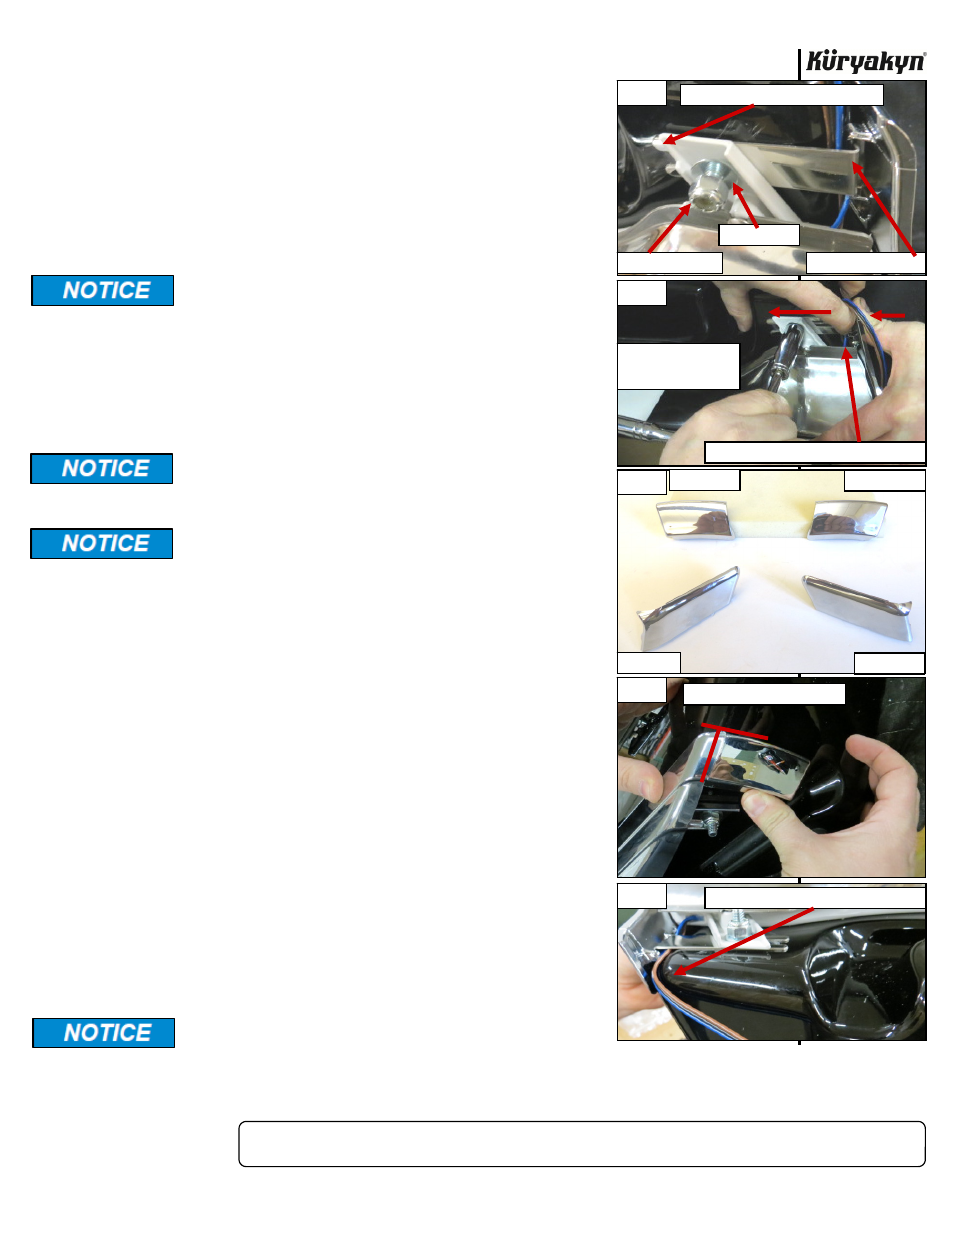
STEP 10
Rotate the attach clip and hook the lip of the attach clip into the slot on the Extension. PIC 5 Make
sure the wire harness (the sheathing is removed for clarity in the pictures) is between the attach
clip and the bottom of the saddlebag. PIC 9
STEP 11
Starting with the front fastener, push the Extension tight against the side
of the saddlebag and tighten the 1/4” nylock nut while holding the button
socket cap screw until it is tight to the tab of the Extension. Repeat for
the
second
fastener.
DO NOT over tighten.
STEP 12
Make sure the wire harness is between the attach clip and the bottom of
the saddlebag and the attach clip is hooked in the slot on the Extension.
Push and hold the Extension tight against the saddlebag while pulling the
attach clip towards the fastener. Tighten the 1/4” nylock nut while
holding the button socket cap screw. PIC 6
Secure all wiring away from any moving parts, pinch points
or extreme heat. Küryakyn WILL NOT issue a warranty on
any electrical component that fails due to pinched, crimped,
broken, abraded, melted or frayed wires.
STEP 13
Determine the left from the right front and rear Extension Fillers. PIC 7
STEP 14
Using one of the included alcohol pads, thoroughly clean the front and
rear of the side and bottom of the saddlebag where the Extension Fillers
will attach.
Ensure the area of installation is free of grease, oil, dirt or
other debris including wax/polish products and bugs to
ensure proper adhesion. Küryakyn WILL NOT issue a
warranty on any parts lost due to improper installation.
The adhesive will not bond correctly if applied at
temperatures less than 50°F. Do not attempt this installation
in temperatures less than 50°F.
STEP 15
Rub the backing of the tape on the right side front Extension filler to
activate the adhesive. Remove the backing. Line up the top and side
edge of the Filler (PIC 8) with the top and side edge of the Extension and
press the Filler firmly in place for one minute. Full bonding will occur in
24
hours.
STEP 16
Route the wire harness from the Extension around the bottom of the
saddlebag.
PIC
9
STEP 17
Rub the backing of the tape on the right side rear Extension filler to
activate the adhesive. Remove the backing. Line up the bottom and end
edge of the Filler with the bottom and end edge of the Extension. Route
the wire harness in the groove in the rear filler (PIC 10)and out the notch
in the end of the Filler. PIC 11 Press the Filler firmly into place, making
sure the wire harness is in place, for one minute. PIC 11 Full bonding will
occur
in
24
hours.
STEP 18
Locate four of the included cord keepers and one of the two included
rubber bumpers. Using one of the included alcohol pads, clean the back
side of the saddlebag. Dry completely. Attach one of the cord keepers in
each location shown in PIC 12. Route the wire harness from the Extension
through the cord keepers and lock each one closed. PIC 12 Attach the
rubber bumper in the location shown in PIC 12.
NOTE:
The rubber bumpers allow the bag to lay on it’s back side when
removed without the paint touching the surface that it’s laid on.
Secure all wiring away from any moving parts, pinch points
or extreme heat. Küryakyn WILL NOT issue a warranty on
any electrical component that fails due to pinched, crimped,
broken, abraded, melted or frayed wires.
L.E.D. SADDLEBAG EXTENSIONS
INSTALLATION
-cont.-
PIC 9
PIC 5
PIC 8
PIC 6
SLIDE FORKED END AROUND FASTENER
FLAT WASHER
1/4” NYLOCK NUT
HOOK LIP INTO SLOT
MAKE SURE WIRE HARNESS IS UNDER CLIP
HOLD EXTENSION AND
PULL BACK ON CLIP
WHILE TIGHTENING
LINE UP TOP AND SIDE EDGES
ROUTE HARNESS AROUND CORNER OF BAG
PIC 7
LEFT FRONT
RIGHT FRONT
LEFT REAR
RIGHT REAR