Step 4 step 5 – Kargo Master Pro II Steel Ladder Rack – With A Camper Shell (0113) User Manual
Page 5
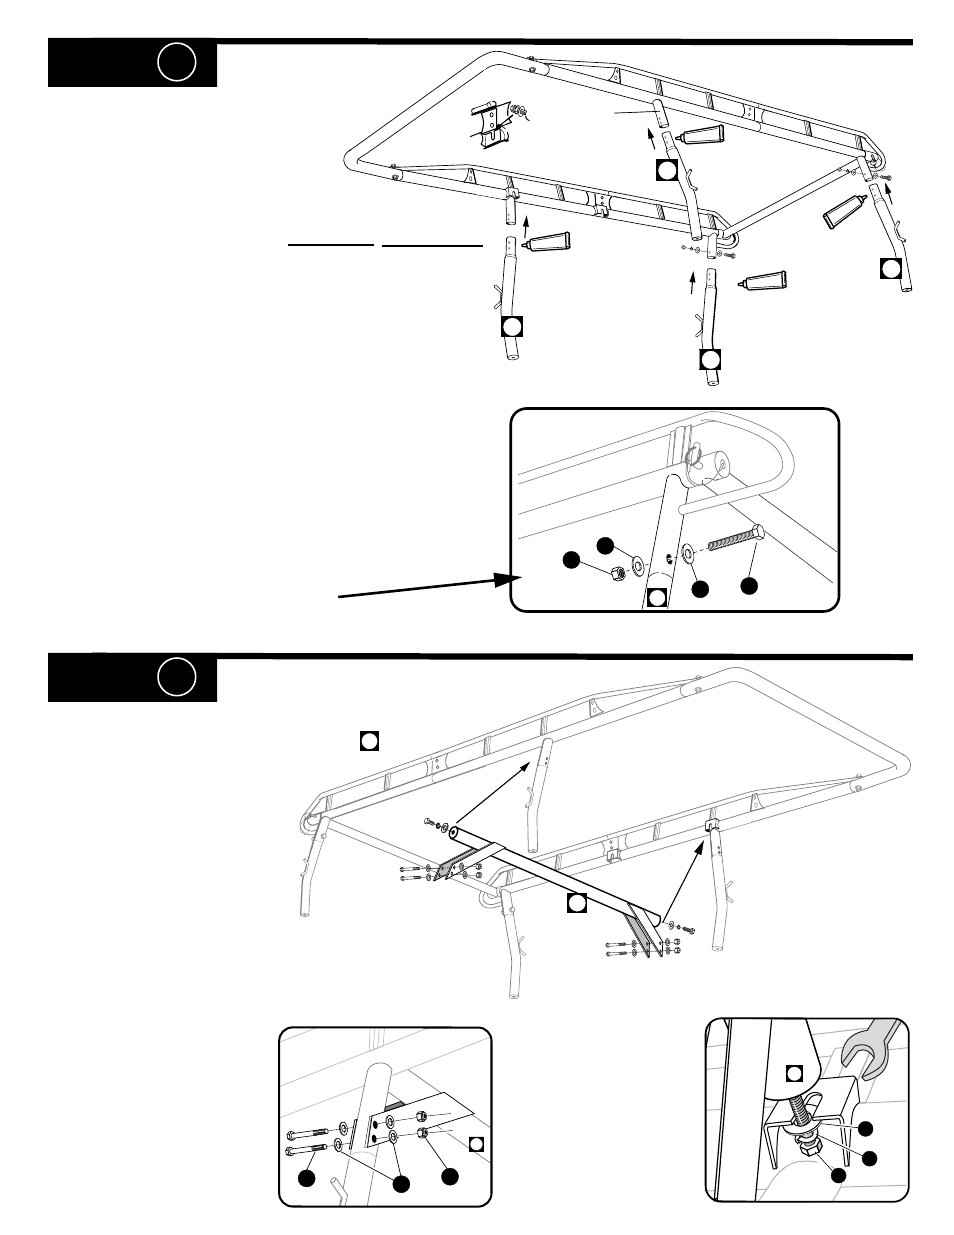
#1=
Cover entire swedged joint surfaces with GOOP,
Then insert the swedged end of each leg, rope hooks
facing outward, into the short leg cup.
Repeat this operation for each leg, leaving
FRONT
LEGS unbolted.
NOTE:
Steps #4 & #5 are more easily completed
with rack turned upside down.
STEP 4
STEP 5
#1
=
At each end of CENTER CROSS BAR
,
start BOLTS & WASHERS. Be sure to include
both flat and lock WASHERS.
Leave loose enough so that
BOLT shaft can be slid into
the FRONT SLOTTED BRACKET
as shown in #3 below.
H
O
B
P
3 3
4 4
//
B
R
U
F
B
B
#
2
= Bolt REAR LEGS (as shown)
#2
=
On one side of rack, slide BOLTS & WASHERS
into
FRONT SLOTTED BRACKET as shown in #3 below.
On the other side of the rack, slide the BOLT &
WASHERS into FRONT SLOTTED BRACKET. Bolt
CENTER CROSS BAR
BRACES and LEG together
(snug only).
Returning to the other side
of the rack, bolt the
CENTER CROSS BAR
BRACES
and LEG together (snug only)
#3
=
With an open end
3/4" wrench, snug the
CENTER CROSS BAR
BOLTS on each side of
the rack.
KS
_11_1.1
GOOP
Silicone
GOOP
GOOP
01
01
01
01
Leg Cup
R
U
U
Z
01
NOTE:
All 4 LEGS are identical with the
exception of PART 0113-0 (FORD SUPER
DUTY), The FRONT legs are bent twice
and the REAR legs are bent only once.
NOTE:
FOR HIGH RISE CAMPER SHELLS, UP TO
6"
ABOVE
THE CAB , YOU WILL NEED TO PURCHASE SEPARATELY
ACCESSORY EXTENDED LEG KIT # :
31520 - MINI TRUCK
31530 - FULL SIZE TRUCK
31540 - '99 + F250/F350