CounterPath Bria 3.4 for Windows Quick Start Guide User Manual
Bria 3 for windows quick start guide
Bria 3 for Windows Quick Start Guide
© CounterPath Corporation, 2011
For more information, visit us at
counterpath.com
Rev
4
Getting Started
After choosing a SIP VoIP service provider, you will need the following information:
• User name, password, and domain
• Firewall traversal and other network information; see “Configuring Accounts” in
the user guide, “Using Bria 3 for Windows – Retail Deployments.
System Requirements
Processor
Minimum: Pentium 4® 2.4 GHz or equivalent
Recommended: Intel Core 2 Duo or equivalent, Video Card with DirectX
9.0c support Video Card with DirectX 9.0c support .
Memory
Minimum: 1 GB RAM
Recommended: 2 GB RAM
Hard Disk Space 100 MB
Operating system Windows® XP Service Pack 3
Windows Vista®
Microsoft Windows® Vista® Service Pack 1, 32-bits and 64-bits arch
Microsoft Windows 7 or Microsoft Windows 7 Service Pack 1
Additional
Microsoft Windows Installer 3.1
Microsoft .NET 3.5 SP1
Microsoft VC 9.0 Runtime Service Pack 1
(Note that the installer will take care of installing those if you do not have
them).
Connection IP
network
connection
(broadband, LAN, wireless)
Periodically, Bria connects to CounterPath’s license server in order to verify
that a valid license is being use. Therefore, at all times, Bria will need to
have an internet connection.
Sound Card
Full-duplex, 16-bit; or use USB headset
Web browser
Microsoft Internet Explorer® 6.0 or later
The Bria Add-in requires a 32-bit version of Microsoft Outlook®. If you have a 64-bit
version of Outlook, you can run Bria but they will not be able to use Bria Add-in.
Installing and Configuring Bria
Run the Bria setup executable file and follow the prompts in the install wizard.
Starting Bria
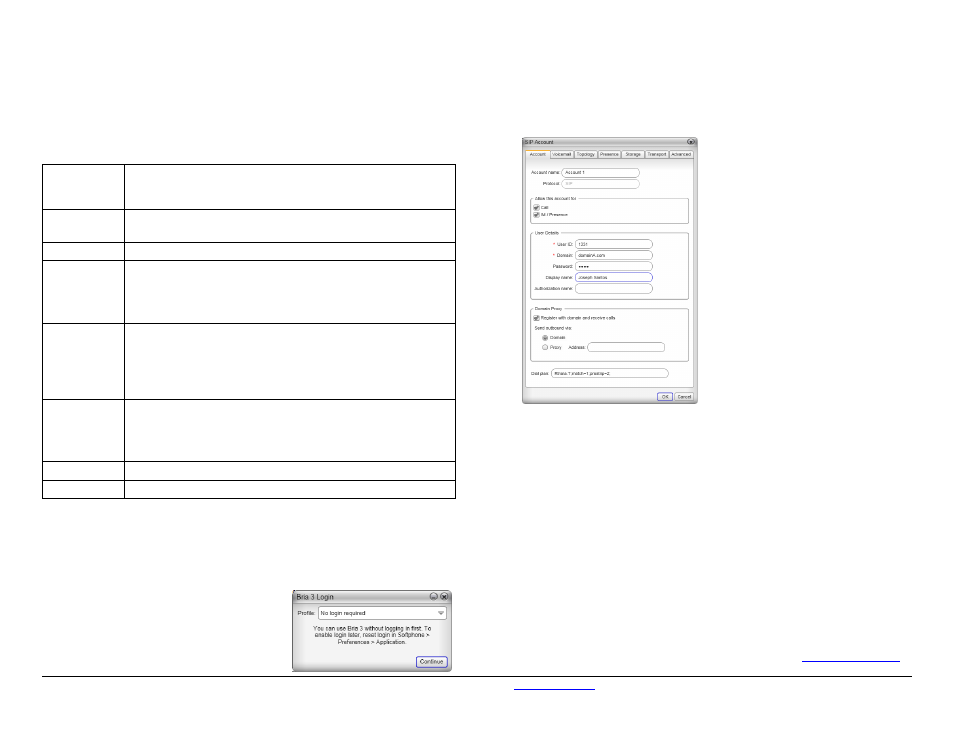
1. Start Bria. The Bria Login dialog appears.
2. Set the Profile to “No login required” and
click Continue. The softphone appears.
Setting up Accounts
You must set up a SIP account to make phone calls.
1. Start Bria if it is not already running.
2. From the Bria menu, choose Softphone > Accounts. The SIP Account window
appears.
3. Complete the User Details area with the information obtained from the VoIP
service provider.
4. Complete the remaining tabs as specified by the service provider or to suit your
setup. Settings that you may need to change immediately include:
•
Account tab, Domain Proxy area.
• Topology tab, if your computer is on a network and/or behind a firewall.
For more information, see the user guide.
5. Click OK; the account is created and registered. “Enter a name or number”
appears in the call field.
You can now make calls with your new phone. If you have trouble making calls, see
the Troubleshooting Assistant: Help > Troubleshooting.
Using XMPP
If your VoIP service provider has given you account information for an XMPP
account, you must set it up separately, as described in the user guide.
Using Bria 3 for Windows –Retail Deployments
can be found at
www.counterpath.com