Important safety information, Step one – review package contents (page 13), Step three – start projector – Artograph LED 500 Quick Setup Guide User Manual
Page 2: Step two – getting started (page 19), Step four – select input source, Page 21), Page 23)
Important Safety Information
Please refer to pages 2 – 6 in the enclosed Owner’s Manual for detailed safety information.
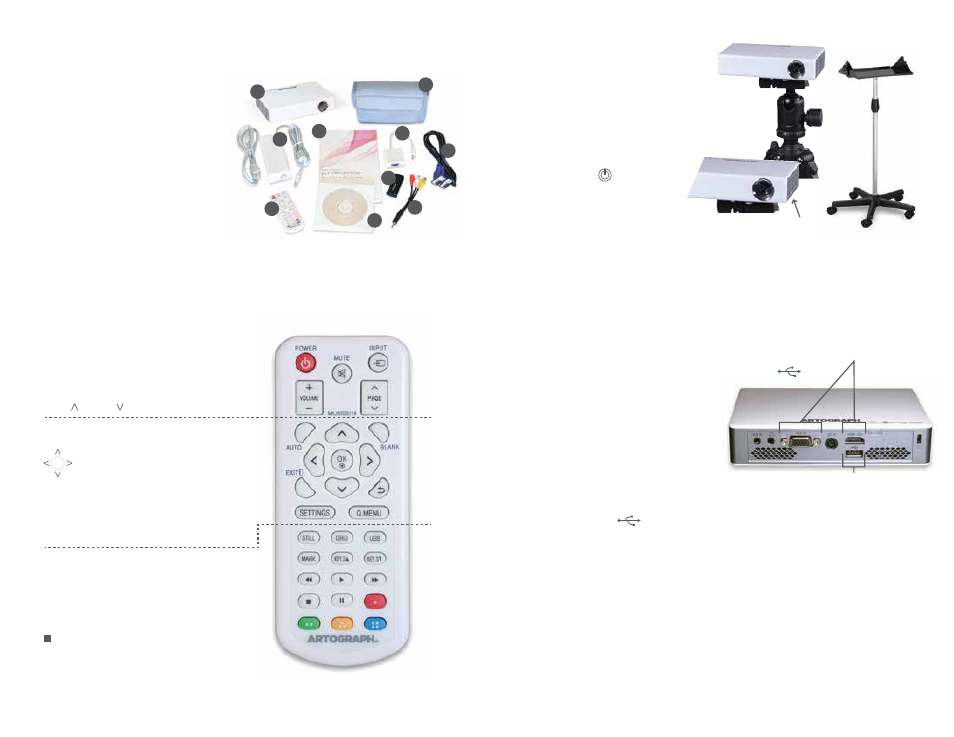
Step One – Review Package Contents (page 13)
1. LED 500
™
Digital Art Projector
™
2. Remote control w/one CR2032/3V battery
3. Power supply (AC/DC adapter + power cord)
4. RGB computer cable
5. Composite cable
6. RGB
g
VGA adapter for MAC
7. Multi-card USB card reader
8. Soft storage bag for LED 500
™
9. Owner’s Manual (English)
10. CD Owner’s Manual
Optional Extras discussed on page 14 of the Owner’s
Manual are either available from Artograph or through
your local consumer electronics store.
Step Three – Start Projector
(Page 21)
1. Mount LED 500
™
onto a tri-pod or sturdy,
hard platform near a power outlet
(DO NOT block vents on projector)
2. Connect power supply cord into nearby
outlet and into the back of LED 500
™
marked DC IN
3. Aim LED 500
™
toward desired surface
4. Press red Power button on remote
or lighted button on top
of LED 500
™
5. FOCUS – Rotate focus wheel on side
of LED 500
™
Step Two – Getting Started (Page 19)
1. Remove protective film from projector
2. Install CR2032/3V battery into remote control
3. Review remote control features:
POWER: on/off
INPUT: input source
MUTE: mutes sounds
VOLUME + / VOLUME –: adjusts volume
PAGE / PAGE : next screen
AUTO: RGB-PC input image
BLANk: Screen on/off
: moves cursor
Ok: saves
EXIT: clears on-screen displays
O
: return to previous screen
SETTINGS: select or close menu
Q.MENU: quick access menu
STILL: freezes (not USB mode)
GRID: select one of 19 grid patterns + grid color
USB: access USB mode
MARk: set optional functions
kEY.S p / kEY.S q: Adjusts keystone
tt
uu: controls playback of My Media
: shows 3D images
II
: switch left to right in 3D mode
Color buttons: access special functions
1
5
9
3
7
2
6
10
4
8
Note: when using remote control, the optimal range is less than 3 meters and within
a 30 degree arc of the IR receiver. The IR receiver is on the back of the receiver.
LED 500™
Tripod
Focus Wheel
Mobile
Floor Stand
Step Four – Select Input Source
(Page 23)
The LED 500
™
accepts input from a variety of devices including computers, SD cards,
HDMI devices and USB flashdrives:
1. USB (Pages 25-26) insert USB flashdrive into USB port
a. “New external input is connected;
do you want to use this?” Answer YES
b. If USB device is not recognized:
i. press “USB” button on remote (or)
ii. press “input” button on remote and
manually select USB
2. SD Card Reader (Same as USB Pages 25 – 26)
Insert SD memory card into multi-card reader; insert multi-card
reader into USB port ; the following menus will appear:
a. All Media (Page 25): allows viewing all media files at once
b. Movie List (Pages 28-33): allows viewing all movie files
c. Photo List (Pages 34-36): allows viewing of all photo files
d. Music List (Pages 29, 36-37, 49): allows viewing of all music files
e. Files List (Pages 38-39): allows viewing of MicroSoft
®
Office document files
3. RGB/HDMI Devices (Page 54)
Direct connect LED 500
™
to PC or MAC computer
a. PC: use RGB cable or HDMI cable
b. MAC: use MAC Adapter cable or HDMI cable
Ports for RGB/HDMI Devices
USB Port
Ok