Anchor CENTURY TENT LINER User Manual
Page 2
Step 1 - Preparation
The liner will be hoisted using liner rigging - see Figure 1.
Important: Before tent is raised, liner rigging must be slipped
over center pole pins. Note that on liners with 8” bale ring, only
one rigging is required per center pole. Liners with 10” bale
rings require two liner riggings per center pole.
Layout drop cloths before placing liner pieces on ground in their
proper positions - fi nished side down toward ground.
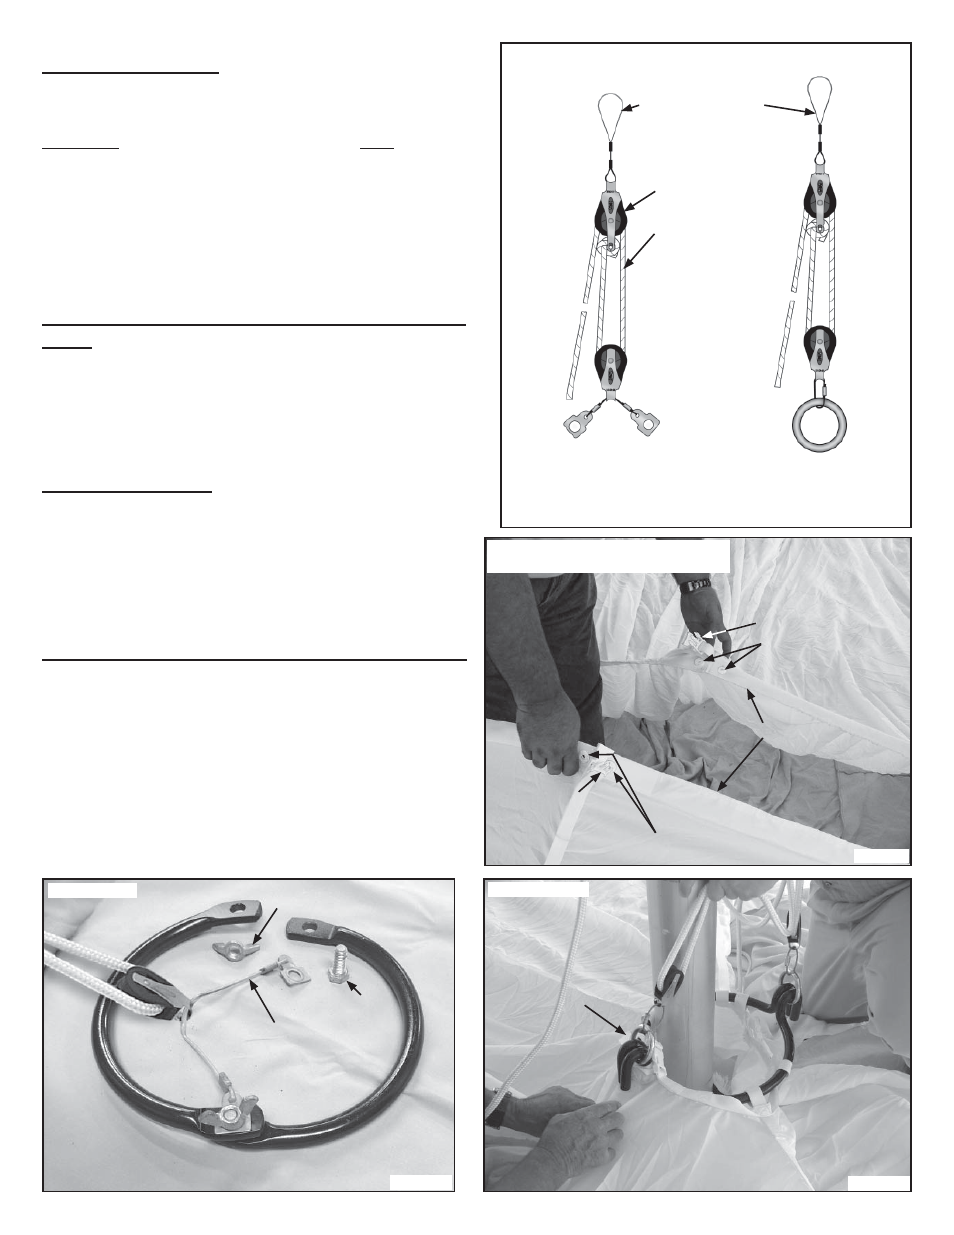
LINER RIGGING
For 8” Bale Ring
(1) per Center Pole
For 10” Bale Ring
(2) per Center Pole
Top loops fit over
center pole pin. (Before
tent is raised.)
Pull rope (typ.)
Figure 1
Pulley (typ.)
Step 2 - Lacing of Ridge on Double Center Pole
Tents
On double center pole tents, start lacing at center of ridge
between center poles. Fasten side-release buckles and menax
fasteners working toward center poles, fastening velcro from
menax fastener to menax fastener. If fullness occurs, try
stretching the shorter side to work in the fullness.
Step 3 - Bale Rings
Run bale ring through loops at center pole holes. See Figure 3.
8” Bale ring requires only one rigging assembly. 10” Bale ring
requires two rigging assemblies.
See fi gures 3 and 4 to see how liner riggings are attached to
bale rings.
Side Release Buckles
Menax fasteners
Menax fasteners
Side Release
Buckles
Velcro edges
CENTER OF RIDGE
ON DOUBLE CENTER POLE TENT
Figure 2
Fasten side-release buckles and menax fasteners at bale ring.
Working toward eave, fasten velcro from menax fastener to
menax fastener. If fullness occurs, try stretching the shorter
side to work in the fullness.
Fasten velcro down to bottom of curtain.
Figure 4
8” Bale Ring
Bolt
Lanyard on pulley
Wingnut
10” Bale Ring
Figure 3
Fit bale ring halves
through rings in
liner riggings as
shown.
Step 4 - Lacing from Center Poles down to Eave