3 stopping the chipper, 4 operating the chipper, 3 stopping the chipper 4.4 operating the chipper – Echo CH911DH Owners Manual v.3 User Manual
Page 15: Caution warning, Warning, English
9 INCH CHIPPER
11
ENGLISH
OPERATION
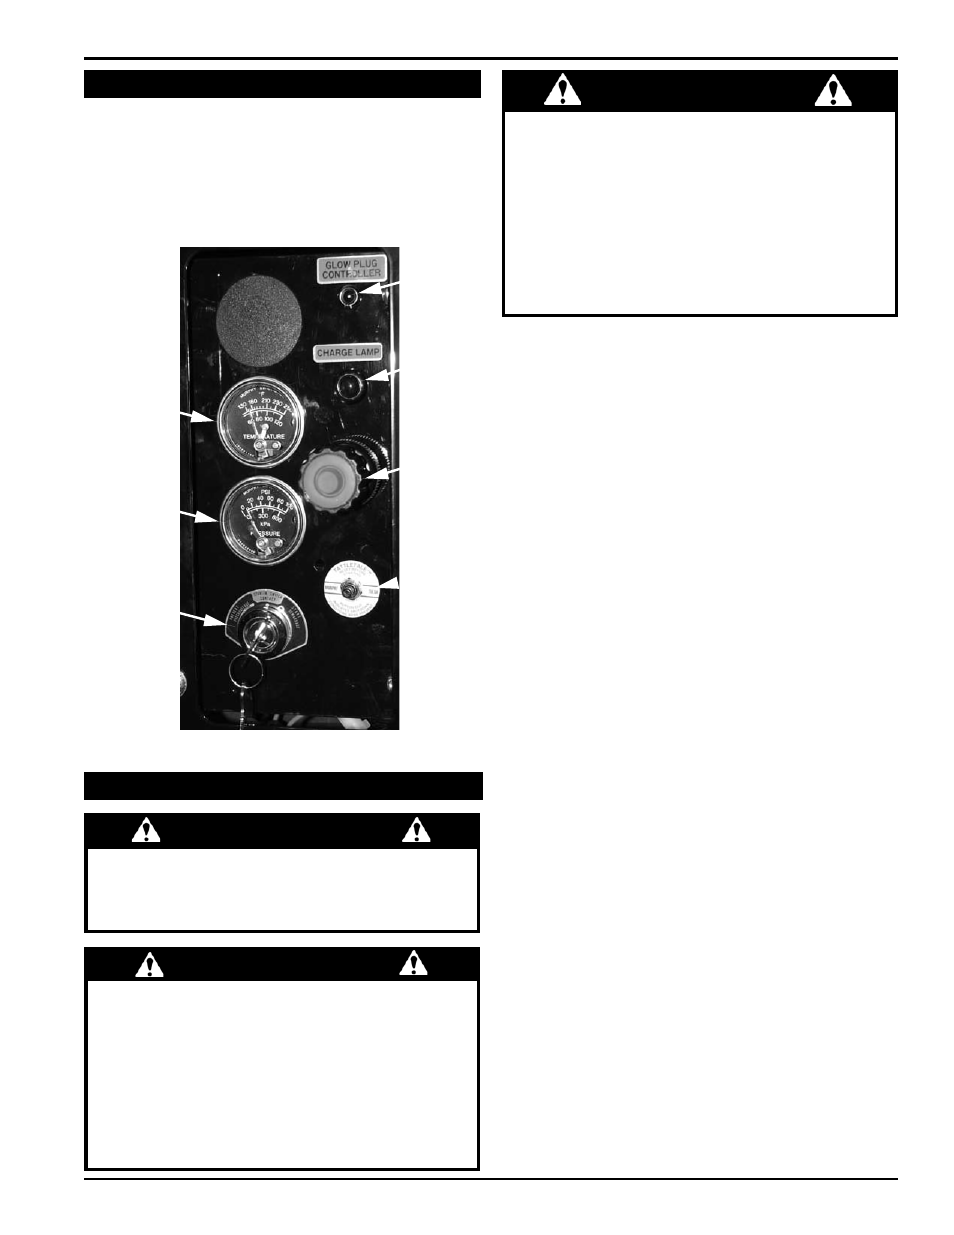
Figure 4.1, Chipper control panel
gradually move throttle to slowest position.
1.
Turn key switch to off position.
2.
Allow machine to come to a complete stop. Release
3.
the belt engagement pedal to help slow the rotor once
the engine has stopped running.
4.3 SToppING THE CHIppER
4.4 opERaTING THE CHIppER
CauTIoN
WaRNING
Never lean over the chipper chute to push objects into the
cutting device. Use a push stick or brush paddle.
Never use shovels or forks to feed brush. They can
cause extensive damage if they contact the blades.
In addition, metal pieces can be ejected from the
chipper chute and cause serious injury or death.
Never feed brush into the chute with your feet.
Never use hands or feet to clear materials that build up in
the chute.
Obtain and wear safety glasses at all times when
operating the machine.
Do not wear loose fitting clothing.
The operator should always wear heavy boots, gloves,
pants and a long-sleeved shirt.
use common sense and practice safety to protect
yourself from branches, sharp objects, and other
harmful objects.
WaRNING
Read and follow all safety instructions in this manual.
Failure to operate the machine in accordance with
the safety instructions
maY RESuLT IN pERSoNaL
INJuRY!
The machine chips and shreds a variety of materials into
a more readily decomposed or handled condition. The
following guidelines will help you get started.
Run unit at full operating speed
1.
before starting to
chip material.
Limbs fed in to the chipper chute must be 9 inches
2.
(23 cm) in diameter or less. Trim side branches that
cannot be bent enough to feed into the chipper chute.
Hold small diameter branches together in a bundle and
feed in simultaneously.
Exclude pieces of metal, rocks, bottles, cans, and
3.
other foreign objects when feeding material into the
machine.
Feed brush from the side of the chipper chute,
4.
rather
than from the front. Step aside to avoid being hit by the
brush moving into the chipper.
place limb, butt end first, into the chipper chute
5.
until it contacts the chipper blades. The actual feed
rate of the limb into the chipper will depend on the type
of material fed and sharpness of the cutting blades.
If the engine slows to where it may stall,
6.
stop feeding
material and allow the engine to recover. Feed material
more evenly.
If the chipper jams,
7.
remove the branch and rotate it
before reinserting it into the chute. Alternately insert
and retract the limb or insert continuously at a rate that
will not kill the engine.
Do not use the belt engagement pedal
8.
to clear a
plugged rotor. This may cause belt damage. Refer
to the instructions for clearing a plugged rotor in the
Service and Maintenance section.
alternate greener material with dry material
9.
to
lubricate the chipping blades for longer life and better
performance. Chipping dead, dry material will create
heat and dull the chipping blades quickly.
Sharpen the chipping blades periodically.
10.
Check
the sharpness of the blades every 5-15 hours. Refer
to the Service and Maintenance section for sharpening
instructions.
Glow Plug
Indicator
Charge
Indicator
Throttle
Switch
Murphy
Temperature
Gauge
Pressure
Gauge
Key Switch