Features & controls – Echo CH911DH Owners Manual v.3 User Manual
Page 13
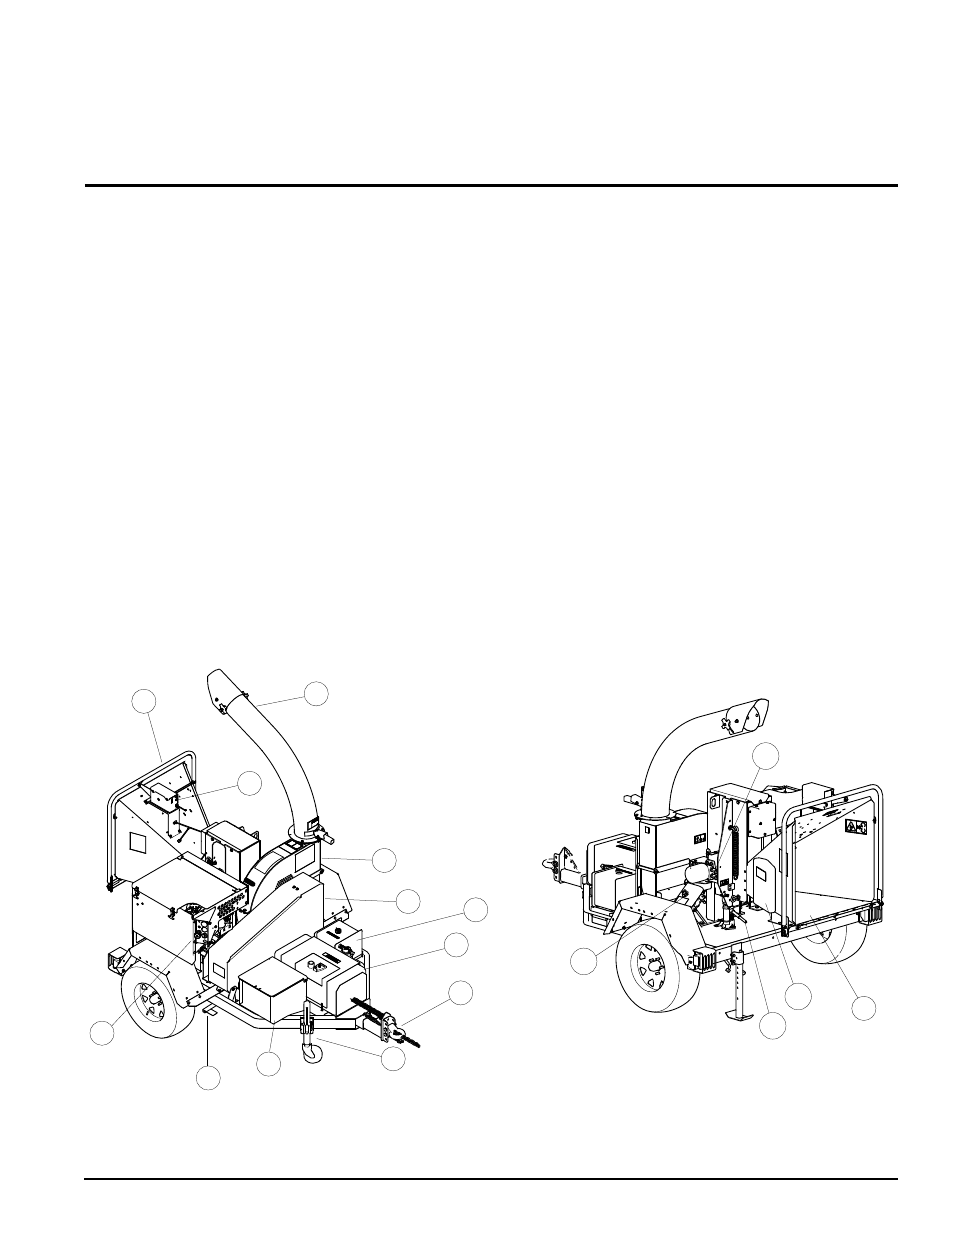
9 INCH CHIPPER
9
Chipper Chute:
1.
Feeds materials to the chipper blades
for chipping.
Discharge Tube:
2.
Chipped material exits through this
tube. It is adjustable 360 degrees.
Rotor access Cover:
3.
Tilts up to expose rotor.
Drive belt Shield:
4.
Never remove shields when in
use.
Fuel Tank:
5.
Fuel level indicator is located on top.
pintle Hitch:
6.
Always use safety chains when towing.
pivoting Tongue Jack:
7.
Always have in uP position
and clear from ground when moving. When in use,
place in DOWN position on a level surface. Turn handle
to raise or lower wheel.
battery box:
8.
Use group 22F 300 CCA min.
belt Engagement pedal:
9.
Used to disengage rotor
assembly drive belt.
Figure 3.1, 9 inch chipper controls
Section
FEaTuRES & CoNTRoLS
3
Control panel:
10.
Contains the key switch, throttle
control, Murphy switch and gauges.
Hydraulic Fluid Tank:
11.
Check level of hydraulic fluid
before each use.
Controller Light:
12.
When the light is flashing green,
increase RPM. The feed roller can be shifted into
Forward when the controller light is steady green. See
Section 7.3 for more information.
Feed Roller Jack:
13.
use the jack to raise the feed roller
for service or maintenance. See Sec. 5.6.
manual Container:
14.
Conveniently holds your
manuals.
Disk Lock and pin:
15.
Use the disk lock to hold the
chipper disk in place when doing any maintenance
work on it. See Sec. 5.2.
Feed Roller Control bar:
16.
Move the feed roller control
bar to begin feeding materials into the chipper.
Feed Roller Speed Control:
17.
Turn clockwise to
increase feed roller speed and counterclockwise to
decrease.
7
2
3
8
4
6
5
9
10
11
12
16
14
17
15
13
1