Aries Automotive 2067 User Manual
Page 3
1
1
1
1
2
2
2
To p
over
For s
used
For g
16. Next, mo
Top Brac
Quick Re
through t
Bracket o
Bracket),
Snug but
17. Repeat S
18. Release/
the vehic
12mm He
level the
19. Adjust th
Nuts. Se
Model ins
20. Slowly cl
Guard in
(Figure 1
occur.
21. Push the
Reattach
22. Do period
rotect your i
the finish. Do
stainless ste
also to clean
gloss black f
(Fig 1A) 07-1
ove to the pa
cket with the
elease Bolt w
the Grille Gu
over the Qui
, (1) 10mm F
t do not fully
Step 16 to at
/loosen the l
cle to the "op
ex Bolts on t
Grille Guard
e Quick Rel
e Steps 23—
stallation ca
ose the hoo
to the "close
15). WARNI
e Grille Guar
h the bottom
dic inspectio
nvestment, w
o not use any
eel: Aluminum
n the Grille Gu
finishes: Mild
13 Tundra bu
pictured fro
assenger sid
e shorter slot
with (1) 10m
uard. Thread
ck Release.
Flat Washer
y tighten hard
ttach the driv
evers on the
pen" position
the Frame M
d and tighten
ease Bolt cl
—27 for mor
n skip to Ste
od and check
ed" position.
NG! Do not
rd back towa
of the bump
ons to the ins
wax this prod
type of polish
m polish may b
uard.
d soap may be
umper brack
om above
Pa
de Top Brack
t in the back
m Special P
d (1) 10mm P
Thread (1)
and (1) 10m
dware at this
ver side Top
e Quick Rele
n, (Figure 14
Mounting Bra
n all hardwa
amping pres
re informatio
ep 21.
k for clearan
If needed, l
completely
ards the vehi
per cover wit
stallation to
uct after insta
h or wax that
be used to po
e used to clea
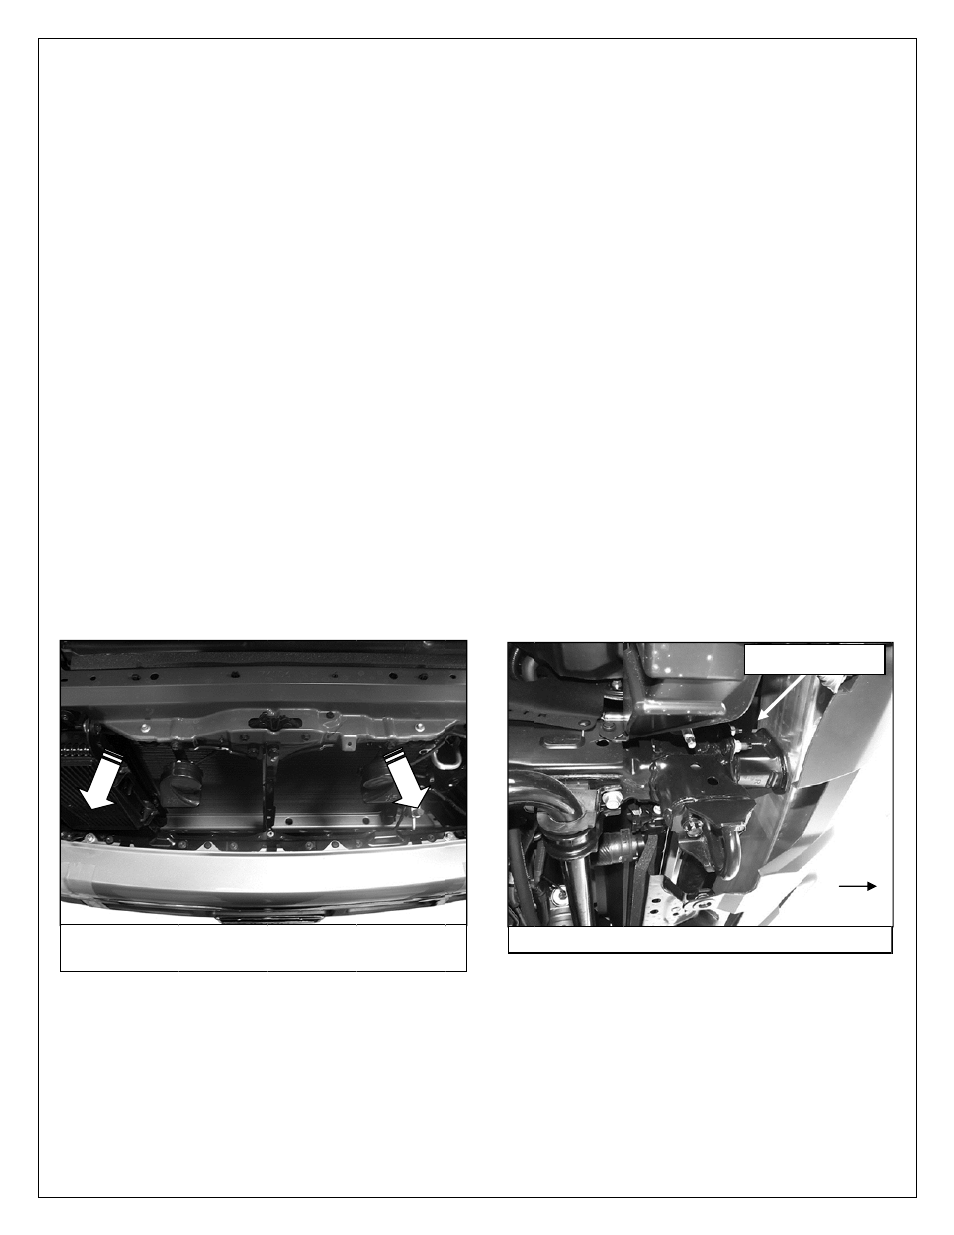
ket location
age 2 of 8
ket installed
of the Grille
Pivot Washer
Plastic Wash
10mm Plast
mm Nylon Lo
s time.
p Bracket to
ease Bolts, (
4). NOTE: It
ackets to mo
re including
ssure by loos
on. NOTE: T
ce. Release
oosen the u
loosen bolts
icle and fully
th the factor
make sure t
alling. Regula
may contain
olish small scr
an the Grille G
(Fi
in Steps 9 &
e Guard upri
r and (1) 10m
her part way
tic Washer,
ock Nut, (Fig
the Grille G
(Figure 13),
may be nec
ove the Grille
the Frame M
sening or tig
ilt feature on
e both Quick
pper bolt on
s or damage
y tighten all h
ry hardware,
that all hardw
ar waxing is re
abrasives tha
ratches and s
Guard.
g 1B) 2014 p
& 10. Line u
ght, (Figure
mm Flat Wa
y onto the th
(to protect th
gure 12), on
uard.
and pull the
cessary to sl
e Guard, (Fi
Mounting Br
ghtening the
nly required
k Release bo
n each Fram
to the truck
hardware, (F
, (Figure 2).
ware is secu
ecommended
at could dama
scuffs on the f
passenger si
up the long s
e 12). Insert
asher, (Figur
reads. Slide
he finish on
nto the Quick
e Grille Guar
lightly loosen
gure 15). C
rackets.
10mm Nylo
on 07-13 mo
olts. Push the
e Mounting
k or Grille Gu
Figure 16 &
ure and tight
d to add a pro
age the finish
finish. Mild so
de pictured f
Bumpe
F
2/17/14 (DP
slot in the
(1) 10mm
re 12),
e the Top
the Top
k Release.
rd away from
n the top (2)
enter and
on Lock
odels. 2014
e Grille
Bracket,
uard may
17).
t.
otective layer
.
oap may be
from below
er bracket
Front
P)
m
)