Transporting work platform, Fold down guardrails, Routine service – Snorkel SL30SL-sn13300-49999 User Manual
Page 5: By forklift, By crane, By truck, Fold down procedure (figure 4), Erection procedure, Service report, Routine service table key
8
Service Report
Date: ______________
Owner: ________________________________
Model No: ___________ Serial No: _________
Serviced By: ___________________________
Service Interval: _________________________
Routine Service
Use the following table as a guide for routine main-
tenance. Inspection and maintenance shall be
performed by personnel who are trained and
familiar with mechanical and electrical proce-
dures. Refer to the Service Manual for complete
service instructions.
Please copy this page and use the Routine Service
Table as a checklist when inspecting a machine for
service.
Routine Service Table Key
Interval
Daily=each shift (every day) or every eight hours
30d=every month (30 days) or every 50 hours
3m=every 3 months or 125 hours
6m=every 6 months or 250 hours
1y=every year or 500 hours
2y=every 2 years or 1000 hours
Y=Yes/Acceptable
N=No/Not Acceptable
R=Repaired/Acceptable
COMPONENT
INSPECTION OR SERVICES
INTERVAL Y N R
Engine Oil
Check level and condition
Daily
Check for leaks
Daily
Change oil & filter (Dual Fuel)
30
D
Change oil & filter (Diesel)
100
HOURS
Engine Fuel Check fuel level
Daily
System
Check for leaks
Daily
Replace fuel filter
6
M
Check air cleaner
Daily
Engine
Check electrolyte level
Daily
Battery
Check specific gravity
30
D
System
Clean exterior
6
M
Check battery cable condition
Daily
Clean terminals
6
M
Engine
Check coolant level (with engine cold)
Daily
Coolant
Replace coolant
3
M
(Diesel)
Hydraulic Oil Check oil level
Daily
Change filter
6
M
Drain and replace oil
2
Y
Hydraulic
Check for leaks
Daily
System
Check hose connections
30
D
Check hoses for exterior wear
30
D
Emergency Open the emergency lowering
Daily
Hydraulic
valve and check for
System
serviceability
Controller
Check switch operation
Daily
Control
Check the exterior of the cable
Daily
Cable
for pinching, binding or wear
Platform
Check fasteners for proper torque
Daily
Deck and
Check welds for cracks
Daily
Rails
Check condition of deck
Daily
Tires
Check for damage
Daily
Check air pressure (50 psi-26 x 12.00-12NHS)
Daily
Check lug nuts (torque to 90 ft. lbs. [123 Nm])
30
D
Hydraulic
Wipe clean
30
D
Pump
Check for leaks at mating surfaces
30
D
Check for hose fitting leaks
Daily
Check mounting bolts for proper torque
30
D
Check the drive coupling for proper
alignment and wear
1
Y
Lubricate pump splines
6
M
Drive Motors Check for operation and leaks
Daily
Steering
Check hardware & fittings for proper torque
6
M
System
Grease pivot pins
30
D
Oil king pins
30
D
Check steering cylinder for leaks &
30
D
mounting bolts for proper torque
Elevating
Inspect for structural cracks
Daily
Assembly
Check pivot points for wear
30
D
Check mounting pin pivot bolts
30
D
for proper torque
Check linkage gear for wear
6
M
Check elevating arms for bending
6
M
Grease linkage pins
30
D
Grease linkage gear
30
D
COMPONENT
INSPECTION OR SERVICES
INTERVAL Y N R
Chassis
Check hoses for pinch or rubbing points
Daily
Check component mounting for proper torque
6
M
Check welds for cracks
Daily
Lift
Check the cylinder rod for wear
30
D
Cylinder
Check mounting pin pivot bolts
30
D
for proper torque
Check pivot pin snap rings
30
D
Check seals for leaks
30
D
Inspect pivot points for wear
30
D
Check fittings for proper torque
30
D
Fore/Aft
Check the cylinder rod for wear
30
D
Cylinder
Check mounting pin pivot bolts
30
D
for proper torque
Check seals for leaks
30
D
Inspect pivot points for wear
30
D
Check fittings for proper torque
30
D
Side/Side
Check the cylinder rod for wear
30
D
Cylinder
Check mounting pin pivot bolts
30
D
for proper torque
Check seals for leaks
30
D
Inspect pivot points for wear
30
D
Check fittings for proper torque
30
D
Axle
Check the cylinder rod for wear
30
D
Cylinder
Check mounting pin pivot bolts
30
D
for proper torque
Check seals for leaks
30
D
Inspect pivot points for wear
30
D
Check fittings for proper torque
30
D
Bubble Level Check bubble and target ring for damage.
Daily
Entire
Check for and repair
Daily
Unit
collision damage
Check fasteners for proper torque
3
M
Check for corrosion-remove
6
M
and repaint
Lubricate
30
D
Labels
Check for peeling, missing, or unreadable
Daily
labels & replace
5
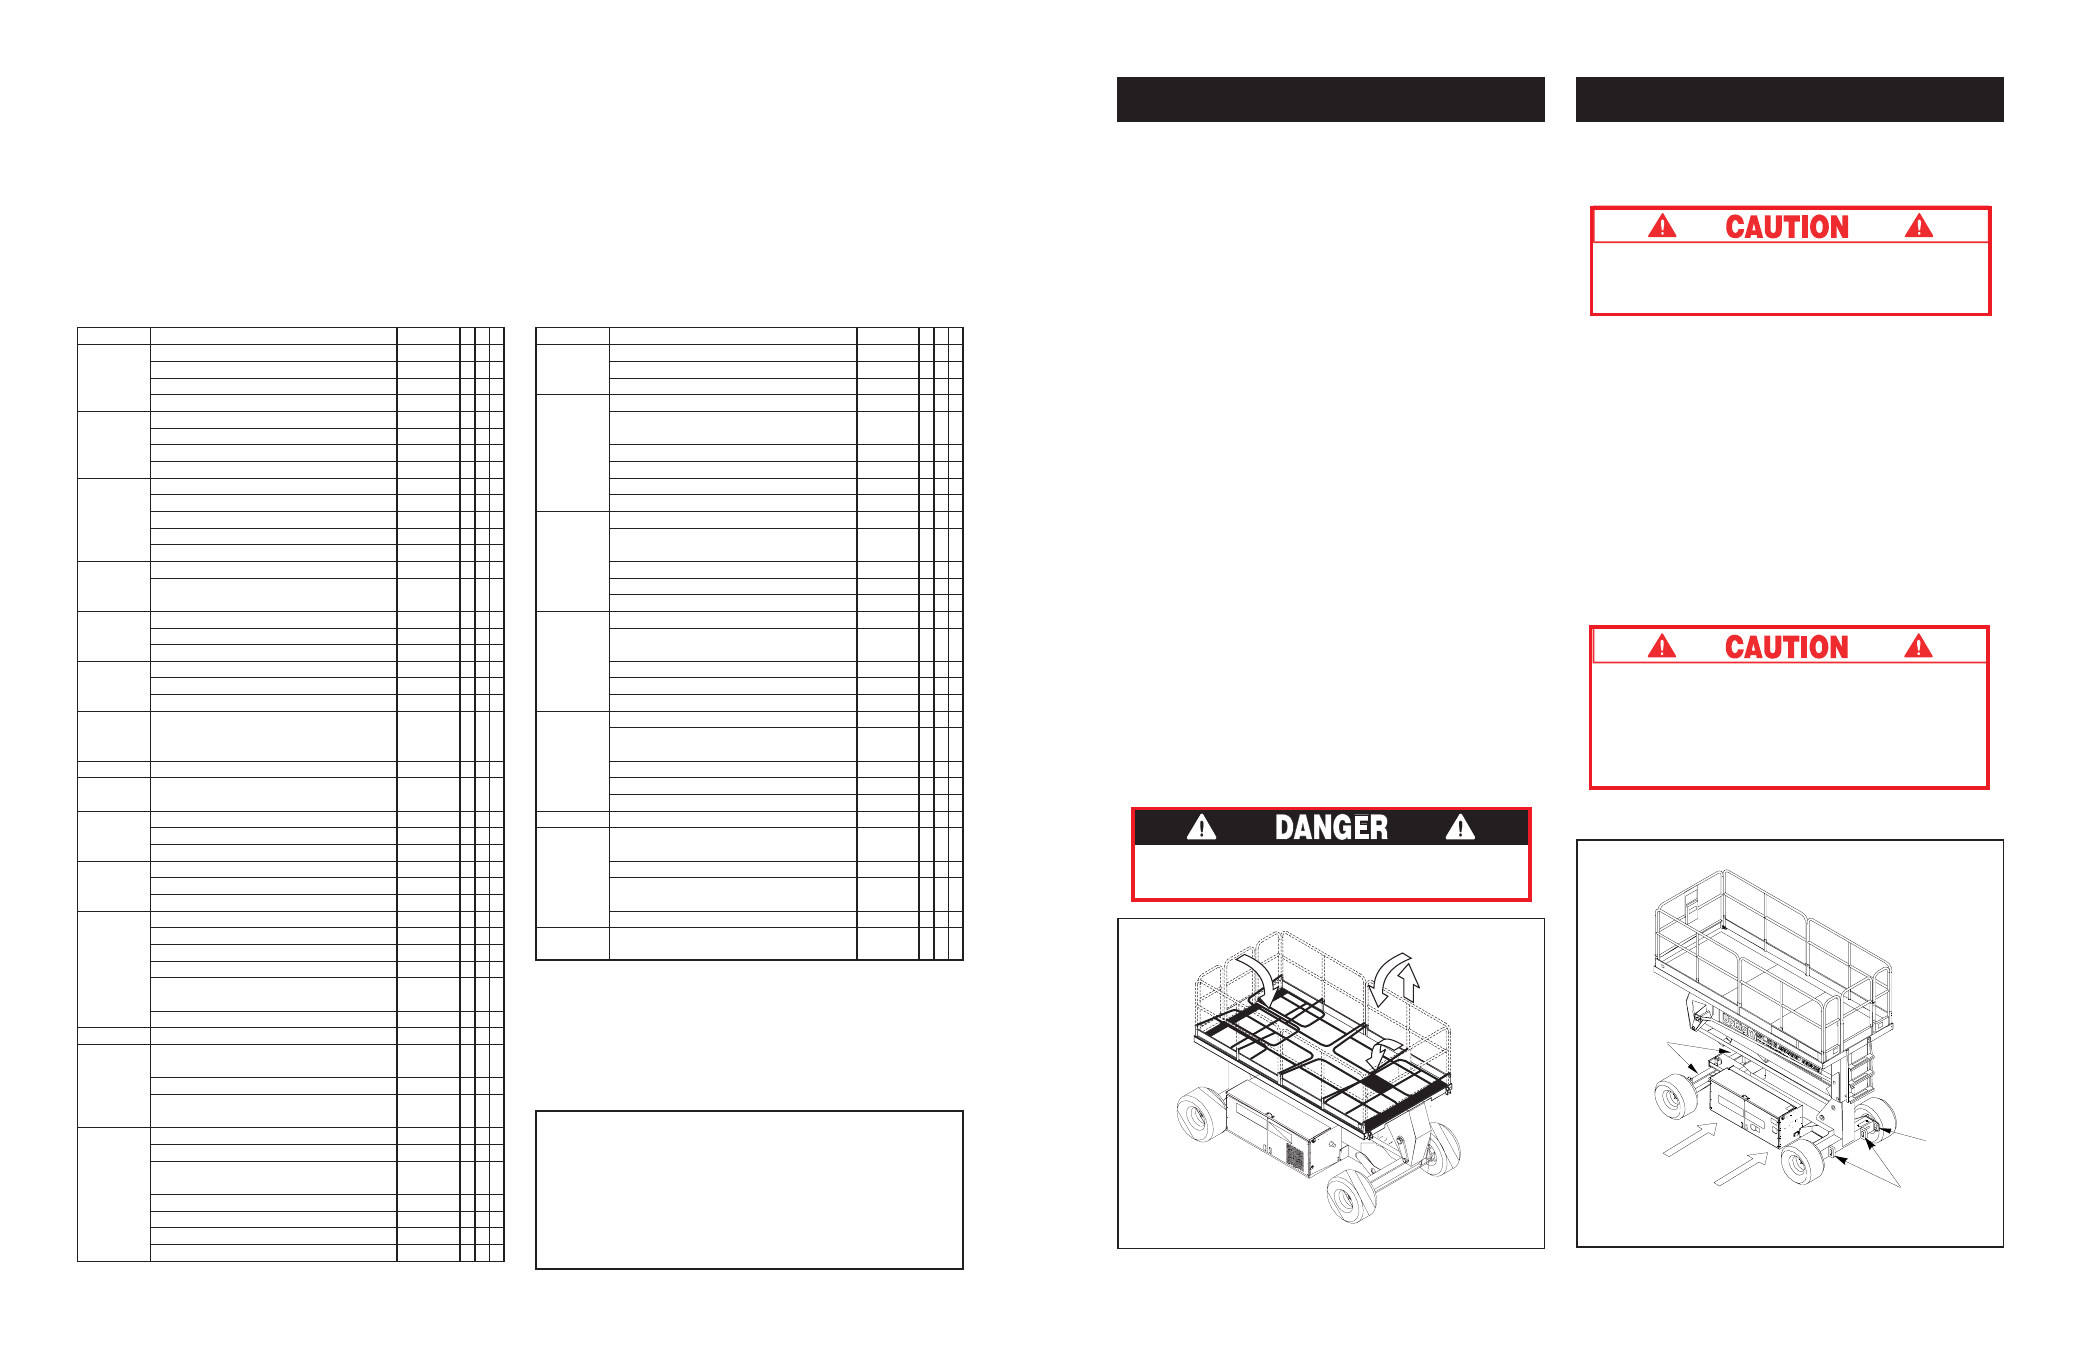
Transporting Work Platform
By Forklift
NOTE: Forklifting is for transporting only.
See specifications for weight of work platform
and be certain that forklift is of adequate
capacity to lift platform.
Forklift from side of Chassis by lifting under the
Chassis Modules (Figure 5).
By Crane
1. Secure straps to Chassis Lifting Lugs only
(Figure 5).
By Truck
1. Maneuver the work platform into transport
position and chock wheels.
2. Secure the work platform to the transport
vehicle with chains or straps of adequate load
capacity attached to the chassis tie down lugs
(Figure 5).
Tie down lugs are not to be used to lift work
platform.
Overtightening of chains or straps through
tie down lugs may result in damage to work
platform.
Figure 5: Transporting Work Platform
Fold Down Guardrails
This procedure is only for passing through door-
ways. Guardrails must be returned to proper
position before using the machine.
Fold Down Procedure (Figure 4)
Note: When performing the following proce-
dures retain all fasteners.
1. Place controller on platform.
2. Starting at the front of the platform, remove
nuts, bolts and washers from the top of the
front guardrail. Fold the front guardrail down
onto the platform.
3. Close and latch the gate.
4. Remove nuts, bolts and washers from the top
of the rear guardrail. Fold the rear guardrail
down onto the platform being careful to keep
gate latched at all times.
5. Remove nuts, bolts and washers from the top
of the side guardrails and from the slideout
deck midrail. Lift up and fold one side guardrail
in so it rests on the deck. Repeat with other
side guardrails.
Erection Procedure
1. Raise side guardrails making sure each is
pushed down to secure the guardrail in the
vertical position.
2. Install bolts, washers and nuts between the
side guardrails, tighten securely.
3. Raise rear guardrail assembly, aligning holes
and install bolts, washers and nuts. Tighten
securely.
Before entering Platform, guardrails must be
securely fastened in their proper position.
Figure 4: Fold Down Guardrails
Forklift
Front Tie
Downs/
Lifting Lugs
Rear Tie
Downs
Right Rear
Lifting Lug
(Typical)