Leveling platform, Raising and lowering the platform, Travel with work platform elevated – Snorkel SL30SL-sn13300-49999 User Manual
Page 4: Emergency lowering, Switching fuels (gasoline / propane only), After use each day, Parking brake release (figure 3)
4
Leveling Platform
With Drive/Level/Lift Switch in LEVEL hold the
Control Lever so the Interlock Lever is depressed.
Center bubble in bubble level using Fore/Aft and
Left/Right Switches. To level the platform forward
it may be necessary to elevate the platform
slightly.
Raising and Lowering The Platform
1. Position the Drive/Level/Lift Switch to LIFT.
2. While holding the Control Lever so the Inter-
lock Lever is depressed, push the Control
Lever slowly to UP to raise the platform. Push-
ing the Control Lever farther increases the lift
speed. If the platform does not elevate above
the interlock height, about eight feet ( 2.44 m),
fully lower platform and re-level.
3. When the work task is completed, position the
Drive/Level/Lift Switch to LIFT and lower the
platform by pulling back on the Control Lever
until the platform is fully lowered.
Travel With Work Platform Elevated
Travel with platform elevated ONLY on firm flat
surfaces.
NOTE: The Work Platform will travel at reduced
speed when in the elevated position.
1. Check that the route is clear of persons,
obstructions, holes and drop-offs, is level and
capable of supporting the wheel loads.
2. Check clearances above, below and to the
sides of platform.
3. Position the Drive/Level/Lift Switch to the
DRIVE position.
4. Push the Control Lever to FORWARD or
REVERSE for the desired direction of travel.
If the machine quits driving and the Tilt Alarm
sounds, immediately lower and re-level the
platform before attempting to elevate again.
Emergency Lowering
The Emergency Lowering Valve is located on
the left hand side of the chassis through the
cutout in the Control Module cover.
1. Open the Emergency Lowering Valve by
pushing in and turning the knob counterclock-
wise approximately ¼ turn, the knob will pop
out, disengaging detent.
2. Once the platform is fully lowered, be certain that
the Emergency Lowering Valve is closed again.
The platform will not elevate if the Emergency
Lowering Valve has not been closed.
3. To close the Emergency Lowering Valve, push
the knob in and turn approximately ¼ turn
clockwise until the detent engages.
Switching Fuels (Gasoline / Propane Only)
1. With engine running push the Fuel Selector
Switch to the center position.
2. After the engine has quit running select the
appropriate fuel supply.
3. Restart the engine.
After Use Each Day
1. Ensure that the platform is fully lowered.
2. Park the machine on level ground, preferably
under cover, secure against vandals, children
or unauthorized operation.
3. Turn the Key Switch to OFF and remove the
key to prevent unauthorized operation.
Parking Brake Release (Figure 3)
Perform the following only when the machine will
not operate under its own power and it is neces-
sary to move the machine or when towing the
machine up a grade or wenching onto a trailer to
transport.
1. Close the needle valve by turning the knob
clockwise.
2. Pump the Brake Release Pump until the Parking
Brakes release and the wheels can be turned.
3. The machine will now roll when pushed or
pulled.
4. Be sure to open the needle valve and verify
that the Parking Brakes have engaged before
the machine is operated.
Never operate work platform with the
Parking Brakes inoperative. Serious injury
or damage could result.
Never tow faster than 1 ft./sec. (.3 m/sec).
Pump
Needle Valve
Figure 3: Brake Release Pump
9
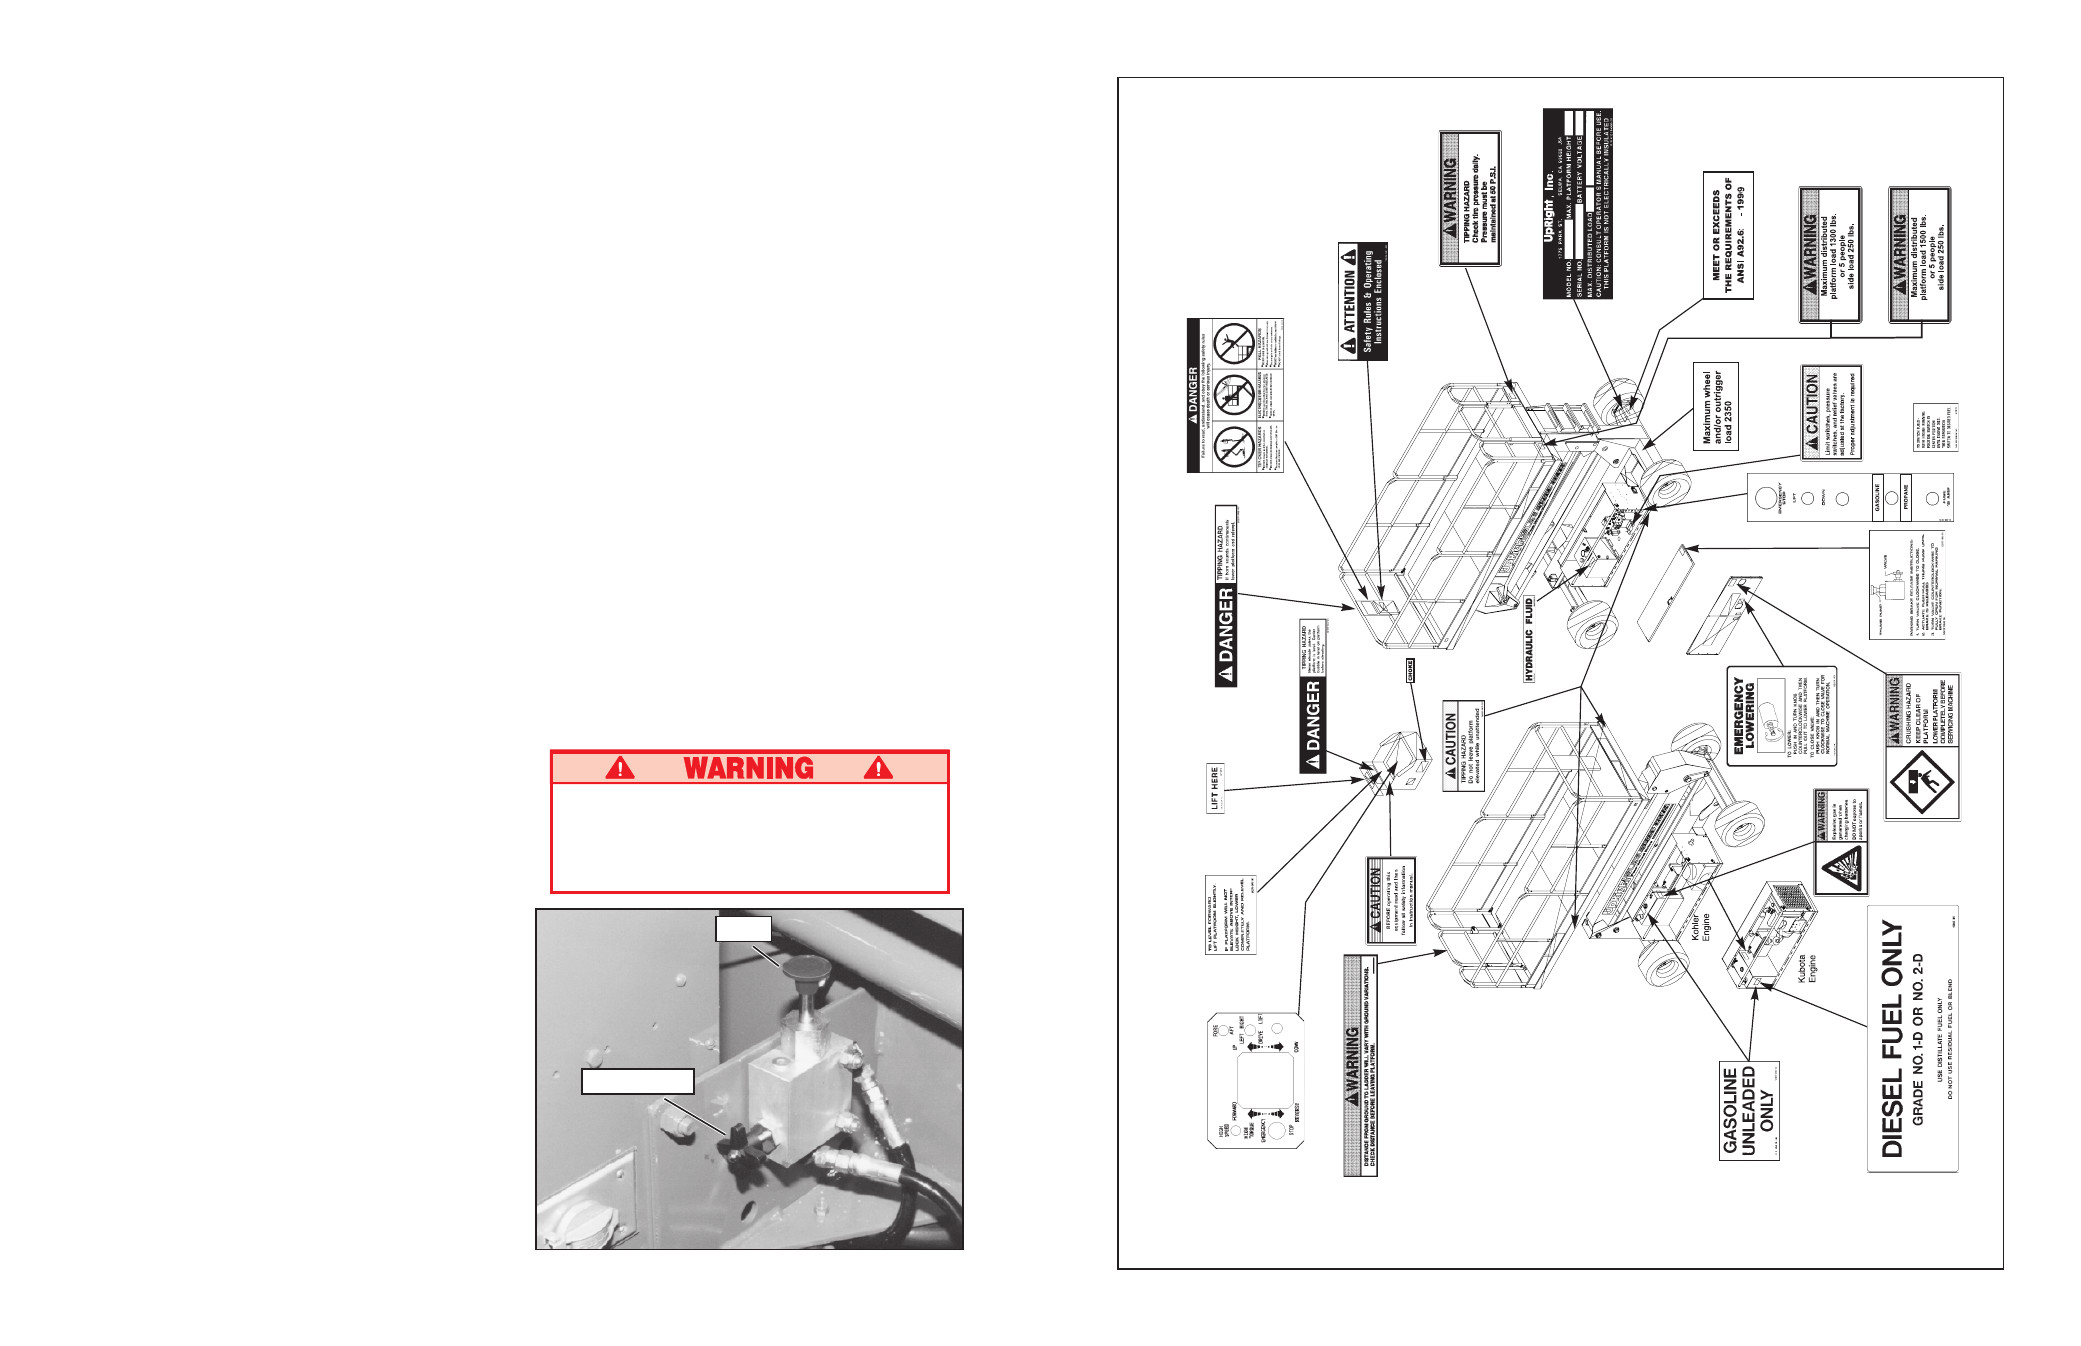
SL-26/30SL LABEL INSTALLATION: THESE LABELS SHALL BE PRESENT AND IN GOOD
CONDITION BEFORE OPERATING THE WORK PLATFORM. BE SURE TO READ, UNDER-
STAND AND FOLLOW THESE LABELS WHEN OPERATING THE WORK PLATFORM.
Note:
Labels can be ordered by using Part Number located by each label. For
m
achines
equipped
with
options
consult
Service
Manual.
061205-000 1-REQUIRED
061220-002 1-REQUIRED
SL30SL 102250-008 1-REQUIRED
SL26SL 102250-007 1-REQUIRED
065791-000 1-REQUIRED
066551-004 1-REQUIRED
064374-000 1-REQUIRED
061515-000 1-REQUIRED
066562-000 1-REQUIRED
064421-000 1-REQUIRED
064414-000 1-REQUIRED
063423-000 1-REQUIRED
066555-000 2-REQUIRED
062524-001 1-REQUIRED
066568-000 1-REQUIRED
066552-000 1-REQUIRED
060197-000 1-REQUIRED
066551-002 1-REQUIRED
027898-000 1-REQUIRED
064166-000 1-REQUIRED
010076-001 1-REQUIRED
066550-004 1-REQUIRED
066554-000 1-REQUIRED
066551-003 1-REQUIRED
066563-000 1-REQUIRED
030624-024 3-REQUIRED
102252-012 2-REQUIRED