Black & Decker BL10471 User Manual
Blender licuadora, Important safeguards, Save these instruc tions
Size: 19.685" x 17.5"
POLARIZED PL
UG (120V
Models Onl
y)
This appliance
has a
polarized plug
(one blade
is wider
than the
other). To
reduce the
risk of
electric shock,
this plug
is intended
to fit
into a
polarized outlet
only one
way. If
the plug
does not
fit fully
into
the outlet,
reverse the
plug. If
it still
does not
fit, contact
a qualified
electrician.
Do not
attempt to
modify the
plug in
any way.
TAMPER-RESIST
ANT SCREW
Warning:
This applianc
e is
equipped with
a tamper-r
esistant
screw
to
prev
ent remo
val
of the
outer
cov
er. T
o reduc
e the
risk of
fire
or
electric
shock, do
not att
empt to
remo
ve
the out
er co
ver
. Ther
e ar
e
no user-servic
eable
parts inside.
Repair should
be done
only
by
authorized servic
e per
sonnel.
ELECTRIC
AL CORD
The cord
of this
appliance was
selected to
reduce the
possibility of
tangling in
or tripping
over a
longer cord.
If more
length is
needed,
use an
extension cord
rated no
less than
15-amperes. (For
220 volts
rated products,
use an
extension cord
rated no
less than
6-amperes).
When using
an extension
cord, do
not let
it drape
over the
working
area or
dangle where
someone could
accidentally trip
over it.
Handle
cord carefully
for longer
life; avoid
jerking or
straining it
at outlet
and
appliance connections
Note:
If the
power supply
cord is
damaged, it
should be
replaced by
qualified personnel
or in
Latin America
by an
authorized service
center.
Please
Read and
Save
this Use
and Car
e Book.
IMPORTANT
SAFEGUARDS
When using
electrical appliances,
basic safety
precautions should
always be
followed, including
the following:
❍
Read all
instructions.
❍
To protect
against risk
of electrical
shock do
not immerse
cord,
plugs or
appliance in
water or
other liquid.
❍
Clo
se
sup
erv
isi
on
is
nec
ess
ary
w
hen
an
y a
ppl
ian
ce
is
use
d b
y o
r
near children.
❍
Unplug from
outlet when
not in
use, before
putting on
or taking
off parts,
and before
cleaning.
❍
Avo
id
con
tac
tin
g m
ovi
ng
par
ts.
❍
Do not
operate any
appliance with
a damaged
cord or
plug or
aft
er
the
ap
plia
nce
m
alf
unc
tio
ns,
or
is
dr
opp
ed
or
dam
age
d in
any manner.
Return appliance
to the
nearest authorized
service
facility or
call the
appropriate toll-free
number on
the front
of
this manual
for examination,
repair or
electrical or
mechanical
adjustment. Or,
call the
appropriate toll-free
number on
the
cover of
this manual.
❍
The use
of attachments,
including canning
jars, not
recommended by
the manufacturer
may cause
fire, electric
shock or
injury.
❍
Do not
use outdoors.
❍
Do not
let cord
hang over
edge of
table or
counter.
❍
Keep hands
and utensils
out of
container while
blending to
reduce the
risk of
severe injury
to persons
or damage
to the
blender. A
scraper may
be used,
but must
be used
only when
the
blender is
not running.
❍
Blades are
sharp. Handle
carefully.
❍
To reduce
the risk
of injury,
never place
cutter-assembly blades
on base
without jar
properly attached.
❍
Always operate
blender with
cover in
place.
❍
When blending
hot liquids,
remove center
piece of
two-piece
cover.
SAVE THESE INSTRUC
TIONS.
This product is f
or household use only.
Product
may vary
slightly
from
what is
illustr
ated.
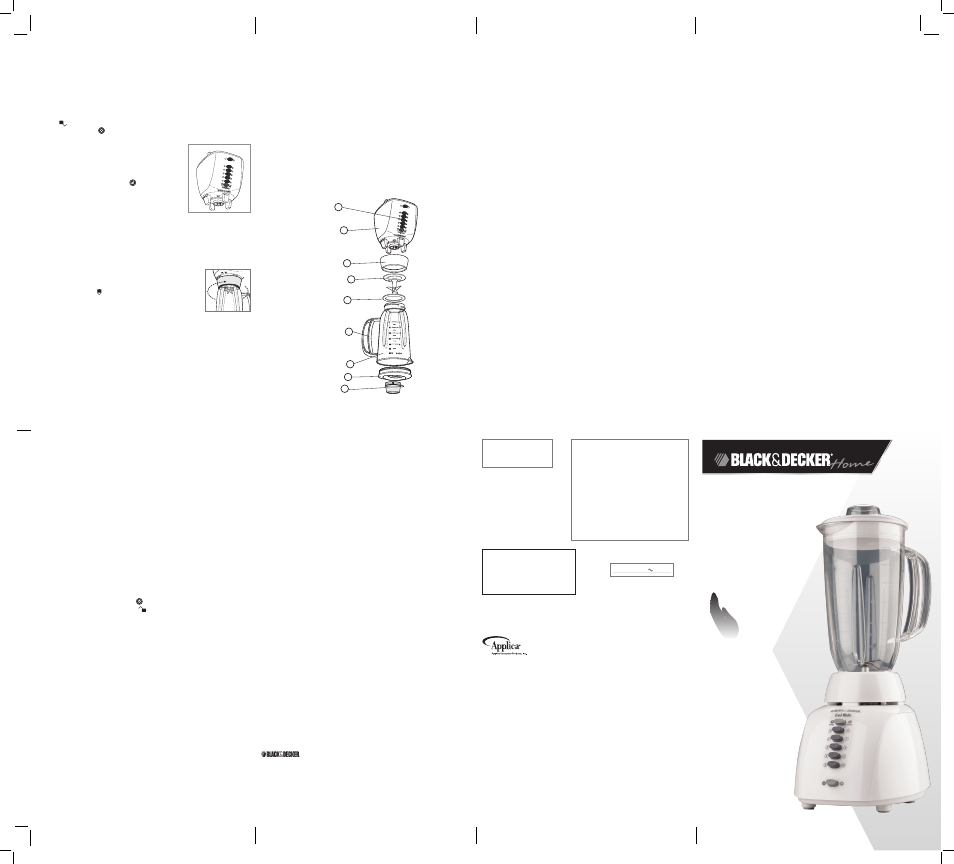
† 1.
Lid
cap
(Part
# 081049)
† 2.
Lid
(Part
# 081050DZ102)
† 3.
Jar
(Part
# 081048FI)
4. Handl
e
† 5.
Gask
et (P
art #
09151)
† 6.
Blade
assembl
y (P
art #
77904)
† 7.
Jar
base (P
art #
03473-2DZ101)
8.
Unit
base
9.
Contr
ols (see
B)
Note:
† indicates
consumer replaceable/removable
parts
NEED HELP?
For service, repair or any questions regarding your appliance, call the appropriate
800 number on cover of this book. Please DO NOT return the product to the place
of purchase. Also, please DO NOT mail product back to manufacturer, nor bring it
to a service center. You may also want to consult the website listed on the cover of
this manual.
Two-Year Limited Warranty
(Applies only in the United States)
What does it cover?
• Any defect in material or workmanship provided; however, Applica’s liability
will not exceed the purchase price of product.
For how long?
• Two years after date of purchase.
What will we do to help you?
• Provide you with a reasonably similar replacement product that is either new
or factory refurbished.
How do you get service?
• Save your receipt as proof of date of sale.
• Visit the online service website at www.prodprotect.com/applica, or call toll-
free
1-800-231-9786, for general warranty service.
• If you need parts or accessories, please call 1-800-738-0245.
What does your warranty not cover?
• Damage from commercial use
• Damage from misuse, abuse or neglect
• Products that have been modified in any way
• Products used or serviced outside the country of purchase
• Glass parts and other accessory items that are packed with the unit
• Shipping and handling costs associated with the replacement of the unit
• Consequential or incidental damages (Please note, however, that some states
do not allow the exclusion or limitation of consequential or incidental damages,
so this limitation may not apply to you.)
How does state law relate to this warranty?
• This warranty gives you specific legal rights. You may also have other rights
that vary from state to state or province to province.
Sello del Distribuidor:
Fecha de compra:
Modelo:
Comercializado por:
Applica Manufacturing, S. de R. L. de C.V.
Presidente Mazarik No 111, 1er Piso
Col. Chapultepec Morales, Mexico D.F
Deleg. Miguel Hidalgo
CP 11570
MEXICO
Servicio y Reparación
aArt. 123 No. 95
Col. Centro, C.P. 06050
Deleg. Cuauhtemoc
Servicio al Consumidor,
Venta de Refacciones y Accesorios
01 800 714 2503
Código de fecha / Date Code
Copyright © 2009 Applica Consumer Products, Inc.
Fabricado en la República Popular de China
Impreso en la República Popular de China
Made in People’s Republic of China
Printed in People’s Republic of China
Importado por / Imported by:
APPLICA AMERICAS, INC.
Av. Juan B Justo 637 Piso 10
(C1425FSA) Ciudad Autonoma de Buenos Aires
Argentina
C.U.I.T No. 30-69729892-0
Importado por / Imported by:
APPLICA MANUFACTURING, S. DE R. L. DE C. V.
Presidente Mazarik No 111, 1er Piso
Col. Chapultepec Morales, Mexico D.F
Deleg. Miguel Hidalgo
CP 11570
MEXICO
Teléfono: (55) 5263-9900
Del interior marque sin costo
01 (800) 714 2503
is a registered trademark of The Black & Decker Corporation,
Towson, Maryland, USA
CRUSH MASTER
®
10-SPEED
BLENDER
LICUADORA
CRUSH MASTER
®
DE 10 VELOCIDADES
For online customer service
and to register your product, go to
www.prodprotect.com/applica
For US residents only.
Customer
Care
Line:
USA
1-800-231-9786
Mexico
01-800 714-2503
Accessories/Parts (USA)
Accesorios/Partes (EE.UU)
1-800-738-0245
MODEL/MODELO
❍
BL10471
1
2
5
6
7
8
9
3
4
How
to
Use
This product
is for
household use
only.
GETTING ST
ARTED
• Remove
all
packing
material
and
any
stickers
from
the
product.
• Remove
and
save
literature.
• Please
go
to
www.prodprotect.com/applica
to
register
your
warranty.
• Wash
all
removable
parts
as
instructed
in
CARE
AND
CLEANING
section
of this
manual.
• Wipe
outside
of
appliance
with
a
damp cloth;
dry
thoroughly.
BLENDER
JAR
ASSEMBL
Y
1. Before
first use,
wash all
parts except
the unit
base. Put
-the
gasket on
top of
the blade
assembly.
2.
Place the
blade assembly
into the
jar base
and turn
the jar
base clockwise
until tight
(A).
3.
Interl
ock Sys
tem:
Place
the assembled
jar onto
the
unit base
and turn
toward lock
(
) until
secured in
place. You’ve
engaged
the
interlock
system
if
you
lift
the jar
handle and
the entire
blender lifts
together as
one unit.
USING YOUR
BLENDER
1. Be
sure the
unit is
off and
plug the
cord into
a standard
electrical outlet.
2. Place
the food
to be
blended into
the jar
and the
lid on
the jar
before
blending.
3. Be
sure that
the lid
cap is
in place.
When crushing
ice or
hard foods,
keep one
hand on
the lid.
4. Choose
the
speed
that
best
suits
your
task
for
food or
beverage blending
(B). Press
the LOW/HI
button in
combination with
the task
button when
choosing or
switching speeds.
5. Use
the Pulse
(
) button
for a
few seconds,
then release
for quick
or delicate
blending
tasks. Releasing
the pulse
automatically turns
the blender
off.
6. If
you want
to add
ingredients while
the blender
is on,
remove the
lid cap
and drop
ingredients
through the
lid open
ing.
7. When
finish ed
blending, push
the on/off
button (
).
8. To
remove the
jar, grasp
the handle,
twist toward
the unlock
(
) and
lift it
from the
unit base.
Remove the
lid before
pouring.
BLENDING TIPS AND TECHNIQUES
• Cut food into small pieces about ¾” (2 cm) before adding to the blender.
• When ingredients stick or spatter along the sides of the jar, stop the
blending action and remove the lid. Use a rubber spatula to push food
toward the blades. Replace the lid, then continue blending.
• Some of the tasks that cannot be perform ed efficiently with a blender
are: beating egg whites, whipping cream, mashing pota toes, grinding
meats, mixing dough, and extracting juices from fruits and vegetables.
• The following items should never be placed in the unit as they may
cause dam age: dried spices and herbs (ground alone), bones, large
pieces of solidly frozen foods, tough foods such as turnips.
Care and Cleaning
This product contains no user serviceable parts. Refer service to qualified
service personnel.
Important: To maintain performance, dry blades after cleaning.
1. The fast clean feature helps make it easier to clean the blender jar by
loosening food particles. You may use the fast clean feature by filling
the jar half full with lukewarm water. Add a little dish detergent for
tough cleaning jobs (such as after mak ing salsa, shakes, or salad
dressing). Hold the lid and press any button. Let the unit run for about 5
seconds, then press the on/off (
) button.
2. Unplug the unit, twist to unlock (
), lift the jar off the unit base, and
rinse.
3. Parts may be hand-washed. Follow the cleaning instructions below.
For hand washing parts:
1. Before cleaning, turn off and unplug the blender.
2. Rinse parts immediately after blending for easier cleanup.
3. Wipe the unit base with a damp cloth and dry thoroughly. Remove
stubborn spots by rubbing with a damp cloth and non-abrasive cleaner.
Do not immerse the base in liquid.
4. Removable parts can be washed by hand or in a dishwasher. Do not
place jars or parts in boiling liquids.
5. If liquids spill into the base, wipe with a damp cloth and dry thoroughly.
Do not use rough scouring pads or cleansers on parts or finish.
A
B
2009/11-12-42E/S
475 W 120 V
60 Hz
CAT. NO. EHB500
TYPE 1 160 W 1
AC ONLY 6