Standard adjustable gable & strip installation, Gable and strip installation, Starting panel installation – Mueller Corrugated Panel User Manual
Page 14: Ending panel installation
14
Details are subject to change without prior notice.
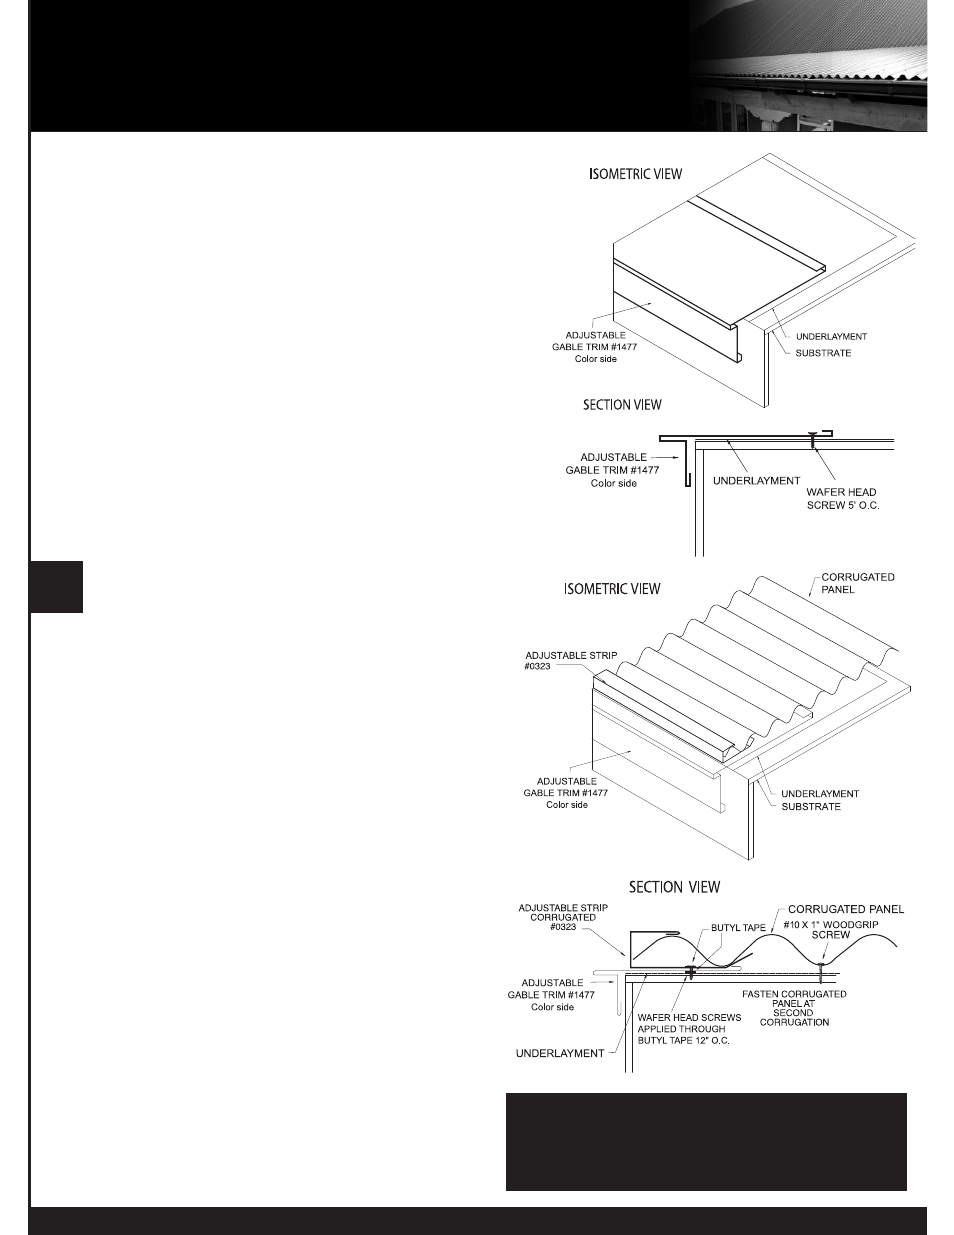
STANDARD ADJUSTABLE GABLE & STRIP INSTALLATION
1. Starting at the corner, install the adjustable gable trim along
the sloping gable, placing it on top of the underlayment.
2. Attach with wafer head screws 5’ on centers
(adjustable strip applied after valley trim).
3. Slide gable trim over eave trim at corner.
4. At the peak, one gable trim should be cut vertical to the
ground and overlap at the junction of the two gable trims.
NOTE: Alternate trim profiles are acceptable using the screw
pattern shown.
Gable and Strip Installation
1. If valley trim is intersecting the gable,
the valley must be installed first.
2. Pre-drill 1/8” holes on 12” centers along the
length of adjustable gable strip #0323.
3. Butyl tape should be applied to the bottom of the strip
covering pre-drilled holes. Place the strip the desired
distance from the outside edge of the gable trim
(optimal distance 2”), making sure it is aligned parallel
to the gable, perpendicular to the eave line and
between the open hem at the edge of the adjustable
gable trim and the outside of the trim.
4. The adjustable strip is attached to the roof with wafer
head screws on 12” centers from eave to ridge using
pre-drilled holes, making sure the screws are applied
through the butyl tape. This condition exists in both
Starting Panel and End Panel Installation.
NOTE: Alternate trim profiles are acceptable using the screw
pattern shown.
Starting Panel Installation
1. Apply adjustable strip as previously instructed.
2. Apply butyl tape continuously down the length of
the adjustable strip, covering the wafer head screw.
3. Insert the edge of the panel into the strip,
making sure the panel is seated fully into the strip.
4. Attach the panel to the roof with #10 x 1” woodgrip
screws on the required centers.
NOTE: Alternate trim profiles are acceptable using the screw
pattern shown.
Ending Panel Installation
1. Make a straight cut the length of the panel
(optimal 2” from gable edge).
2. Apply adjustable strip as previously instructed.
3. Test apply the panel to make sure that the cut
edge seats fully into the strip.
4. Apply butyl tape and insert last panel into strip,
making appropriate panel lap.
NOTE: Alternate trim profiles are acceptable using the screw
pattern shown.
NOTE:
To
comply
with
Texas
Windstorm
Certification Testing, #12x11 SDT Type A screws
must be used in place of the #9 Woodgrip screws.