U-control uma25s – Behringer UMA25S User Manual
Page 19
19
U-CONTROL UMA25S
4b. Alternatively, press the EDIT/EXIT push button to cancel
any changes you made and to exit Edit Mode The EDIT LED
goes out.
+
To select the channel in CH ASSIGN Mode, it is
possible to use the +/- push buttons below the
display instead of the keyboard with its labeled
numbers.
+
Please note that the channel assignment in GLOBAL
EDIT Mode differs from the above described GLOBAL
SEND CHANNEL method! For more information, read
Chapter 5.7.
5.6.4 Snapshot Send (Send TX)
The Snapshot Send transmits all values of the current controller
positions. This allows a synchronization of the UMA25S settings
with the connected MIDI device.
1.
Press the EDIT push button.
2.
Press the SNAP TX key. The UMA25S transmits the status
of all control elements including the positions of the 8 rotary
knobs, the state of the 8 push buttons, etc.
After sending the snapshot the UMA25S switches to Play Mode.
+
In addition to the Snap TX function, there is also the
Single Preset Dump (see Chapter 5.7). Both of these
functions differ in the type of data they send. With a
Snapshot Send, only the current control values are
transmitted, which are synchronized with the
connected MIDI device. A Single Preset Dump on
the other hand allows the entire content of the
current preset, including the present control
element assignment, to be transmitted. This
function allows you easily to archive and exchange
individual presets with other U-CONTROL users.
5.6.5 Sending a Notes Off message
It may happen that a Note Off message cannot be transmitted
when the connection between the UMA25S and the other devices
is interrupted in which case the notes keep on playing. This kind
of situation requires you manually to trigger the Notes Off
message which mutes all connected sound modules at once.
The Notes Off message is sent to each of the 16 MIDI channels.
1.
Press the EDIT push button.
2.
Press the NOTES OFF key. The Notes Off message is
immediately transmitted. NOF appears on the display.
The device automatically switches to Play Mode.
5.6.6
Action Send function
The Action Send function lets you trigger the transmission of a
specific control element. For example, this function allows you
to send a one-off MIDI message which is only supposed to be
assigned to a control element for a short time.
1.
Press and hold down the EDIT push button.
2.
Turn the control element that you want reassigned.
3.
Release the EDIT push button.
4.
Use E9 to E16 to make the assignment.
5.
Press the ACTION SEND key. The MIDI message is trans-
mitted.
6a. Press the EDIT/EXIT push button to discard any changes
you made.
6b. Alternatively, if you want to keep the new assignment,
press ENTER to confirm. Additionally, store the changes in
a preset.
5. UMA25S as USB/MIDI controller
5.7 Settings in Global Mode
In Global Mode, you can make all settings that affect the device
as a whole, except for the presets.
1.
Press and hold down the EDIT/EXIT push button while you
press the MUTE push button
.
2.
You are now in Global Mode and can release both push
buttons. GLb for Global Mode appears on the display.
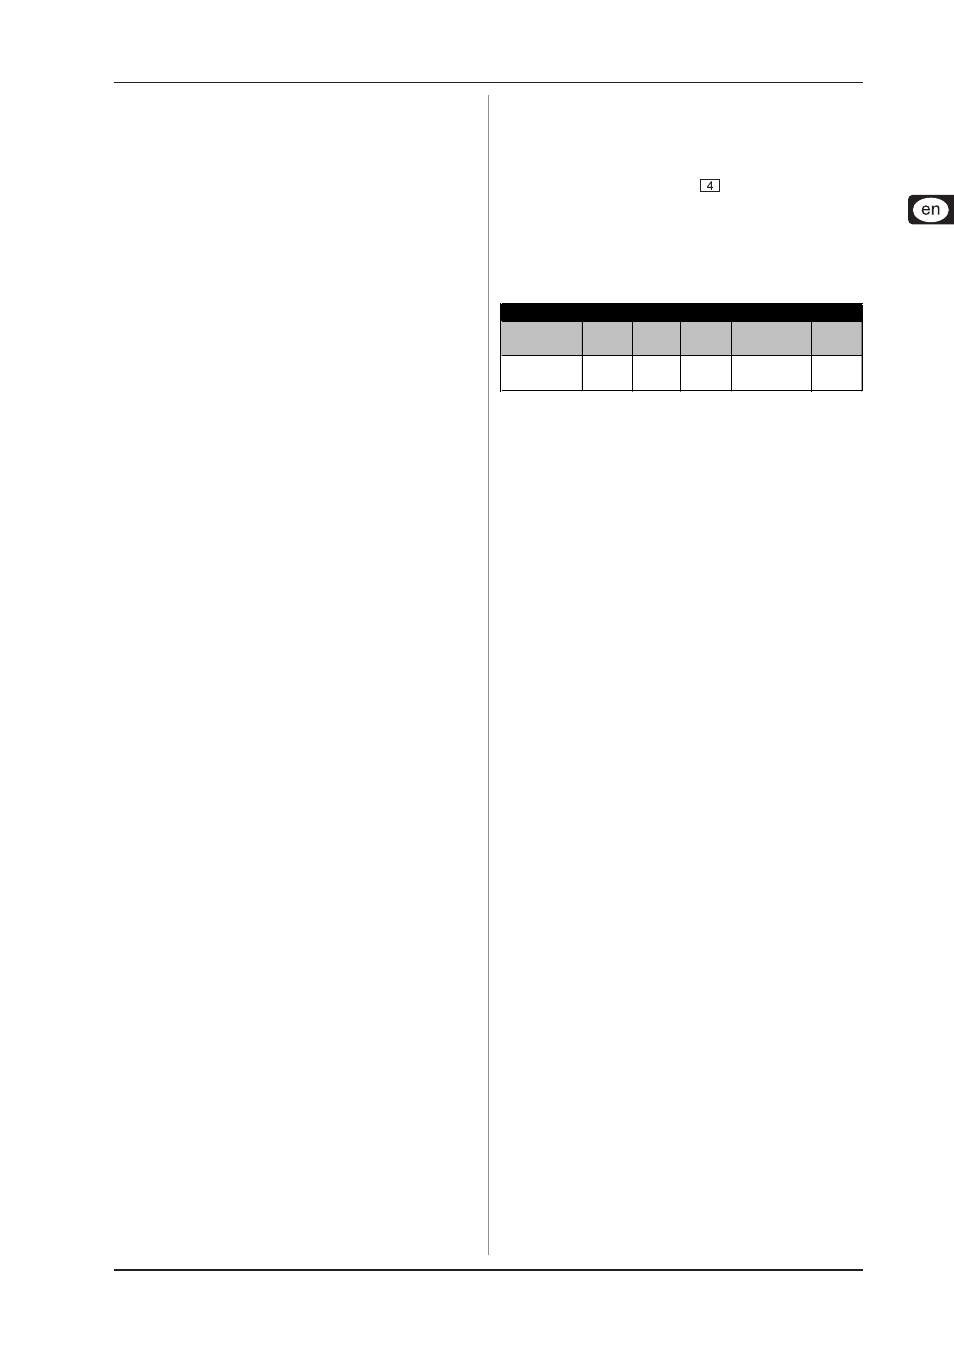
3.
Now you can make the necessary settings by using the
rotary knobs E9 to E16. The assignment of the knobs is as
follows:
(
(
(
(
(
(
Global
Receive Ch.
Device
ID
Dump
All
Dump
Single
MMC Frame
Rate Select
Factory
Reset
1-16, Off
1 - 16
Run/
End
Run/
End
Off, 24, 25,
30d, 30
FAC
Table 5.2: Rotary knob assignment in Global Mode
4.
Press the EDIT/EXIT push button to exit Global Mode.
+
The settings in Global Mode are directly taken over
and need not be separately stored.
Global Receive Channel:
The UMA25S receives Program Change messages on this
channel in order to load the presets.
+
Please note that the channel assignment in CH
ASSIGN Mode differs from the described method
in GLOBAL EDIT Mode! For more information, read
Chapter 5.6.3.
Device ID Number:
Only change the Device ID number settings when you are working
with several U-CONTROLs at the same time and encounter
problems recognizing the correct device during a SysEx dump.
+
Please note that SysEx dumps can only be received
at the Device ID number from which they were sent!
SysEx Dump ALL:
By turning the E11 rotary knob, the entire memory contents of
the 16 presets is sent as SysEx dump via MIDI. During the dump,
the display flashes Run. You can cancel the process by turning
the E11 rotary knob until End appears on the display.
In order to receive a SysEx dump, no settings on your equipment
have to be adjusted.
+
CAUTION: If you send an All SysEx Dump to the
U-CONTROL, the entire memory content is directly
overwritten! There is no prompt for confirmation
nor a memory safety function!
SysEx Dump SINGLE:
By turning the E12 rotary knob, the current preset is sent as
SysEx dump. During the dump, the display flashes Run. You
can cancel the process by turning the E12 rotary knob until End
appears on the display.
In order to receive a SysEx dump, no settings on your equipment
have to be adjusted. If you send a single preset to the UMA25S,
the data are first stored in a temporary memory. In order to be
stored permanently, save the data in a memory slot of your
choice (see Chapter 5.1.2).