Operating buttons and connections, English – Philips CDR950BK User Manual
Page 10
English
10
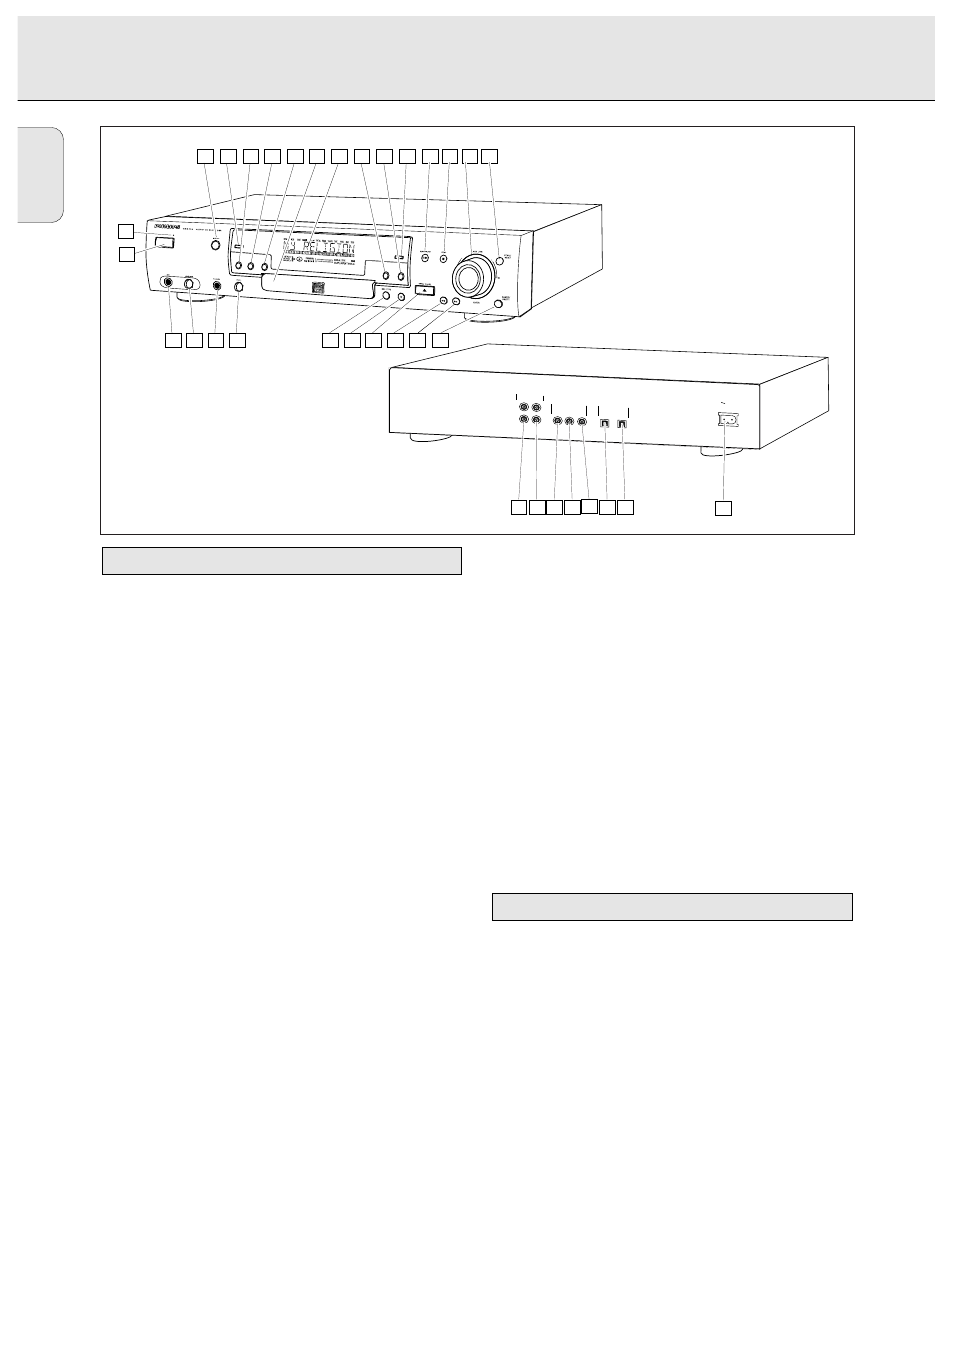
1 ON/OFF ........................turns the CD recorder ON and OFF
2 Standby indicator
3 DISPLAY......................selects display information/text
4 SCROLL........................activates scrolling of text over the
display (once)
5 PROGRAM ..................opens/closes program memory
6 REPEAT........................repeats play (all, program or track)
7 SHUFFLE......................plays CD(RW) or program in
random order
8 Disc tray
9 Display..........................information screen
0 ERASE..........................selects erasing mode
! FINALIZE ....................selects finalize mode
@ SOURCE ......................selects input source
# PLAY/PAUSE 2 ; ......starts play/interrupts play or
recording
$ STOP 9........................stops/clears a program
% ¡ EASY JOG ™ ........- previous/next track (Play and
(rotate)
Program mode)
- recording level control (recording)
- selects settings (menu on)
ENTER (push) ..............- plays selected tracks
- selects settings in Menu mode
- programs track numbers
^ STORE/MENU ............- enters Menu mode
- stores Menu settings
& CANCEL/DELETE ......- deletes tracks from a program
- deletes text in Menu mode
- returns to a higher level in the
menu
* R ............................- searches forward
- cursor control in Menu/Prog.
review mode
( Q ............................- searches backward
- cursor control in Menu/Prog.
review mode
) OPEN/CLOSE /..........opens/closes disc tray
¡ RECORD ......................starts recording, finalising, erasing
™ REC(ord) TYPE ............selects recording modes
£ LEVEL ..........................headphone volume control
≤ PHONES ......................socket for headphones
∞ LEVEL (MIC)................microphone/mix level controller
§ MIC ..............................socket for (stereo) microphone
Note: Unless stated otherwise, all controls are on the front of
the CD recorder. When provided on the remote control,
you can also use the corresponding buttons, after
selecting the CD recorder or separate CD player by
pressing CDR or CD.
1 ANALOG IN ................connects to the line output of an
amplifier (left and right)
2 ANALOG OUT ............connects to the line input of an
amplifier (left and right)
3 DIGITAL IN 1 ..............connects to the digital coaxial
output of an external CD player
4 DIGITAL OUT ..............connects to the digital coaxial
input of e.g. amplifier or recording
device
5 DIGITAL IN 2 ..............connects to the digital coaxial
output of an extra CD player
6 OPTICAL IN ................connects to the digital optical
output of an external CD player
7 OPTICAL OUT ............connects to the digital optical
input of e.g. amplifier or recording
device
8 Connection to mains
Connections at the back
Operating buttons on the front
OPERATING BUTTONS AND CONNECTIONS
RECORD
MAINS
OPTICAL
IN
OUT
DIGITAL
IN1
IN2
OUT
ANALOG
L
R
L
R
IN
OUT
8
7
6
5
4
3
2
1
13
15
14
16
17
18
19
20
21
22
23
24
25
26
4
5
6
7
8
9
10 11 12
3
1
2