10 meter menu, 11 rta/mic input, Applications – Behringer high-precision digital 24-bit/96 kHz EQ/RTA mastering processor DEQ2496 User Manual
Page 14: 1 sum-signal equalizer for live applications, 10 meter menu 3.11 rta/mic input
14
ULTRACURVE PRO DEQ2496 User Manual
To load individual modules from an existing preset, please press the PAGE key
to go to the second page of the MEMORY menu. Similar to page 1, you can
select a preset from which you want to load a module. Turn the lower data
wheel to select the module of your choice (GEQ, PEQ, DEQ, WIDTH, DYN and
I/O). Then, press the large data wheel or the B key to load the module
(RECALL MODULE). Here, too, you will be prompted to confirm your selection.
Additionally, STORE MODULE (A key) allows you to store individual modules in
an existing preset.
Exception:
DUAL MONO modules cannot be stored in a STEREO preset.
3.10 METER menu
The METER key below the two 7-digit LED displays selects the METER menu
comprising three pages and giving you an overview of all input/output levels of
the DEQ2496.
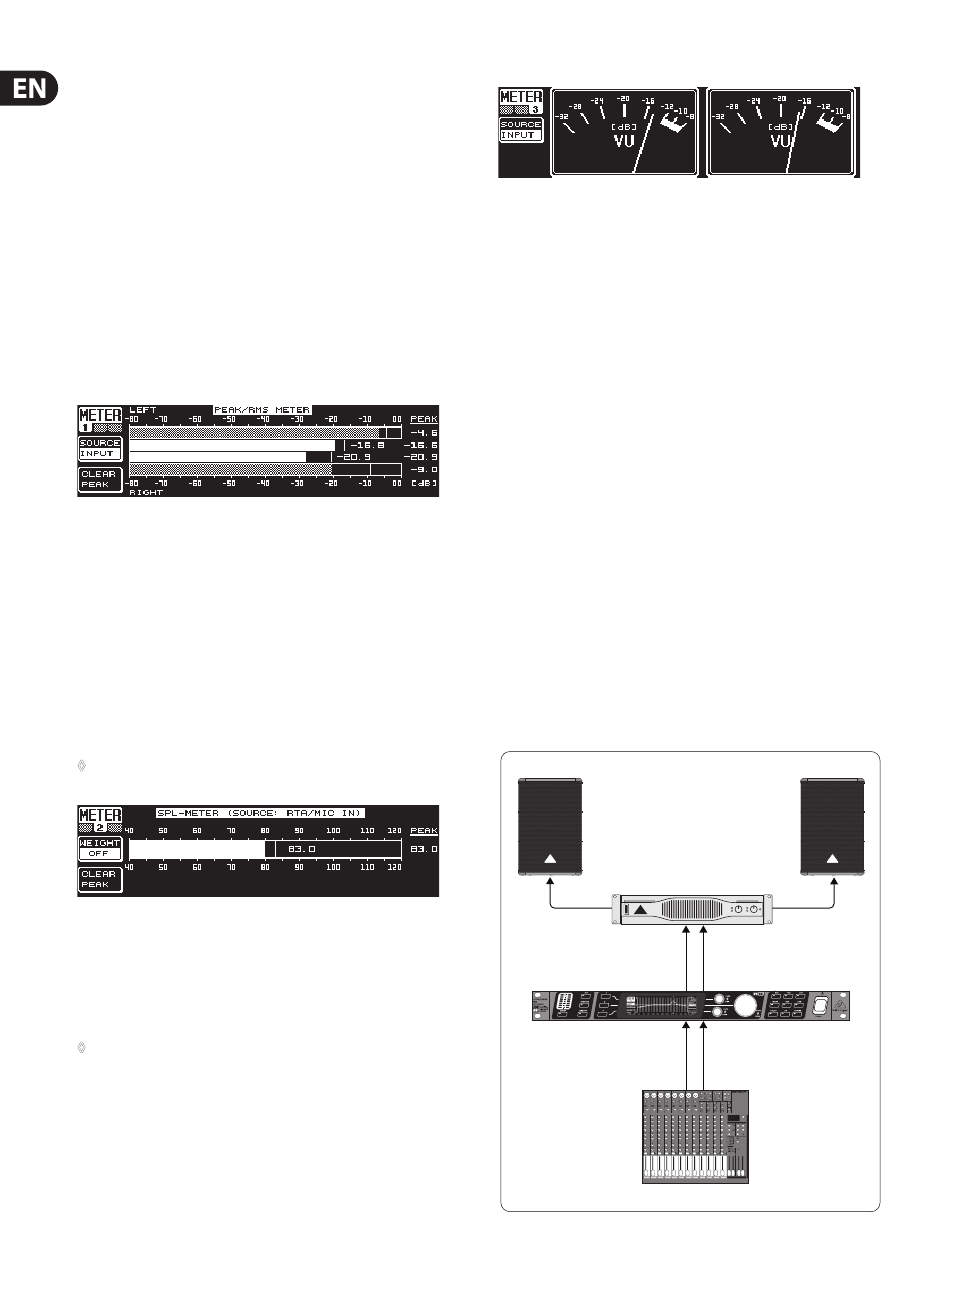
Fig. 3.33: METER menu (page 1)
Page 1 of the METER menu shows the levels of the left and right stereo side.
Use the A key (SOURCE) to determine whether the input signal, the output signal
or the signal applied to the digital or AUX output shall be displayed. The two bars
in the middle of the display show the average level of the signals in the form of
a VU meter. This means that the displays respond with some delay to changes in
signal level. Thus, very short peaks will not be displayed (RMS).
The outer two displays are peak meters indicating the signal level including
all peaks. As a consequence, the levels shown here are always a bit higher
than those displayed by the VU meter. The signal peaks of all level meters
(including peak hold) are shown to the right of these displays (PEAK). Press the
B key (CLEAR PEAK) to reset the peak values and recalculate them.
◊
If the input/output signal overloads, the corresponding LEVEL meter
will read “CLIP” (PEAK). In this case, reduce the input/output level.
Fig. 3.34: METER menu (page 2)
The SPL meter (Sound Pressure Level) can be found on page 2 of this menu.
In combination with a measuring microphone (e.g. BEHRINGER ECM8000),
this meter allows you to measure volume levels. SPL also features a peak
hold display, and with the B key you can reset and recalculate the peak
value (CLEAR PEAK).
◊
The correct setting of the microphone sensitivity must be ensured
(see chapter 3.11). We recommend our measurement microphone
BEHRINGER ECM8000, which features an input sensitivity of -37 dBV/Pa.
The A key (WEIGHT) adjusts various dB weighting routines for the calculation of
the signal level (dB (A), dB (C) or OFF).
Fig. 3.35: METER menu (page 3)
Page 3 of the METER menu provides a virtual VU meter, as known from analog
processors or mixing consoles.
3.11 RTA/MIC input
Use this input to feed a microphone or line signal (separate from the main input)
into RTA or SPL meter. Information on how this is done is found on page 1 of the
UTILITY menu.
3.11.1 Connecting a measurement microphone
Select MIC LEVEL as input sensitivity on RTA/MIC. If you are using a condenser
mic, you need to activate phantom power (MIC LEVEL +15 V). On RTA/MIC MIC
LEVEL, adjust the sensitivity of the mic you are connecting. If you are using the
BEHRINGER ECM8000, this value is -37 dBV/Pa.
3.11.2 Connecting a line signal
Select LINE LEVEL as input sensitivity on RTA/MIC INPUT. Adjust the desired input
sensitivity under RTA/MIC LINE LEVEL. The preset value is 0 dBFS or 120 dB SPL.
4. Applications
The universal concept of the BEHRINGER ULTRACURVE PRO with its multitude
of audio processing functions opens up a whole range of applications. A few
examples with typical settings will be described in the following.
4.1 Sum-signal equalizer for live applications
This application is the most probable use of the ULTRACURVE PRO.
XENYX 2222FX
Stereo output L + R
ULTRACURVE PRO DEQ2496
Inputs L + R
Outputs L + R
EP2000
Left
Right
B1520 PRO
B1520 PRO
Fig. 4.1: The ULTRACURVE PRO as sum-signal equalizer