Assembly – Briggs & Stratton 1695353 User Manual
Page 8
6
Assembly
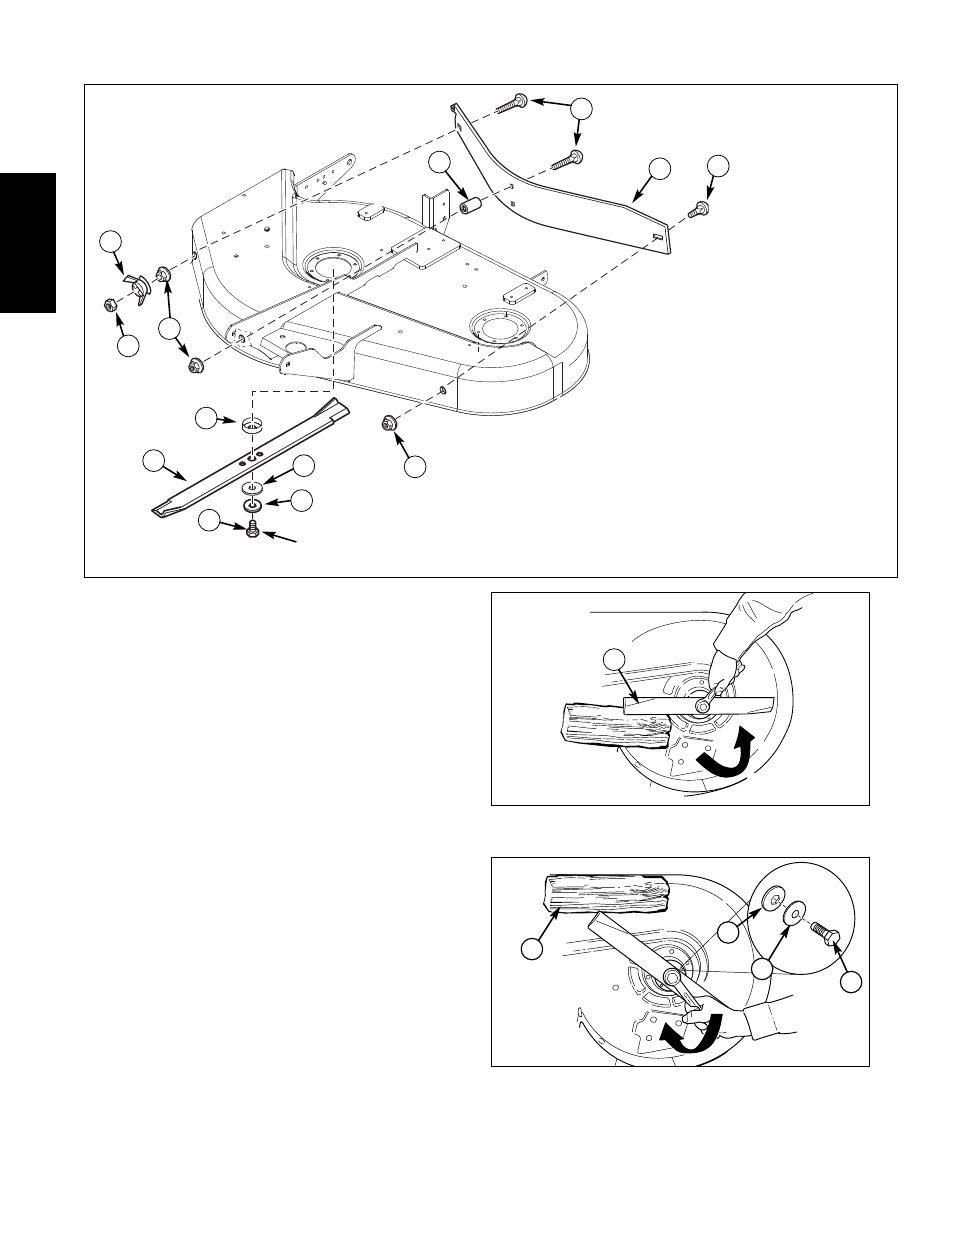
Install Baffle and Blade
Note: Units with an anti-blowout baffle do not require
the Clean Sweep baffle.
1. Remove mower deck. See OPERATOR’S
MANUAL.
2. Install notched side of baffle (A, Figure 3) to
discharge side of deck securing with 5/16-18 x 2
carriage bolt (C) and 5/16-18 locknut (D). Install
5/16-18 wing nut (F) and locknut (G) to carriage
bolt (C) as shown.
3. Secure center of baffle (A) to deck using 5/16-18 x
2 carriage bolt (C), spacer (B) and nut (D).
Secure LH end of baffle (A) to deck using 5/16-18
x 5/8 carriage bolt (E) and nut (D).
4. Remove right hand blade (A, Figure 5). Use a
block of wood to prevent blade rotation while
loosening the capscrew.
5. Reinstall the large washer (B, Figure 6), spring
washer (C) and capscrew (D). Use a wooden
block (A) to prevent blade rotation while tightening
the capscrew (D) to 45-55 ft. lbs. (61-75 Nm).
Figure 3. Baffle Assembly
A. Baffle (New)
B. Spacer (New)
C. Carriage Bolts,
5/16-18 x 2 (New)
D. Locknuts, WHIZ Lock,
5/16-18 (New)
E. Carriage Bolt,
5/16-18 x 5/8 (New)
F. Wing Nut Assembly,
Large, 5/16-18 (New)
G. Locknut, Center Lock,
5/16-18 (New)
H. Grass Shield (Existing)
I.
Blade, High Lift (New)
J. Hex Washer (Existing)
K. Washer (Existing)
L. Capscrew,
7/16-14 x 1-1/4 (Existing)
D
J
B
D
E
H
G
F
I
K
L
A
C
LOOSEN
Figure 4. Blade Removal
A. Blade
Figure 5. Blade Installation Mowers
A. 4x4 Wood Block
B. Hex Washer
C. Spring Washer
D. Blade Capscrew
A
B
C
D
Torque Capscrew to
45-55 ft. lbs. (61-75 Nm)
A