Britax FRONTIER 85 SICT User Manual
Page 26
48
49
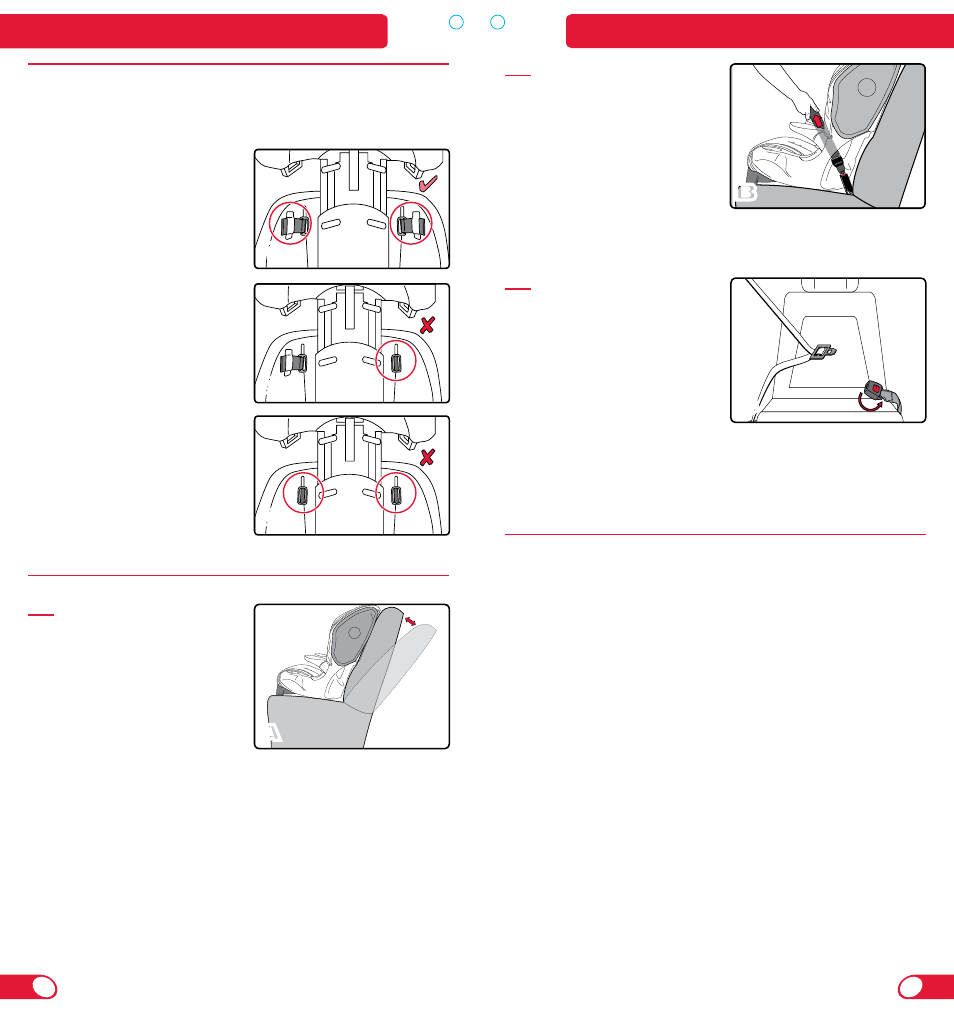
Energy-Absorbing Tether
The Versa-Tether can indicate when the child seat has been in a
moderate or severe crash and replacement of the child seat is
necessary.
Figure 1 shows the tether when
the child seat is acceptable for
continued use (provided the child
seat has not been involved in a
crash). The colored stitching will
be intact and the webbing will be
held under a tether label.
Figures 2 and 3 show examples
of when the child seat is
unacceptable for continued use.
If the tether label is torn, or if one
or both of the loops have pulled
through the back side of the shell
and/or any of the colored stitching
has ripped, the child seat is no
longer acceptable for use.
IMPORTANT: Discontinue use of
child seat if it has been involved
in a moderate or severe crash,
regardless of whether the loops
have pulled through the back
side of the shell and the colored
stitching has been ripped.
Tips
TIP:
If you’re having difficulty
1
2
3
attaining a tight installation in
harness mode using the short belt
route, try reclining the vehicle seat
back during installation. Once the
installation process is complete,
return the vehicle seat back to the
most upright position possible. See
Figure A.
NOTE: This tip will only be helpful if your vehicle seat back is able to
recline. See page 12 for important information on choosing a vehicle
seating position. The back seat is the safest place for children 12 and
under.
A
b
TIP:
When installing the child seat
using the short belt route (Figure B):
• Buckle the vehicle belt or
attach the LATCH connectors
to the vehicle anchors.
• Pull the vehicle buckle stalk
or LATCH connectors into the
belt slot to properly align it into
the belt path.
• Tighten
TIP:
When installing the child seat
with the vehicle seat belt and the
vehicle buckle stalk is too long:
• Consult your vehicle owner’s
manual to see if you can lower
the vehicle buckle position
by twisting the vehicle buckle
stalk a maximum of three
full rotations to shorten to
appropriate length. See Figure
C.
• Be sure the vehicle buckle release is facing outward after twisting.
Troubleshooting
Problem: The harness is hard to adjust.
Possible Solution: Check that the harness slots in the head
restraint and harness adjuster are properly aligned. Do not use the
head restraint adjuster when the harness is attached.
Possible Solution: The yoke may be caught on a strap or other
component of the child seat. Remove the obstruction and try
adjusting the harness again.
Problem: The adjuster strap is fraying at the sides:
Possible Solution: Pull the harness adjuster strap away from the
child seat (parallel to the ground) to tighten. Do not pull sideways.
Doing so may cause the harness adjuster strap to fray at the sides.
See page 39.
Problem: The buckle will not fasten with a click after each tongue
is inserted.
Possible solution: There may be debris in the buckle mechanism.
Clean the buckle as shown on page 46 and try fastening the
buckle again.
If you have misplaced your head restraint lock-out screw, you
can purchase a replacement #8 x ½” sheet metal screw at any
hardware store.
Please contact Consumer Services at 1.888.427.4829 if you have
an issue not listed here.
C
Tips and Troubleshooting
Tips and Troubleshooting